Wednesday, March 6, 2013

How to set up Face Unlock on your Android phone

,
Set up face unlock
Security is important these days. Our phones carry our lives, so using security features like Face Unlock can give us peace of mind.

As facial recognition software gets more and more sophisticated, it will also become more and more affordable – appearing on many of our electronic devices. While not foolproof – just yet – the Face Unlock feature built into your new Android phone does pretty well.
The argument against using facial recognition software is that it is too easy to “fool” the software into thinking you are the owner. Fortunately, Samsung also includes a “backup” recognition using standard PIN or Pattern input.

Setting up Face Lock on Android phones

Out of the box, your typical Ice Cream Sandwich Android phone does not have security enabled.
settings menu  choose screen lock
  1. Tap the Settings icon to get to the Settings app
  2. Scroll down to Personal and then tap on Security
  3. Tap on Screen Lock and choose:
a.     None – for no locking at all
b.     Slide- for the typical slide to unlock
c.      Face Unlock – to set the Face Unlock feature
d.     Pattern – to set a Pattern unlock
e.     PIN – to set a standard four digit PIN unlock
f.      Password – to set a more secure password to unlock
For our purposes, choose Face Unlock. Read the warning notice that a Face Unlock is less secure than a Pattern, PIN or Password. Now you are ready to have your Android phone capture your face to unlock the phone.

choose face unlock  face unlock warning
  1. Tap Continue
  2.  Move a little away from the front facing camera so your face fits in the Show Your Face screen.
  3. Center your face in the outlined area marked “put your face here.”
  4. You will receive a Face Captured screen if the Face Unlock setup was successful.
Once the Face Unlock is set to your face, you will be prompted to now set up a backup lock. In case the phone does not recognize you (this can happen for a bunch of reasons) it will revert to another method for secure unlocking of the phone.

show your face  face captured
  1. Choose one of the two backup methods listed; Pattern or PIN
  2. For a Pattern unlock, slide your finger to connect at least four dots in any pattern of your choosing.
  3. Repeat the pattern to confirm the choice.
  4. For a PIN unlock, simply input a four digit PIN – repeat to confirm.
choose pattern or pin   pattern

Using the Face Unlock feature on  your Android phone

Using Face Unlock is very simple, just turn on the device and look at the front facing camera. You will see an area in the middle of the screen to capture your face, try to put yourself in the same position as you did when you set up Face Unlock.

use face unlock  backup security

If you get an error message telling you that the phone did not recognize you, it will automatically default to the backup unlock method chosen.
Either input your PIN or complete the Pattern than you originally chose and the phone will unlock.

Setting the time before the phone locks

Depending on your phone, it might lock immediately after the screen goes off.  On my EVO 4G LTE, the default was to lock immediately and on my HTC One X, the default was to lock after 15 minutes. Locking immediately is sort of a pain since you then have to look at your phone every single time you turn it on. I found that setting the Lock phone after field to 5 minutes was a good amount of time.
  1. Go to the Settings menu
  2. Go to Security
  3. Tap on the Lock phone after tab
  4. Choose the desired time
lock phone after  lock options

All in all, Face Unlock works surprisingly well on the new  Android phones.   It is easy to set up, fun to use and it adds the necessary layer of security so that if someone were to “steal” your device, they would not have access to your personal information.
If you are very security conscious, remember that this is perhaps the “least” secure option of those listed as screen unlock choices – but it is certainly much more secure than no security at all.


Gary Mazo

How to manually install Adobe Flash Player on your Android device

,
New devices will soon be unable to get Adobe Flash from Google Play. Here's how to install it manually.

From today, for some new devices, Adobe Flash Player will no longer be available from Google Play, marking the end of Flash’s brief flirtation with Android. That means if you want to get hold of Flash on an Android device that doesn't ship with it, you’ll need to resort to a little bit of trickery. Fortunately, though, it’s pretty easy to get Flash up and running manually, assuming you understand the risks.
Join us after the break to find out how to manually install a legacy version of Adobe Flash Player on your Android phone or tablet.

Big scary warning

Before we begin, make sure you understand the risks associated with running the now-unsupported Adobe Flash on your device --
  • There’s no official support for Flash on Android now. That means no more security or stability updates, no official support channels if something goes wrong. In particular, if you’re using this on an Android 4.1 (Jelly Bean) device, you can probably expect a few stability issues
  • The fact that security updates are no longer being developed for Flash for Android means that running this could potentially open you up to security risks and malicious Flash content. There’s no record of Flash exploits specifically targeting Android users, but that doesn’t mean it couldn’t happen.
  • You’re installing an app from a third-party source, so you’ll need to disable one of Android’s built-in security options. Remember to re-enable it afterwards for your device’s security.
  • On newer hardware, particularly devices running Android 4.1, you may experience stability issues with Flash content. That’s just the way Flash rolls on mobile devices.

Prerequisites

You’ll need a phone or tablet running Android 2.2 (Froyo) to 4.1 (Jelly Bean). Check Settings > About phone / About tablet to see what you’re running. If you’re on Jelly Bean, check that you have a stock browser installed besides Google Chrome, as Chrome for Android doesn’t support Flash. Check your app drawer for “Browser” or “Internet.”

The method

Now, down to business. The process of getting Flash for Android on a device that doesn’t already have it is pretty simple.
  1. First, you’ll need to tell your device it’s OK to install apps from sources other than Google Play. You’ll need to check the box marked “Unknown sources.” On Android 2.2, 2.3 or 3.x, this is found under Settings > Applications. On Android 4.x, you’ll find it under Settings > Security.
  2. On your phone or tablet, download the Flash for Android application downloader. (It'll then download the file directly from Adobe.)
  3. Once that’s done, pull down the notification area and tap on the file to install it. Tap “Install” on the next screen to confirm.
  4. When Flash is installed, head into your phone’s stock browser (again, Google Chrome won’t support your newly-installed Flash apk).
  5. On Android 3.0 or later, go to Menu (three dots next to the address bar on some phones) > Settings > Advanced > Enable plug-ins. To enable Flash content all the time, select “Always on,” or to enable it selectively on each page, choose “On demand.” Or on Android 2.2 or 2.3, go to Menu > Settings (sometimes Menu > More > Settings), where you’ll find the “Enable plug-ins” option.
  6. You should now be ready to go. Check this link on your phone to confirm that Flash is up and running.
Android Central Android Central Android Central

Finally, once it’s working, you may want to uncheck the “Unknown sources” option once again to keep your phone or tablet secure.
So there you have it -- Flash support on your Android device. Flash on mobile devices has never been perfect, but on the right hardware Flash 11.1 for Android will give you a decent experience. Remember, though, that Flash has been withdrawn from the Google Play Store for a reason -- it’s no longer officially supported, so bear that in mind as you’re browsing through Flash content on your phone.

(androidcentral.com)


Alex Dobie

Saturday, March 2, 2013

Ten basic Android terminal commands you should know

,

command line

For a lot of us, the fact that we can plug our Android phone or tablet into our computer and interact with it is a big plus. Besides the times when we've broken something and need to fix it, there are plenty of reasons why an advanced Android user would want to talk to his or her device. To do that, you need to have a few tools and know a few commands. That's what we're going to talk about today. Granted, this won't be the end-all be-all discussion of adb commands, but there are 10 basic commands everyone should know if they plan to get down and dirty with the command line.
The tools are easy. If you're a Mac or Linux user, you'll want to install the SDK as explained at the Android developers site. It's not hard, and you don't have the whole driver mess that Windows users do. Follow the directions and get things set up while I talk to the Windows using folks for a minute.
If you're using Windows, things are easier and harder at the same time. The tools themselves are the easy part. Download this file. Open the zip file and you'll see a folder named android-tools. Drag that folder somewhere easy to get to. Next, visit the manufacturers page for your device and install the adb and fastboot drivers for Windows. You'll need this so that your computer can talk to your Android device. If you hit a snag, visit the forums and somebody is bound to be able to help you through it.
Now that we're all on the same page, enable USB debugging on your device (see your devices manual if you need help finding it, and remember it was hidden in Android 4.2), and plug it in to your computer. Now skip past the break and let's begin!

1. The adb devices command

location
The adb devices command is the most important one of the bunch, as it's what is used to make sure your computer and Android device are communicating. That's why we're covering it first.
If you're a pro at the operating system on your computer, you'll want to add the directory with the Android tools to your path. If you're not, no worries. Just start up your terminal or command console and point it at the folder with the tools in it. This will be the file you downloaded earlier if you use Windows, or the platform-tools folder in the fully installed Android SDK. Windows users have another easy shortcut here, and can simply Shift + right click on the folder itself to open a console in the right spot. Mac and Linux users need to navigate there once the terminal is open, or install an extension for your file manager to do the same right click magic that's in Windows by default.
Once you're sure that you are in the right folder, type "adb devices" (without the quotes) at the command prompt. If you get a serial number, you're good to go! If you don't, make sure you're in the right folder and that you have the device driver installed correctly if you're using Windows. And be sure you have USB debugging turned on!
Now that we have everything set up, let's look at a few more commands.

2. The adb push command

adb push
If you want to move a file onto your Android device programmatically, you want to use the adb push command. You'll need to know a few parameters, namely the full path of the file you're pushing, and the full path to where you want to put it. Let's practice by placing a short video (in my case it's a poorly done cover of the Rick James tune Superfreak) into the Movies folder on your device storage.
I copied the superfreak.mp4 file into the android-tools folder so I didn't need to type out a long path to my desktop. I suggest you do the same. I jumped back to the command line and typed "adb push superfreak.mp4 /sdcard/Movies/" and the file copied itself to my Nexus 4, right in the Movies folder. If I hadn't dropped the file into my tools folder, I would have had to specify the full path to it -- something like C:\Users\Jerry\Desktop\superfreak.mp4. Either way works, but it's always easier to just drop the file into your tools folder and save the typing.
You also have to specify the full path on your device where you want the file to go. Use any of the popular Android file explorer apps from Google Play to find this. Windows users need to remember that on Android, you use forward slashes (one of these -- / ) to switch folders because it's Linux.

3. The adb pull command

adb pull
If adb push sends files to your Android device, it stands to reason the adb pull command gets them out. That's exactly what it does, and it works the same way as the adb push command did. You need to know both the path of the file you want to pull off, as well as the path you want it placed into. You can leave the destination path blank and it will drop the file into your tools folder to make things easy.
In this example, I did it the hard way so you can see what it looks like. The path of the file on the device is "/sdcard/Movies/superfreak.mp4" and I put it on my Windows 8 desktop at "C:\Users\Jerry\Desktop". Again, the easy way it to just let it drop into your tools folder by not giving a destination, which would have been "adb pull /sdcard/Movies/superfreak.mp4". Remember your forwards slash for the Android side, and you'll have no problems here.

4. The adb reboot command

adb reboot
This is exactly what you think it is -- a way to reboot your device from the command line. Running it is simple, just type "adb reboot" and enter. Before you say "I can just push the button!" you have to understand that these commands can be scripted, and your device can reboot in the middle of a script if you need it to. And it's a good segue to number five.

5. The adb reboot-bootloader and adb reboot recovery commands

bootloader
Not only can you reboot your device, you can specify that it reboots to the bootloader. This is awfully handy, as sometimes those button combos are touchy, and if you have a lot of devices you can never remember them all. Some devices (the LG Optimus Black comes to mind) don't even a way to boot to the bootloader without this command. And once again, being able to use this command in a script is priceless. Doing it is easy, just type "adb reboot-bootloader" and hit the enter key.
Most devices can also boot to the recovery directly with the "adb reboot recovery" (note there is no hyphen in this one) and some can't. It won't hurt anything to try, and if yours can't nothing will happen.

6. The fastboot devices command

fastboot devices
When you're working in the bootloader, adb no longer works. You're not yet booted into Android, and the debugging tools aren't active to communicate with. We use the fastboot command in it's place.
Fastboot is probably the most powerful tool available, and many devices don't have it enabled. If you're does, you need to be sure things are communicating. That's where the fastboot devices command comes into play. At the prompt, just type in "fastboot devices" and you should see a serial number, just like the adb devices command we looked at earlier.
If things aren't working and you are using Windows, you likely have a driver issue. Hit those forums for the answer.

7. The fastboot oem unlock command

unlock
The holy grail of Android commands, fastboot oem unlock does one thing, and one thing only -- unlocks your Nexus device (or an HTC device using their official tool). If you're using a phone from a different manufacturer, you have a different method of unlocking things -- maybe with ODIN or .sbf files -- and this won't apply to you. We're including it because even if you don't need it, it's an important part of Android's openness. Google doesn't care what we do with phones or tablets that we've bought, and include this easy way to crack them open. That's something you usually don't see from any tech company, and a big part of the reason why many of us choose Android.
Using it is easy enough. Once you've used fastboot devices to make sure everything is communicating, just type "fastboot oem unlock" at the prompt and hit enter. Look at your device, read carefully, and choose wisely.
Protip: Using "fastboot oem unlock" will erase everything on your device

8. The adb shell command

adb shell
The adb shell command confuses a lot of folks. There are two ways to use it, one where you send a command to the device to run in its own command line shell, and one where you actually enter the device's command shell from your terminal. In the image above, I'm inside the device shell, listing the flies and folders on the device. Getting there is easy enough, just type "adb shell" and enter. Once inside, you can escalate yourself to root if you need to. I'll warn you, unless you're familiar with an ash or bash shell, you need to be careful here -- especially if you're root. Things can turn south quickly if you're not careful. If you're not familiar, ash and bash are command shells that a lot of folks use on their Linux or Mac computers. It's nothing like DOS. 
The other method of using the adb shell command is in conjunction with one of those Ash commands your Android device can run. You'll often use it for more advanced tasks like changing permissions of files or folders, or running a script. Using it is easy -- "adb shell <command>". An example would be changing permissions on a file like so: "adb shell chmod 666 /data/somefile". As mentioned, be very careful running direct commands using these methods.

9. The adb install command

adb install
While adb push can copy files to our Android devices, adb install can actually install .apk files. Using it is similar to use the push command, because we need to provide the path to the file we're installing. That means it's always easier to just drop the app you're installing into your tools folder. Once you've got that path, you tell your device to sideload it like this: "adb install TheAppName.apk".
If you're updating an app, you use the -r switch: "adb install -r TheAppName.apk". There is also a -s switch which tries to install on the SD card if your ROM supports it, and the -l switch will forward lock the app (install it to /data/app-private). there are also some very advanced encryption switches, but those are best left for another article.
And finally, you can uninstall apps by their package name with "adb uninstall TheAppName.apk". Uninstall has a switch, too. The -k switch will uninstall the app but leave all the app data and cache in place.

10. The adb logcat command

adb logcat
The adb logcat command is one of the most useful commands for some folks, but just prints a bunch of gibberish unless you understand what you're seeing. It returns the events written to the various logs in the running Android system, providing invaluable information for app developers and system debuggers. Most of us will only run this one when asked by one of those developers, but it's very important that we know how to use it correctly.
To see the log output on your computer screen, just type "adb logcat" and hit enter. Things can scroll by pretty fast, and chances are you won't find what you're looking for. There are two ways to handle this one -- filters, or text output.
The filter switch is used when a developer has placed a tag in his or her application, and wants to see what the event logs are saying about it. If it's needed, the developer will tell you what tag to append to the command. The text output is more useful, as it logs to a .txt file on your computer for reading later. Evoke is like so: "adb logcat > filename.txt". Let it run while you're doing whatever it takes to crash the app or system program you're debugging, then close it with the CTRL+C keystroke. You'll find the full log file saved in the directory you're working from, likely your tools folder. This is what you'll send to the developer.
Be warned that sensitive information can be contained in the log files. Be sure you trust the person you're sending them to, or open the log file in a text editor and see just what you're sending and edit as necessary.
There are plenty of other switches for the logcat command. Savvy developers can choose between the main, event, or radio logs, save and rotate log files on the device or their computer, and even change the verbosity of the log entries. These methods are a bit more advanced, and anyone interested should read the Android developer documentation.

Bonus: The adb sideload command

adb sideload
This one's relatively new, and it's one of the easier ways to update a stock Nexus device. Every over-the-air update downloads the update file from a public URL. That means you can download the update and install it manually without having to wait for your phone to have the update pushed to it. We call it "manually updating," and the end result is the same as if you wait. But we hate waiting.
All you have to do is download the update to your computer. Plug your phone into the computer. Reboot into recovery on your phone and choose "Apply update from ADB." Then hop into your favorite terminal/command line and type "adb sideload xxxxxxxx.zip," with the variable pointing to the update you downloaded. Let things run their course, and you're golden.

Jerry Hildenbrand (Cowboy)

Thursday, February 21, 2013

Backing Up Your Android Apps and Other Phone Info

,


app backups

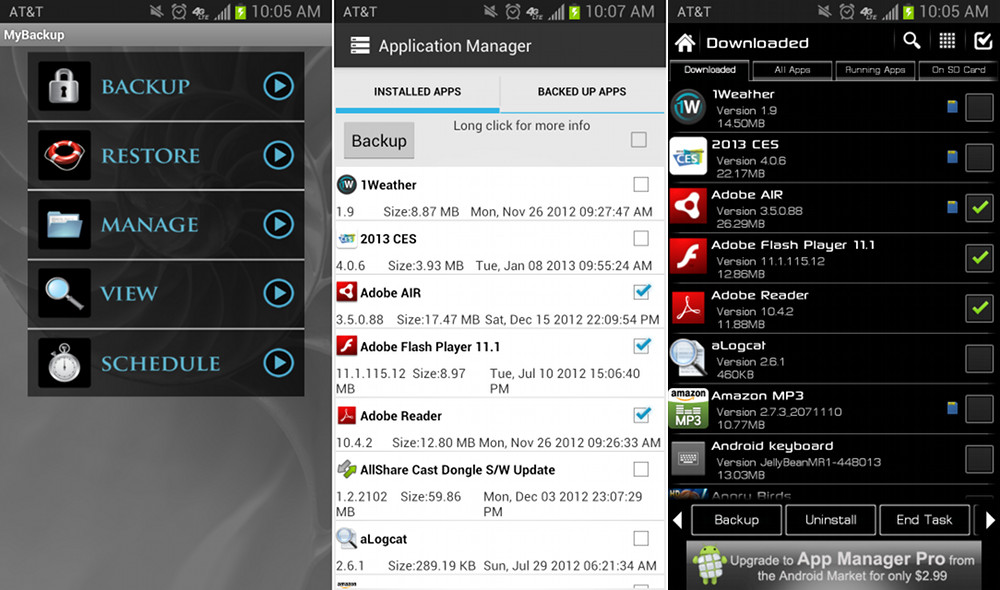
When you first buy a new smartphone or tablet, thinking about installing an app that backs up things like apps, photos, texts, and other information is recommended. Since many new users aren’t 100% familiar with the inner workings of a smartphone operating system and how it handles your phone’s data, 3rd party apps that automate processes like backing up are a great idea. In this mini-tutorial, we’ll tackle the benefits of backing up and some of the apps worth a look. 

App Backups

As a new user to Android, there may be times when you need to backup your apps, however, with the most recent versions of Android getting more advanced and a Google Play store that continues to evolve, it has become less and less important. For novice users, backing up can be good when you need to keep older versions of apps that are no longer available or because you think Google’s automated backup system from Google Play doesn’t work all that well. Thankfully, with apps being attached to your account for life, it’s not necessary to worry about always backing up apps unless you become an advanced user and root (gain system access) your phone. At that point, you can make full backups of apps that contain your user data and settings, something that can’t be done by normal non-root access.
Basically, what I’m saying is that for new users, app backups aren’t all that important. If you have to factory reset your phone or uninstall an app, you can simply load the Google Play store back up and re-install the app, if Google doesn’t do it automatically for you. The only problem here, is that you lose all of the data from the previously installed version. That’s when having root access can be beneficial, as you can backup user data and restore it. But you will rarely have to worry about not being able to install an app again.
I know this tutorial is about backing up apps, but again, it’s not something you really need to worry about unless you become a power user that is constantly factory resetting your phone.

Photos, Texts, and Other Info

On the flip side of backups, I would say that it is important to backup your photos, text messages, call logs, and other info. This information, if deleted during a factory reset or lost because you changed phones, might be missed. There are a number of apps that will store this info in the cloud so that it can be accessed from anywhere in the world, or on your phone’s microSD card for safe keeping.
Two of the most popular are apps called My Backup Pro and Ultimate Backup, both of which allow you to back up all of your personal data (photos, texts, etc.), store it on device or in the cloud (recommended), in a file that can be restored from any device. They are simple to use, can be automated to do it regularly, and only cost a couple of dollars. Free options like Dropbox are what I personally use for things like photos, however, they aren’t as automated and are more of a storage locker than anything. The best part, though, is the fact that Dropbox is easily accessed from PC browser to tablet to phone. There are also options for advanced users that are more of a file manager than anything, or if you decide to root your phone, you can have even more control.
Most of the apps I’ve laid out are super simple to use, and that’s on purpose. No one wants to have to worry about backups, so feel free to check out the couple of options we have included below and decide which you like the best. Most of them have free or trial options, giving you the time to find your favorite.

Cloud Backups

One thing that I definitely recommend, is using an option that can store your personal info in the cloud, so that if you lose your device, it’s stolen, or you change to something new, you can pull back your data with ease. Storing information on local drives has become a thing of the past, especially since many of us tend to carry around multiple devices that all need access to the same data.

Contacts

There is no need to backup your contacts with an app or 3rd party service (like Verizon’s Backup Assistant). Google automatically backs up, updates, and restores your contacts, calendar, and Gmail once you login to your phone with your Google account. Using 3rd party apps only makes the situation a mess, often times creating doubles of contacts.
(Kellex)

Tuesday, February 19, 2013

Transfer applications between 2 Android devices over a Bluetooth connection

,
Astro and Transer Bluetooth App  will help you do that, from the need to access the online application store.
Basically, users of Android devices can download and install apps from the app store online Google Play.However, many people still prefer to get right to the application has been installed on an Android device of friends, both fast and comfortable. To do this, you need to install the application before 2 Astro and Transer Bluetooth App to Android devices need to share, then follow the steps below.


1. Packaged into APK file applications with “Astro”
Astro is the best file manager application for Android devices. We will take advantage of feature-packed applications installed on your Android device’s memory card into the APK file to share for another Android device via Bluetooth connection. Thus, this APK files can easily install apps on your friends.
First, Astro launch the application on your Android device. From the main interface, you select Application Backup if you are using version install 3.1.427std. If you use an older version, you’ll have to click the Settingsbutton to open the Tools dialog before they can select Applications Backup as shown below.


After selecting the Application Backup, please wait a moment to Astro listed the full list of applications installed on your Android device. Next, you check to select the application to be sent to the Android device of your friends and click the Backup button to begin the process of packing the APK file. You can also select multiple applications to be packaged in this step.


At this point you have completed the process of packaging the application on your Android device by Astro and know. You can check by opening the Backup folder> Apps from Astro app’s main interface to view the applications that are packaged complete.
2. Packaged applications via Bluetooth transmission with “Bluetooth File Transfer”
Launch the Bluetooth File Transfer application. In the application, find and select the application to send to friends in the above path as the test procedure. When you do, you press the button with the Bluetooth icon, finding the right Android device name to send. The recipient can install the application as soon as the data transfer is complete.


This method is ideal when you need to share an application already installed on your Android device with another Android device, from concern with network connection or not.

Top 20 Things Every First-Time Android User Should Know

,
Choosing a new device like a new phone or tablet should be fun. But there are so many choices out there, and it can be hard to know where to start. If you’re thinking about anAndroid device, or if you’ve just bought one and want to get the most out of it, we have some basic tips to get you started.


1. What is Android?
Android is an operating system, like Windows for computers or iOS for iPhones and iPads
2. Who makes Android?
Google makes Android, and a lot of manufacturers such as Samsung, HTC and Motorola put it on their phones, tablets and now even cameras.
3. Why does everyone keep talking about desserts?
As well as regular version numbers, every time Google makes a significant update to Android, it names the update after a dessert. The desserts run alphabetically, so you can keep track of different Android versions. In the past few years, devices have upgraded from Eclair, to Froyo, to Gingerbread, to Honeycomb, to Ice Cream Sandwich. The latest devices to be released are currently running Jelly Bean.
4. Does Android have apps?
Yes. Android has a huge app market called Google Play, where you can download books, music and movies as well as apps, all from one place. Amazon also has its own app store for Android phones, giving you even more choice.
5. Can I use Twitter and Facebook on Android phones?
Yes. Pretty much every phone released nowadays is a smartphone with Internet capabilities. Whether you choose a BlackBerry, an iPhone, a Windows phone or a phone running Android, you’ll be able to use Facebook and Twitter.
6. How do I download apps to my Android device?
You can install new apps on your Android device in two ways. First, you can use the Google Play app that you’ll find on your device when you power it up the first time. No need to be connected to a computer; Android devices can install apps all by themselves. Second, you can use the Google Play website on your computer. If you log in with the Google Account you used on your Android device, Google Play will give you the option to install straight to your device. This can be handy when you want a big screen to browse through lots of apps.
7. Wait, I don’t have to tether my phone to my computer to install new apps?
Nope! You can do it via cellular data or Wi-Fi directly to your phone or tablet. No cables.
8. Okay, I understand apps now, but what if I want to put some pictures or a movie on my phone?
There are a couple of super-simple ways to move your personal files on and off an Android device. First, you can use a Dropbox account plus the Dropbox app. Upload everything to Dropbox via your computer, log into Dropbox on your phone or tablet, and they’ll all be there waiting for you. Even easier, connect your phone to your computer and treat it like a fancy USB stick — just drag and drop the files, and Android will know how to organize them.
9. I have lots of music in iTunes. Can I listen to it on my Android phone?
Yes. There’s a piece of software called doubleTwist that works just like iTunes, letting you install your iTunes music collection on your Android phone or tablet. If you store your music collection outside of iTunes, then the drag-and-drop method of file transfer should work just fine.
10. There’s a game called Angry Birds that I keep hearing about. Can I play it on Android?
Yes. It’s one of the top free games on Android. Download Angry Birds from Google Play.
11. My friend has an Android phone from Samsung, and my Android phone is from HTC. Why does Android look a bit different on our phones?
Google makes the Android software and then lets hardware manufacturers such as HTC and Samsung install it on their phones and tablets. Device manufacturers usually add their own design tweaks to the standard Android operating system. These design tweaks are known as skins, and manufacturers use them to help Android devices stand out from the competition.
12. What if I just want pure Android without a skin?
If you want the pure Android experience straight from Google, then you should choose a device with “Nexus” in the title, such as the Nexus 7 tablet or the Galaxy Nexus phone. These devices always get updated to the latest version of Android first, too, because they don’t use any extra tweaks from the hardware manufacturers that might hold up the upgrade process.
13. What’s the difference between home screens and the app drawer?
The app drawer is where you can find all of the apps installed on your device. On Apple devices, all of your apps are live on your home screens. But Android devices have (up to) seven home screens that you can fill with your favorite apps and widgets for quick access — any apps you don’t choose to keep on your home screen will still be in your app drawer.
14. Widgets? What are widgets?
Widgets are one of our favorite features of Android. Super useful at both displaying information and saving power, they are a little like snapshots of apps that live on your home screens. Widgets come in all different sizes. They can display simple things like how much data you’ve used this month or show more complex things like your Facebook news feed. Because they’re designed for basic interactions like posting updates to Facebook or Twitter, widgets can help you save battery power because you don’t need to open up the full app every time you want to make a simple update or reply to comments.
15. Do I need a Google account to use Android?
Yes. Just like you need an Apple ID to use an iDevice, you need a Google account to use Android. You don’t have to use any of the specific Google services like Gmail on a daily basis if you don’t want to, and Google lets you add other email accounts to your Android phone or tablet. But if you really don’t want a Google account, Android might not be right for you. Google’s software and cloud services are really slickly integrated into the Android experience, and you’ll miss out on some of the best features of Android if you don’t want to use them.
16. What’s the easiest way to move all my contacts onto my phone?
You can enter them as contacts into Gmail, and they’ll be automatically synced to your phone, or you can transfer saved numbers off your SIM card.
17. How do I save battery power on my Android device?
We’ve got some battery-saving tips right here for you.
18. Are there any good Android productivity apps?
Yes, loads! Here are some of our favorite Android productivity apps.
19. Which Android games do you recommend?
We’ve got a list of cool (and free) Android games.
20. How do I keep my Android phone secure?
Android has plenty of security features. We make understanding Android security featuressimple.

Have you got any pointers for first-time Android users? Let us know in the comments!

Image courtesy of FlickrJohan Larsson
This article originally published at Tecca here

Saturday, December 29, 2012

Use Nova Launcher to Access Google Now

,


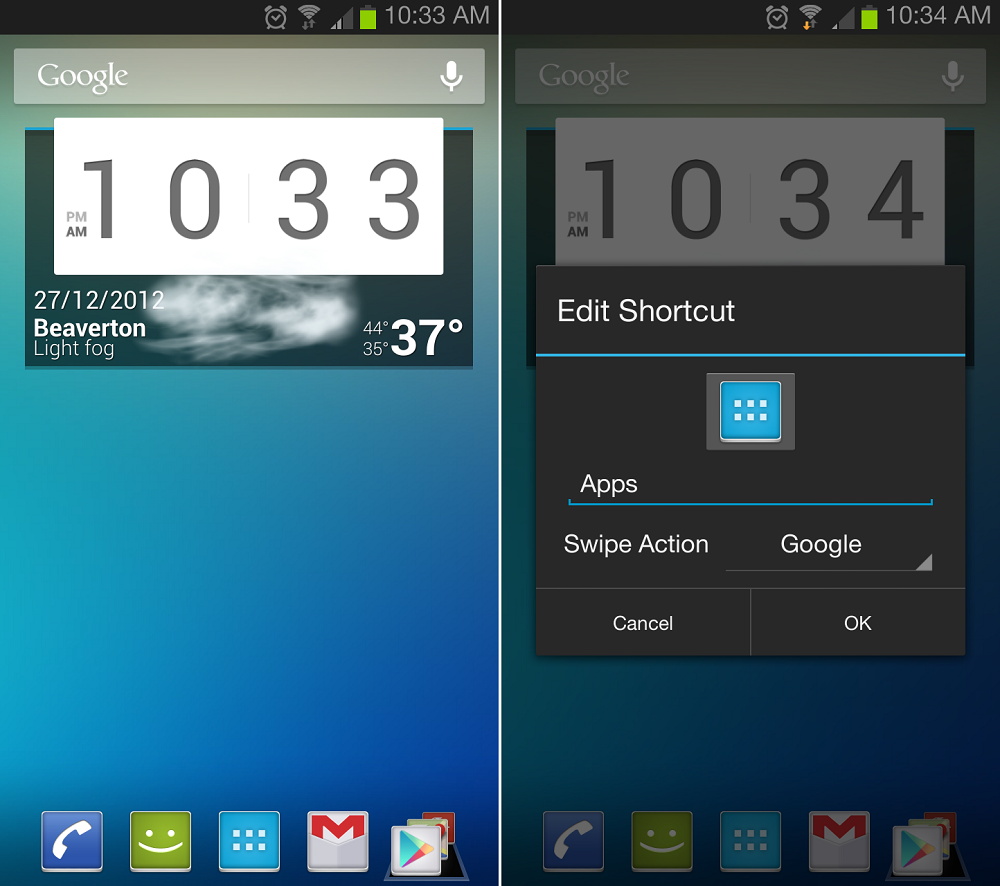
Nova 1

For owners of a device with hardware keys instead of onscreen buttons (Galaxy S3, Note 2, DNA, etc.), accessing Google Now with a simple swipe up from the “Home” button just isn’t possible. Some people either have to long press their Home button or access it from the up-top Search widget. This quick tip will help anyone using Nova Launcher or other third party launchers to assign a simple swipe gesture to their app drawer button for easy access to Google Now.

Nova 22

This can be performed by other custom launchers such as Apex, Go, and others. For this example, we are using Nova.

Instructions:

1.  From your homescreen, long press on the “App Drawer” button.
2.  Select the option for “Edit.”
3.  Next to Swipe Action, select the “None” text.
4.  A separate page will pop up. On the top, hit “Apps.”
5.  Scroll down until you find “Google.”
6.  Select it.
7.  Under the Edit Shortcut menu, hit “OK.”
8.  Test it. Swipe up on the App Drawer button and you will be taken to Google Now.
And that’s it! No more fuss.

by: Tim-o-tato 

Thursday, November 8, 2012

Open source Android thermostat

,
filed under: android hacks, home hacks


Put that old Android phone to good use by mounting it on the wall as a smart thermostat. This open source hardware and software project lets you replace your home’s thermostat with an Android device which adds Internet connectivity and all that comes with the increase in computing power.
The brunt of the hardware work is taken care of by using an IOIO board which makes it easy to interface any Android device with the simple hardware which switches your HVAC equipment. We’ve been waiting for the launch of the new IOIO design and if it comes in at a lower price as has been rumored that makes this project in the price range of the least expensive of programmable thermostats (assuming you already have an Android device to devote to it). Simply etch your own board to host the relays and voltage rectifier and you’re in business.
There is a client and server app, both free in the Play Store. The server runs on the wall-mounted device with the client offering control via a network connection. The features of the system are shown off quite well in the video after the break.


Sunday, October 21, 2012

Tip: Add Guru On Your Gtalk List and Receive Google Now Like Answers Via Chat

,

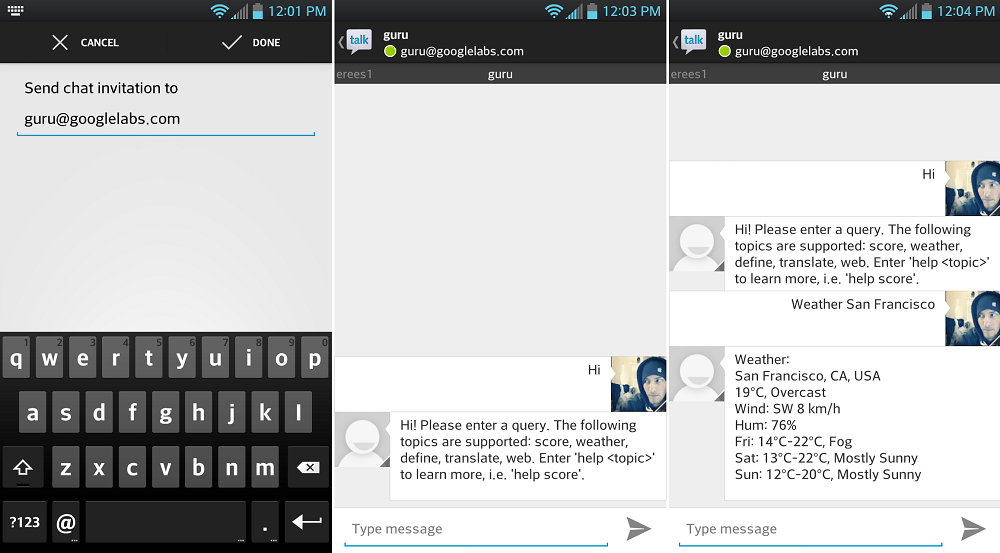
A few days ago, an XDA member stumbled upon a neat trick. If you love Google Now or don’t have Jelly Bean and can’t access it yet, then this is for you. Using Gtalk, simpy add user, “guru@googlelabs.com” – then, ask away! Guru can give you answers to basic questions just like Google Now. So far, it handles sports, weather, word definitions, translations, web queries, and calculations.
Go into the future, much like Google Now, maybe we can expect greater and more advanced things to come from Guru. For now, it’s a neat little trick that some of you should enjoy.

 by: Tim-o-tato

Sunday, October 14, 2012

Send and Receive JSON between Android and PHP Web Service

,

Introduction

You are creating an Android app and want to read data from a MySQL database and send data. We will create a Web Service in PHP, read from the MySQL database, and let the Android connect with the Web Service and send data, and the Web Service will save it and another Web Service will read data from MySQL and send it to the Android app.

Using the Code

First, we have to create the Web service to read data from the MySQL database.

<?php  
<pre>/* require the user as the parameter */
<pre>//http://localhost:8080/sample1/webservice1.php?user=1
if(isset($_GET['user']) && intval($_GET['user'])) {
  /* soak in the passed variable or set our own */
  $number_of_posts = isset($_GET['num']) ? intval($_GET['num']) : 10; //10 is the default
  $format = strtolower($_GET['format']) == 'json' ? 'json' : 'xml'; //xml is the default
  $user_id = intval($_GET['user']); //no default
  /* connect to the db */
  $link = mysql_connect('localhost','root','123456') or die('Cannot connect to the DB');
  mysql_select_db('TEST',$link) or die('Cannot select the DB');
  /* grab the posts from the db */
  //$query = "SELECT post_title, guid FROM wp_posts WHERE post_author = 
  //  $user_id AND post_status = 'publish' ORDER BY ID DESC LIMIT $number_of_posts";
  $query = "SELECT * FROM `test`.`users`;";
  $result = mysql_query($query,$link) or die('Errant query:  '.$query);
  /* create one master array of the records */
  $posts = array();
  if(mysql_num_rows($result)) {
    while($post = mysql_fetch_assoc($result)) {
      $posts[] = array('post'=>$post);
    }
  }
  /* output in necessary format */
  if($format == 'json') {
    header('Content-type: application/json');
    echo json_encode(array('posts'=>$posts));
  }
  else {
    header('Content-type: text/xml');
    echo '';
    foreach($posts as $index => $post) {
      if(is_array($post)) {
        foreach($post as $key => $value) {
          echo '<',$key,'>';
          if(is_array($value)) {
            foreach($value as $tag => $val) {
              echo '<',$tag,'>',htmlentities($val),'</',$tag,'>';
            }
          }
          echo '</',$key,'>';
        }
      }
    }
    echo '';
  }
  /* disconnect from the db */
  @mysql_close($link);
}
?>
Here is the code for the Android activity to read from the Web Service and parse the JSON object:

public void clickbutton(View v) {
    try {
        // http://androidarabia.net/quran4android/phpserver/connecttoserver.php

        // Log.i(getClass().getSimpleName(), "send  task - start");
        HttpParams httpParams = new BasicHttpParams();
        HttpConnectionParams.setConnectionTimeout(httpParams,
                TIMEOUT_MILLISEC);
        HttpConnectionParams.setSoTimeout(httpParams, TIMEOUT_MILLISEC);
        //
        HttpParams p = new BasicHttpParams();
        // p.setParameter("name", pvo.getName());
        p.setParameter("user", "1");

        // Instantiate an HttpClient
        HttpClient httpclient = new DefaultHttpClient(p);
        String url = "http://10.0.2.2:8080/sample1/" + 
                     "webservice1.php?user=1&format=json";
        HttpPost httppost = new HttpPost(url);

        // Instantiate a GET HTTP method
        try {
            Log.i(getClass().getSimpleName(), "send  task - start");
            //
            List<NameValuePair> nameValuePairs = new ArrayList<NameValuePair>(
                    2);
            nameValuePairs.add(new BasicNameValuePair("user", "1"));
            httppost.setEntity(new UrlEncodedFormEntity(nameValuePairs));
            ResponseHandler<String> responseHandler = new BasicResponseHandler();
            String responseBody = httpclient.execute(httppost,
                    responseHandler);
            // Parse
            JSONObject json = new JSONObject(responseBody);
            JSONArray jArray = json.getJSONArray("posts");
            ArrayList<HashMap<String, String>> mylist = 
                   new ArrayList<HashMap<String, String>>();

            for (int i = 0; i < jArray.length(); i++) {
                HashMap<String, String> map = new HashMap<String, String>();
                JSONObject e = jArray.getJSONObject(i);
                String s = e.getString("post");
                JSONObject jObject = new JSONObject(s);

                map.put("idusers", jObject.getString("idusers"));
                map.put("UserName", jObject.getString("UserName"));
                map.put("FullName", jObject.getString("FullName"));

                mylist.add(map);
            }
            Toast.makeText(this, responseBody, Toast.LENGTH_LONG).show();

        } catch (ClientProtocolException e) {
            // TODO Auto-generated catch block
            e.printStackTrace();
        } catch (IOException e) {
            // TODO Auto-generated catch block
            e.printStackTrace();
        }
        // Log.i(getClass().getSimpleName(), "send  task - end");

    } catch (Throwable t) {
        Toast.makeText(this, "Request failed: " + t.toString(),
                Toast.LENGTH_LONG).show();
    }
}
Here is the PHP code to send data to the Web Service and save it:

<?php  
//$json=$_GET ['json'];
$json = file_get_contents('php://input');
$obj = json_decode($json);
//echo $json;

//Save
$con = mysql_connect('localhost','root','123456') 
       or die('Cannot connect to the DB');
mysql_select_db('TEST',$con);
  /* grab the posts from the db */
  //$query = "SELECT post_title, guid FROM wp_posts WHERE 
  //  post_author = $user_id AND post_status = 'publish'
  // ORDER BY ID DESC LIMIT $number_of_posts";
mysql_query("INSERT INTO `test`.`users` (UserName, FullName)
VALUES ('".$obj->{'UserName'}."', '".$obj->{'FullName'}."')");
mysql_close($con);
//
  //$posts = array($json);
  $posts = array(1);
    header('Content-type: application/json');
    echo json_encode(array('posts'=>$posts)); 
  ?>
Android activity to send data to the Web Service as a JSON object to save in the MySQL database:

public void clickbuttonRecieve(View v) {
    try {
        JSONObject json = new JSONObject();
        json.put("UserName", "test2");
        json.put("FullName", "1234567");
        HttpParams httpParams = new BasicHttpParams();
        HttpConnectionParams.setConnectionTimeout(httpParams,
                TIMEOUT_MILLISEC);
        HttpConnectionParams.setSoTimeout(httpParams, TIMEOUT_MILLISEC);
        HttpClient client = new DefaultHttpClient(httpParams);
        //
        //String url = "http://10.0.2.2:8080/sample1/webservice2.php?" + 
        //             "json={\"UserName\":1,\"FullName\":2}";
        String url = "http://10.0.2.2:8080/sample1/webservice2.php";

        HttpPost request = new HttpPost(url);
        request.setEntity(new ByteArrayEntity(json.toString().getBytes(
                "UTF8")));
        request.setHeader("json", json.toString());
        HttpResponse response = client.execute(request);
        HttpEntity entity = response.getEntity();
        // If the response does not enclose an entity, there is no need
        if (entity != null) {
            InputStream instream = entity.getContent();

            String result = RestClient.convertStreamToString(instream);
            Log.i("Read from server", result);
            Toast.makeText(this,  result,
                    Toast.LENGTH_LONG).show();
        }
    } catch (Throwable t) {
        Toast.makeText(this, "Request failed: " + t.toString(),
                Toast.LENGTH_LONG).show();
    }
}

Points of Interest

To connect to your emulator, you can use this link: http://10.0.2.2:8080/.
To read the JSON object in the Web Service, you can use this line of code:

$json = file_get_contents('php://input');
$obj = json_decode($json);

(Hamdy Ghanem)
 

Android Development Tutorials Copyright © 2011 -- Template created by O Pregador -- Powered by Blogger Templates