Samsung didn’t see the kind of sales it hoped for with last year’s Galaxy S5,
so this year the Galaxy S6 is a radical departure. A number of
prominent features from last year’s device have been removed, and others
are disabled by default to make for a cleaner experience. You don’t
have to bend over backwards to get Samsung out of your face.
But there’s still plenty you can do to make the Galaxy S6 even better. Just go through these tips and you’ll be ready to rock.
Set up fingerprints
The new fingerprint scanner works a lot better than the one on Samsung’s earlier phones.
The fingerprint sensor is built into the home button, just like last
year, but it has been vastly improved. Now you can just lightly press it
to have your print recognized—no more swiping. The setup process takes a
little longer, but it will still only take a few minutes. To add
fingerprints, go to your main system settings and enter Lock screen and security > Fingerprints.
You can add up to four prints here by tapping repeatedly on the sensor.
You probably want to use your thumbs and index fingers on each hand.
Remember to tilt your finger back and forth and place different parts of
it on the sensor. This will help the system to recognize you more
easily and reliably. Also make sure to get the very tip of each finger.
While you’re at it, you can configure the security settings to use your
fingerprint for accessing your Samsung account and filling passwords in
the stock web browser.
Activate Smart Lock
Even if fingerprints aren’t your thing, you should have some sort of
secure lock screen. There’s no reason to deal with it all the time,
right? The Galaxy S6 supports Lollipop’s Smart Lock feature, which you
can access in the Lock screen and security menu. It’s a level deeper in Secure lock settings.
Here you can set geographic locations as trusted, so your phone will
default to a standard swipe unlock at home, for example. The GS6 also
supports trusted devices, so you can keep it unlocked when it’s
connected to a chosen Bluetooth accessory or NFC tag.
Change your home screen grid and layout
You can change the arrangement of the home screen grid, to show more or fewer icons.
Samsung has added the ability to pick the size of the home screen grid
for its stock TouchWiz launcher. You can use this to cram more icons
onto each panel, but you won’t get as many options as you would with a
third-party home screen app. Simply long press on the home screen and
tap Screen grid. The default is 4x4—it can be changed to 4x5 or 5x5.
While you’re at it, a long press on the home screen is also how you can
add, remove, and rearrange home screen panels. You can set any panel to
be the main panel by tapping the home icon at the top of each page.
Remove the briefing screen
Samsung’s Flipboard-powered news feed page is back this year, though
it’s now called “Briefing” instead of “My Magazine.” You can use it if
you want, but it’s still a strangely laggy interface. The method to
disable it has also changed on the Galaxy S6. Long press on the home
screen, then scroll over to the Briefing panel on the far left. There’s a
checkbox at the top, so go ahead and uncheck it, and you’re done. You
can tap the checkbox again any time you want to be reminded why you shut
it off in the first place.
Disable built-in apps and services
There’s still too much bloatware on the Galaxy S6, but you can disable nearly all of it.
Samsung has reduced the number of built-in apps and services this year, but this is
still Samsung we’re talking about. There’s a fair amount of cruft to
clear out. Most of the pre-installed apps can be disabled so they don’t
show up in the app drawer or run in the background. A few can be
uninstalled completely as well.
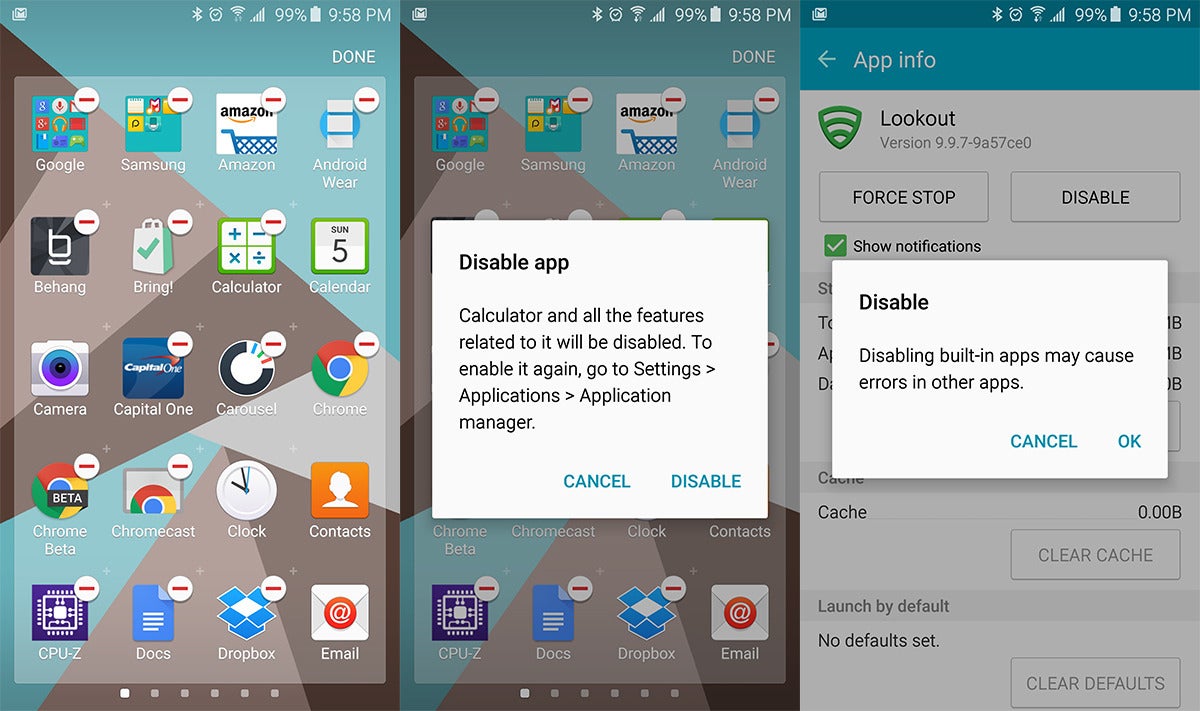
There are two ways to go about this. You can open the app drawer and hit
the edit button, then tap the minus sign on the apps you want to
remove. They will be uninstalled if possible, otherwise the system will
simply disable them.
The other method is to go into the main settings and open Applications > Application manager
and find the apps you want to disable or remove in the list. The info
page when you tap on them will have the applicable options.
Some things you might want to get rid of include: Lookout, the Microsoft
suite of apps, and S Voice. Since S Voice is no longer bound to the
home button, this is all you need to do in order to do away with that
particular feature. And you should. It’s still not very good.
Set up ‘OK Google’ voice detection
If you got rid of S Voice in the above step, you might want to get
Google’s (much better) voice command system set up. On the Galaxy S6,
you can call up a voice query from any screen by saying “OK Google.” It
just takes a few minutes of your time to configure.
Head over to the Google app by long-pressing the home button or
launching it from the app drawer. Open the settings from the slide-out
navigation drawer on the left and open up Voice> Ok Google detection. Toggle on the From any screen option and go through the setup process. The phone will ask you to say “Ok Google” a few times so it can learn your voice.
Optionally, you can activate “personal results,” which makes voice
search features available from the lock screen too. It’s a little less
secure as someone could place calls or access your address, but it can
be useful for quick access to voice commands. Be sure to check out our
full list of Google Now voice commands.
Customize notification toggles
Change the quick toggles to the features you use most often.
One of the most thoughtful aspects of TouchWiz is the configurable group
of toggles at the top of the notification shade. This is an
increasingly common feature in Android, but Samsung has actually been
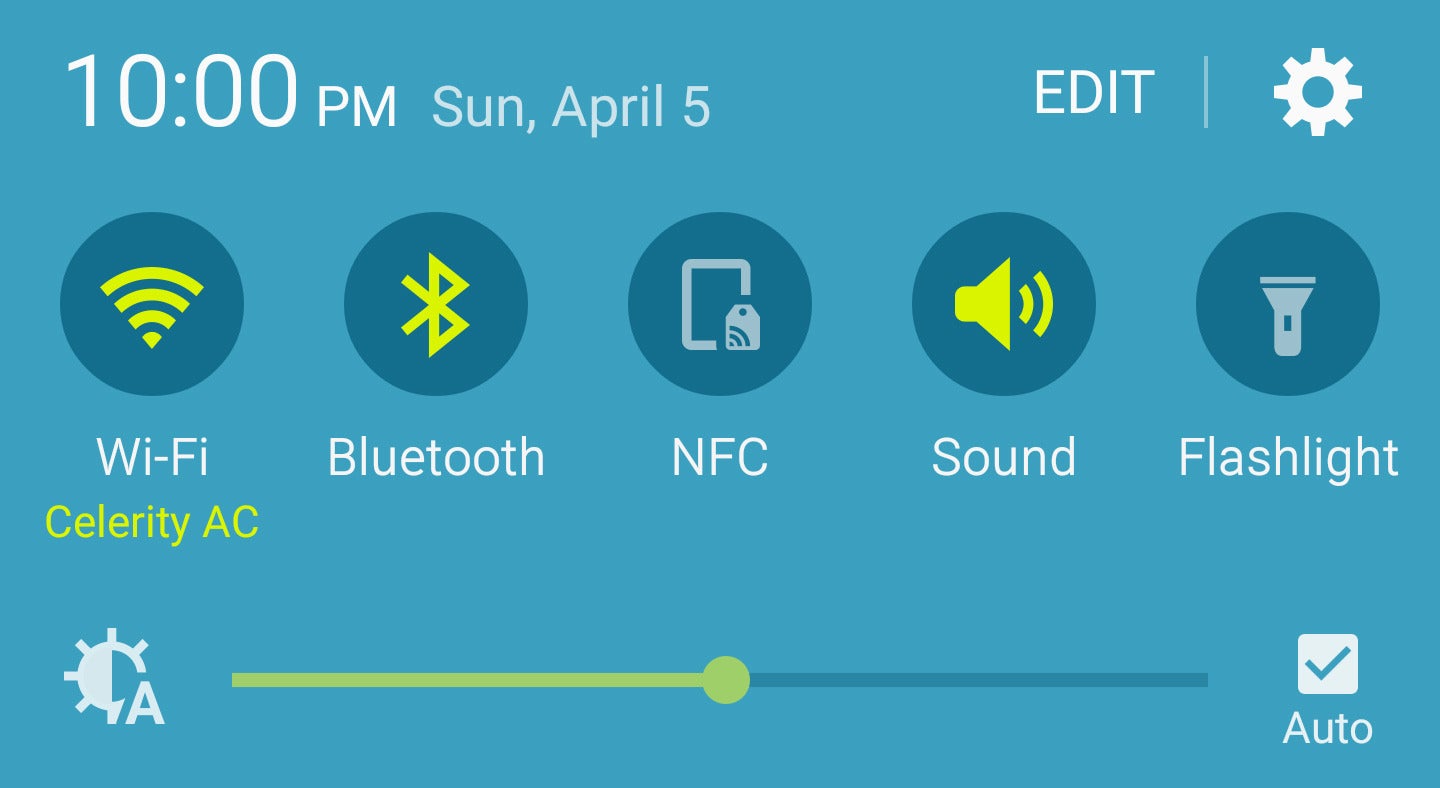
doing it for years. To change the order of the toggles, tap the Edit button at the top of the screen.
From this menu, you can drag the buttons around as you like. The first
group of five icons at the top of the screen will be seen when you open
the notifications and the second group is accessible by scrolling.
Samsung has removed the expanded toggle list, so the remaining buttons
are only available in the editing interface.
Customize quick settings
You might notice using the Galaxy S6 involves poking around in the
settings a lot. Well, you can make some of those menus easier to get to
by configuring the Quick Settings. Note, this is different from Quick
Settings on stock Android—which refers to the toggles accessible from
the notification shade. On the Galaxy S6, “Quick Settings” refers to the
buttons at the top of your main Settings menu that take you to your
most frequently used settings pages.
Open Settings and you’ll see a few buttons pre-populated at the
top. Tap the Edit button in the upper right to change what’s shown. You
can access things like WiFi, data usage, app notifications,
fingerprints, and more.
Simply tap Edit at the top of the existing Quick Settings and
put tap the checkbox next to those which you want to eappear. Quick
Settings supports a maximum of nine links of your choice.
Enable download booster
Download booster is a great feature. Here’s hoping your carrier didn’t disable it.
Download Booster was one of the coolest features from the Galaxy S5, and
it’s back with the Galaxy S6. However, it’s off by default and buried
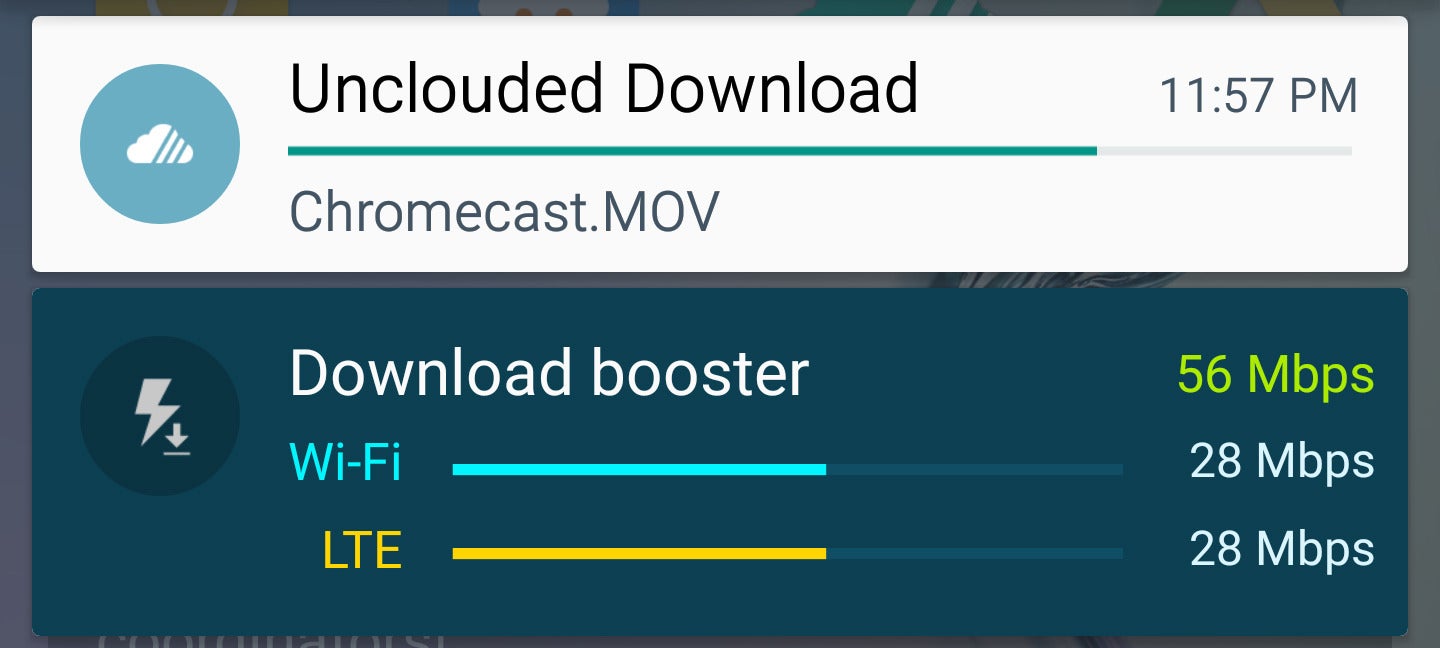
in the settings. When enabled, Download Booster combines the Wi-Fi and
LTE connection to download large files faster than either connection
could on its own.
To access Download Booster, open the main system settings and go to More connection settings > Download Booster.
Turn it on and get ready for faster downloads. If this setting isn’t
present, guess what? Your carrier made Samsung remove it. In fairness,
Download Booster can gobble up a lot of data if you’re not paying
attention.
Configure power saving modes
Samsung’s Ultra Power Saving Mode can stretch a tiny bit of battery life
into more than a day of use. The phone won’t be as much fun to use, but
you’ll be able to take calls, send messages, and use a select few apps.
Ultra Power Saving Mode switches the device to a simplified black and
white interface and disables most background services. Before you find
yourself turning it on with a nearly-dead battery, you should fire it up
while your battery is full and get things organized.
There’s a notification toggle to activate Ultra Power Saving Mode when
your battery gets really low, but it can also be accessed from the
battery settings menu. In Ultra Power Saving Mode you can select a few
apps to have as shortcuts on the home screen. There aren’t many, but you
can choose from the stock browser, Google+, messaging, and a few
others.
There’s also a regular power saving mode that’s a little less extreme.
This setting reduces the screen brightness, down-clocks the processor,
reduces the display’s refresh rate, and shuts off vibration. This mode
can be configured to switch on automatically when you reach a certain
battery level between 50% and 5%. It’s a good idea to set this up.
You’ll find it in Settings > Battery > Power saving mode.
Use the new multi-window mode
Run two aps at once, side by side, in multi-window mode.
Samsung has changed the way Multi Window works on the GS6. It’s now tied
into the app switcher UI instead of being something you need to
explicitly start up. Apps that support Multi Window will have a small
twin rectangle icon in the corner when you have the app switcher open.
You can tap on this button to move that app to the top half of the
screen. On the bottom half you will get a similar stack of recent apps
that also support Multi Window, as well as a scrollable list of all
Multi Window apps.
You can also long-press on the multitasking button to move the current
app to the top half of the screen (provided it’s a Multi Window
compatible app), then pick another app for the bottom half. Once you’ve
got both apps up, you can go back and forth between them and adjust the
position of the divider, giving one app or the other more room. When
you’re done, just hit back or home to leave Multi Window mode.
Enable screen pinning
Screen pinning is a feature introduced in Android 5.0 that makes it easy
to hand your phone to someone else without worrying about them getting
too nosey. It a few taps you can lock the screen to a single app to keep
your stuff private, but you need to enable it first. Screen pinning is
found in Settings > Lock screen and security > Other security settings. You’re looking for “pin windows,” which is way down at the bottom.
You can pin any app by opening the app switcher, then tapping the little
pushpin icon in the lower right. When there is a secure lock screen on
your device, you can also choose to require the PIN, pattern, or
fingerprint when leaving the pinned application. This ensures only you
will be able to unlock the phone and access other apps.
Pop-up view
Pop-up View makes more sense on a big-screen phone like the Note 4, but it’s nice that Samsung included it anyway.
So now you’ve mastered Multi Window mode, but there’s something else of
note tangentially connected to that. Samsung included a cool feature
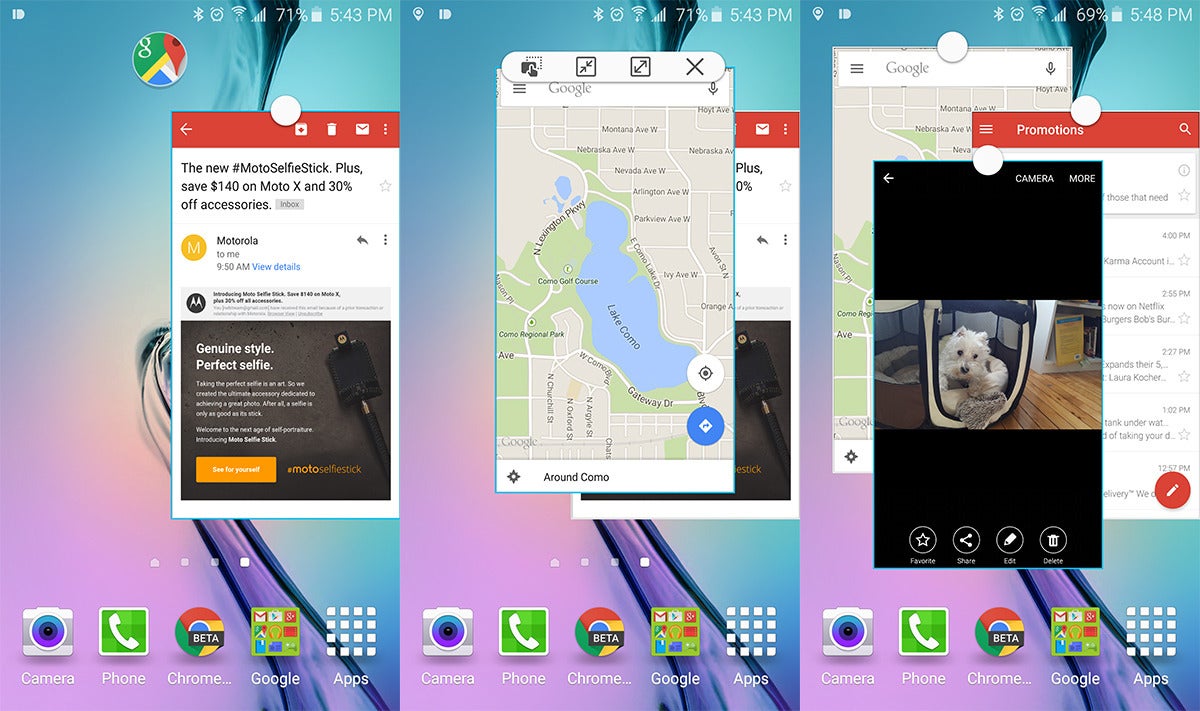
from the Note 4 called Pop-up View that works with any app that supports Multi Window (and only
those apps). Basically, you get a resizeable floating app window that
you can move around the screen. You can even have more than one and
minimize them to floating icons.
There are three ways to go about this: long press on an app in the
multitasking UI, drag down from the top right corner when an app is
open, or use the pop up button when you have an app in Multi Window
mode.
You can arrange these floating windows however you want, drag content
between them, and maximize them to full screen at any time.
Pick ‘Do not disturb’ settings
The Galaxy S6 has support for the priority notification system that was
added in Android 5.0, but it doesn’t use the same terminology. If you’ve
used another phone with Lollipop, you might not even know what to look
for. This seems unnecessarily confusing, but okay. All the notification
modes are under Do not disturb, which you’ll find in Settings > Sounds and notification.
If you turn on Do not disturb mode, you have the option of allowing
exceptions or not. With no exceptions, the phone won’t make a peep, not
even for alarms. That’s the same as “None” mode from other Android
phones. If you allow exceptions like alarms, calls from certain numbers,
and priority apps, that’s the same as Priority mode.
If you don’t want to manually toggle Do not disturb every evening, you can use this settings menu to set a schedule.
Try some Themes
Support for themes is good! Samsung’s initial selection of themes is...not so good.
Samsung added a theme engine to Lollipop on the Galaxy S6, which is
great. However, the themes available at launch are, well... ugly, to put
it kindly. Still, this is a neat feature you should be aware of going
forward. In time, more themes are sure to arrive that are easier on the
eyes, and that could instantly make the Galaxy S6 more appealing.
The theme settings are available in the main system settings, or by
long-pressing on the home screen. From here you can download free
themes, buy premium ones (eventually), and apply them to the phone. This
is an all-or-nothing scenario—Samsung’s themes come with sounds,
wallpaper, icons, fonts, and interface colors. The few currently
available are rather over-the-top, but there’s always hope for the
future.
As you may already know, there are plenty of hosting companies out
there, some expensive, some not. Some are dependable, some have terrible
up time, and some simply shouldn’t be allowed to offer hosting. Even
after looking through a list of some of the best options, finding the perfect hosting company can be a rather difficult thing to do. So why not host your site yourself?
Thanks to your Android device’s capabilities you can host a website
by yourself. Note this is not meant to be the perfect solution for
anyone and everyone. But, it’s helpful for developers who want to test
their website or people who want to learn and test capabilities of their
Android.
Here’s how to host a website on your Android device:
Setting up the Server
1. Install and run KSWEB on
your Andriod device. The app allows a 6-day free trial, after which you
will be required to pay $2.99 for the full version in-order to keep
your site running. Other alternatives include My FTP Server (Free) and Pixel Media Server (Free). For the purpose of this article we will use KSWEB.
2. Once opened, locate the IP Address given on the
KSWEB and access it through your computer, or access the
‘localhost:8080′ link through your phone.
3. Go to “Tools” and click on Start, your browser should now open. The default username and password is ‘admin’ for both.
4. (Optional but Recommended) Select ‘system
settings’ and change password from ‘admin’ to something else. Do this
again for MySQL. Go on KSWEB settings and enter a MySQL Password.
Making your Server accessible though the Web
1. Enter your router’s IP Address in a browser to access it’s admin page.
2. Create a Static IP available for your Android
Device. Access your DHCP settings and select an IP range that your
router allows you to use.
3. Access ‘port forwarding’ and change the ports to
80 and 8080. This allows your router to communicate with your Android
device and it’s server. 4. Access the WiFi settings on your Android Device,
and long press the name of your WiFi network until you see the pop-up.
Click ‘Modify network,’ and check advanced settings. Change IP Settings
to Static and IP Address to the Static IP set in step 2.
5. Find out your IP Address. An easy way to this is
by Googling “What is my IP.” People will use the IP Address to access
your site so make sure to capture it correctly.
For now your site will show blank; you have to give out IP to people
in-order for them to access your site. Also, your Android device has to
be on at all times in order for this to work.
By installing Keep Screen On Free you can allow your server to be on almost always. As for the content of your site, install FTP Server, you can now add files to your site after you change the ports for FTP. This method obviously doesn’t even come close to some of the best hosting services available, but it’s “free” and simple to set-up.
Have you hosted a website from your Android before? Did we miss
anything? What would you recommend to others hoping to do something
similar?
Baked deep into Android is a bunch of secret codes that will enable
of a variety of statistics and settings on your device that you probably
didn’t know existed, as well as some diagnostic tests you can perform
on the hardware.
These settings are not enabled by default, and that’s for a reason.
Take care when using these and we’re not responsible if you mess your
device up.
1. Get information from your phone and battery, including usage and statistics.
*#*#4636#*#*
2. Factory format your device
*2767*3855#
3. Get information your camera
*#*#34971539#*#*
4. Open a file copy screen to backup your media
*#*#273283*255*663282*#*#*
5. Enter service mode
*#*#197328640#*#*
6. Perform various tests on your device
*#*#232339#*#*- WLAN test *#*#232338#*#* - Shows WiFi MAC address *#*#1472365#*#* - GPS test *#*#1575#*#* - Another GPS test *#*#232331#*#* - Bluetooth test *#*#2664#*#* – Touch screen test
Drop us a comment in the section below if you found out any useful
information about your device that you didn’t know before by using these
codes.
Smart Phone have a great innovation of 21 century.Its Change our life style.Now more and more updation make our life more and more success. We Use Android Smartphone. Android Phone is Best smartphone for me Because It has a losts of app store with free and premium app. You can download apps from google play store . But many times we don’t know which app is best. If you are looking for Android App that make your android phone a wireless webcam. Then here we publish top 5 Best Android Apps that make your Smartphone a Wireless Webcam.
It is useful App for those users who are using Vodafone and Docomo carriers in India and to those whose carriers blocks downloading and surfing for site like vuclip, songs.pk, djmaza etc...
Description
ProxyDroid is an app that can help you to set the proxy (http / socks4 / socks5) on your android devices.
PLEASE ROOT YOUR DEVICES FIRST
TIPS: Press MENU button to find a "Recover" option that would help you to recover / reset the proxy settings when you get something wrong.
** FEATURES **
1. Support HTTP / HTTPS / SOCKS4 / SOCKS5 proxy
2. Support basic / NTLM / NTLMv2 authentication methods
3. Individual proxy for only one or several apps
4. Multiple profiles support
5. Bind configuration to WIFI's SSID / Mobile Network (2G / 3G)
6. Widgets for quickly switching on/off proxy
7. Low battery and memory consumption (written in C and compiled as native binary)
8. Bypass custom IP address
9. DNS proxy for guys behind the firewall that disallows to resolve external addresses
10. PAC file support (only basic support, thanks to Rhino)
ProxyDroid is an open source software and distributed with many other open source projects, here is a list of them:
* cntlm - Authentication Proxy: http://cntlm.sourceforge.net/
* redsocks - transparent socks redirector: http://darkk.net.ru/redsocks/
* netfilter/iptables - http://www.netfilter.org/
* transproxy - transparent proxy for HTTP: http://sourceforge.net/projects/transproxy/
* stunnel - multiplatform SSL tunneling proxy: http://www.stunnel.org/
As an open source project, you can check out all source codes from our project site.
Unlike standard mobile phones, Android phones are load with a ton of
functions and features like gaming, web browsing, media playing, GPS,
video calls, etc that blow away any other cell or mobile phones on the
market.
However, many of the features available on Android devices can cause
the battery to be drained very quickly. Therefore, Android users have to
be smart and proactively manage the battery in their phone. Below are
some simple tips that can help to save your android phone’s battery.
Reduce screen brightness
One the biggest battery hogs on your android device is the screen. The
brighter the screen, the more battery it requires. Reduce the screen
brightness can conserve more of your battery.
Don’t use Live Wallpapers
Even though using live wallpapers can make your android phone look cool
and attractive, but they drain a quite amount of battery. Change live
wallpaper to normal wallpaper can slightly extend your battery life.
Use black wallpaper or black theme
Since black color is very dark, the screen don’t have to spend too much
energy for creating colors and therefore, it uses less battery.
Remove home screen widgets that you don’t need
The more widgets placed on the home screen, the more RAM they took for
running the applications, resulting in more battery consumption. So
trying not to go overboard with these.
Disable Auto Sync
Many Applications like Gmail and other email apps eat up a lot of
battery due to auto sync features. When push e-mail is not required,
turn off the auto sync and manual synchronization when needed. to turn
of auto sync, go to Settings -> Accounts and Sync -> uncheck the
‘Auto-sync’.
Switch 3G to 2G network
The later models of android can take advantage the speedy 3G cellular
phone network. Not surprisingly, 3G requires more battery to get the
faster data speeds. However, if you live in area where there is no 3G
coverage, it’s better to turn off 3G and just use the 2G, slower EDGE
network. In this way, your battery will last longer.
Turn off WIFI when not in use
The other kind of high-speed network that the android phone can connect
to is Wi-Fi. Wi-Fi is available where there’s a hotspot – not virtually
everywhere like 3G. If you turn on the WiFi, it will keep looking for a
Wi-Fi hotspot which may drain your battery life. So, unless you’re using
it right this second, keep Wi-Fi turned off.
Disable haptic feedback
Haptic feedback gives touchscreen keyboards the sensation of a physical
layout through small vibrations. While this feature can make typing feel
more natural, it can affect your battery life.
How to disable haptic feedback:
Tap Settings and select Sound.
Scroll down to system and uncheck Haptic feedback to disable feedback to the soft-touch keys.
Turn off location services
Location services such as GPS and Google Maps are very useful when you
want to find directions or looking for a place, but they are also use a
lot of battery. So unless you are using it right now, keep them turned
off.
How to turn off location services:
Tap Settings -> Location services.
Uncheck all the the boxes available.
Disable auto updates for widgets
Home screen widgets like weather updates and news get their information
by pinging a corresponding website automatically. Some widgets allow you
to disable automatic updates, while others have to be removed entirely.
To disable a widget’s automatic updates:
Open the widget and press Menu -> Settings.
Tap on auto refresh and choose None
If you can’t customize the widget and it’s something you can live
without, we suggest you remove it from the home screen. To do that:
Press and hold down the widget until it is highlighted.
Drag the widget to the trash icon to remove it from the home screen.
If all you do with your Android phone or tablet’s keyboard is tap out words, you are missing a lot of great features. There’s more to learn about a keyboard than you might expect.
Of course, you can just type out words without paying attention to any of these features — but mastering them will help you type faster and save time while entering text.
Voice Typing
If your hands aren’t free — or you just feel like dictating — you can tap the microphone button on the keyboard and enter words just by speaking them.
This feature sends your voice input to Google’s speech recognition service, where it’s examined, converted to text, and sent back to your phone. This means that it requires an Internet connection, but the approach of using Google’s massive computing power makes it surprisingly accurate.
To enter punctuation marks while using voice recognition, just say “period,” “comma,” “question mark,” “exclamation mark,” or “exclamation point.” Android will enter the appropriate punctuation mark instead of the words.
Offline Voice Typing
If you’re using Android 4.2 or a newer version of Android, you can now use voice typing offline. You’ll just need to install the appropriate voice-recognition language dictionaries. Note that voice recognition is slightly less accurate in offline mode.
To install the dictionaries, open the Settings screen, tap Language & input, and tap the settings button to the right of Google voice typing.
Download the languages you want to use offline from the Offline Speech Recognition screen.
Swipe to Type
The default keyboard in Android 4.2 gained the ability to type words simply by swiping your finger over them.
To type a word by swiping, simply touch the first letter and glide your finger over the letters — for example, to type Geek, touch the G, move your finger to the E, and then move your finger to the K. Android will try to guess what you’re typing, displaying it above the keyboard. Lift your finger and the word will be typed. You can do this to type many words in sequence quickly, lifting your finger from the screen in between each one.
Word Prediction and Auto-correction
When tapping in a word, Android 4.2′s keyboard will try to think ahead and guess the word you’re about to type. For example, type Messa and “Message” will appear above the keyboard. You can then tap the space bar to move to the next word and Android will automatically fill in the rest of the word it’s expecting you to type.
The keyboard will even use context to guess which word you’re likely to type, even if you haven’t started typing a word yet. Tap one of the suggestions to type it.
Keyboard Settings
You can customize your keyboard’s behavior, too. Open the Settings screen, tap Language & input, and tap the settings button to the right of the Android keyboard.
The keyboard settings screen contains options for disabling features like swiping, auto-correction, auto-capitalization, and next-word suggestions. You can also make auto-correction even more aggressive or switch to other keyboard layouts, like the French QWERTZ layout.
Third-Party Keyboard Replacements
Android’s included keyboard is just one of many options — in fact, your phone’s manufacturer may have already included third-party keyboards like Swype for you to use. You can install other third-party keyboards from Google Play and switch between them. For example, many people consider SwiftKey to have the best auto-correction features, while Swype is the original swipe-over-letters-to-type-them keyboard.
Such experimental features are usually found on Android first — you can find a wide variety of different keyboards, all with their own ideas of how to make text input faster and more efficient.
Android’s keyboard isn’t just a keyboard — it’s a piece of software with its own unique tricks, but also one that can be swapped out and replaced for another keyboard that you might like better. If you want a different keyboard on your iPhone or iPad, you’ll have to jailbreak it.
Skype has done fine work with its new Version 4.0 on Android,
bringing about some badly needed performance improvements as well as a
redesign.
But in doing so, it's buried the sign-out button, as well as
the settings — two things that absolutely need to be in the top level of
the user interface.
( Many user interface changes and speed improvements are welcome, but
latest version of Skype has also some clumsiness. One of them is
"hidden" SIGN OUT possibility.)
Here's how to get to them:
* When you're logged in, tap the image of your face (or whatever you're
using as an avatar) in the top right corner. That'll take you to your
account profile. Then hit the overflow button — the three dots — in the
lower right corner, or hit the menu button if you're on one of Samsung's
phones (or any other with an actual menu button). Now you'll have the
option to sign out, or to go to the settings.
It's worth noting that if you want to log in with a different
username, you'll need to make sure "Sign in automatically" is unchecked
in the settings menu.
Google Play is full of task managers for Android. These utilities can
show you apps running in the background, kill running apps, and
otherwise manage your apps — but you don’t need to install any
third-party software to do this.
We’ll show you how to quickly and easily kill and manage your running
apps using only the software included with your Android phone.
Third-party task managers are unnecessary and many include harmful
features, like task killers.
Automatic Task Killing
Task managers and task killers are often one and the same. A task
killer promises to speed up your phone by automatically killing apps
running in the background. It stays running in the background,
automatically removing apps from memory when you’re done using them.
However, we’ve already explained why you shouldn’t use a task killer on Android.
In a nutshell, Android doesn’t manage processes like Windows does.
Properly behaved apps running in the background aren’t actually doing
anything — they’re just remaining in memory and using no CPU or other
resources. When you access them again, they’ll quickly open, as they’re
waiting in memory for you to return. If they were removed from memory,
they would take longer to re-open as their data would have to be
transferred from system storage back into RAM — in this way, a task
killer can actually slow things down.
Android includes its own automatic task killer
— if its memory fills up and it needs more memory for other reasons, it
will automatically kill running apps, removing them from memory. You
don’t have to install any software to take advantage of this.
End a Running App — The Easy Way
If you would like to manually close an app and remove it from memory,
this is extremely easy on the latest versions of Android — Android 4.0
and up.
First, open the multitasking screen. On a Nexus 4 or Galaxy Nexus,
simply press the dedicated multitasking button. On a phone without a
multitasking button, like a Galaxy S4 or HTC One, you may have to
long-press or double tap the home button to open this screen.
Next, swipe a recent app to the left or right of the screen and its
thumbnail will disappear. In addition to removing this app from the list
of recent apps, cleaning up the list, Android will also remove the app
from memory.
Killing an app is generally not necessary. However, it can help if
the app is misbehaving — killing and re-opening the app may cause it to
work properly.
End a Running App — The Hard Way
You can also end running apps from Android’s settings screen. First, open the Settings screen and tap the Apps category.
Scroll down in the list, select an app, and tap the Force stop button
to end the app’s running process and remove it from memory.
Managing Apps
From the app’s info screen where the Force Stop button is, you can
also prevent the apps from showing notifications, view the amount of
storage the app is using, clear its data or cache, prevent it from being
a default application if it’s set as a default app, and view its
permissions.
View Apps Running in the Background
From the Apps settings pane, you can also swipe over to the Running
category to view apps that are running in the background. These apps
aren’t just remaining in memory. They may start automatically at boot
and stay running in the background so they can automatically do things.
For example, chat apps like WhatsApp may remain running in the
background so they can automatically receive messages.
If you would like to prevent these apps from running in the
background, your best bet is to uninstall them from your phone — you can
end their tasks, but they’ll just restart anyway.
Note that these apps may use very few resources, so you shouldn’t
necessarily worry if they’re running in the background. If they’re
running in the background and you don’t see them consuming much memory,
battery, or network resources, they’re safe to leave alone.
Tap the Show Cached Processes option at the top-right corner of the
screen to view apps that are cached in memory, but aren’t actually
running in the background.
You can end such apps’ processes from here by tapping them and tapping Stop, but there should be no reason to do so.
View Memory Use
At the bottom of the Running apps screen, you’ll see a RAM meter.
This shows you how much of your phone’s memory is being used and how
much is free. Note that this can be misleading — your RAM may appear to
be rather full, but it may just be full of cached applications. This
will speed things up later — it’s good that your RAM is full, as Android is using your RAM as a cache to speed things up.
The Running apps screen also displays the memory used by running
services and cached processes, so you can identify which apps are the
most RAM-hungry.
View Battery Use
To view app-specific battery use, open the Settings screen and tap
the Battery option. You’ll see a list of phone functions and apps,
sorted by how much they’ve used your battery. This screen can help you
see how apps are using your CPU and other resources. You’ll probably see
apps you frequently use near the top of this list. If you see an app
you don’t use here, it’s likely consuming resources in the background —
you’ll want to uninstall it if you don’t use it.
The various task management features in Android should be more than
enough for most people. The biggest feature available in third-party
task manager apps is the task killer, but you shouldn’t need to
automatically kill applications. Android will do that for you when it’s
actually necessary.
Google Now tells you today’s weather before you start your day, how
much traffic to expect before you leave for work, and when the next
train will arrive. All of this happens automatically and the information
appears in what are known as "cards."
Sounds cool right? It's awesome and if it sounds like something
you're interested in, read out guide below. Here we show you how to set
up Google Now in 7 easy steps.
To set up Google Now on your Galaxy S3, follow the steps below:
From the home screen, select Applications.
From the Applications screen, select the Google search app.
After selecting it, a brief tutorial will begin. You’ll need to tap through the welcome screen.
Next, tap the menu button. This will launch the Google Now/Voice
Search settings. Tap Google Now to customize your Google Now cards.
Now, head to the location settings,this can be found in settings
under Privacy accounts. By default, all of these settings should be
enabled.
That's it. To access Google Now tap the Google search bar or the Google search app.
To maximize the most out of the app, you really need to investigate
everything on your own. That being said, the app is wonderful, and well
worth your time.
How to add widgets to your Samsung Galaxy S3 home screen
Widgets are probably one of my favorite features on the Galaxy S3.
There easy to use and provide snippets of information very quickly. They
also really set the Android OS apart from iOS and Windows Phone in a
big way.
What exactly is a widget you ask? Well, it's small piece of self-updating software
that can be placed on the Android home screen. They show new emails
received, upcoming appointments and even missed phone calls. They are
very useful. While adding a widget is easy for some, we've given you
specific directions so you can't screw it up. Luckily, adding them on
the Galaxy S3 is pretty straightforward.
To add widgets to your Galaxy S3 home screen, follow the steps below:
From the S3 home screen, select the Apps in the bottom right.
Once inside, select Widgets on the right.
Tap and hold on the widget you want to install.
Select where on the screen to place the widget, by dragging your finger across the display.
That's it! You're done.
How to add custom words to your Samsung Galaxy S3 dictionary
Adding custom words to the auto-complete dictionary can be a real
pain, especially for someone new to Android. There are just so many
screens, menus and options that it can be intimidating.
With that in mind we thought we should go over a few steps required
to add custom words to the Galaxy S3 auto-complete dictionary. Just
follow our steps and you should be good.
To add words, please follow the simple steps:
From the Galaxy S3 home screen, find and select the Settings app.
Once inside settings, scroll down to find and select Language & keyboard.
Then tap Personal dictionary>Edit personal dictionary> and then the plus symbol.
Enter the word or phrase you want to add and tap OK.
You're done. Your phrase or word will now show up in the auto-complete dictionary.
How to set up Smart Stay on your Samsung Galaxy S3
Smart Stay is Samsung's custom software
that is meant to keep the screen on when you're browing the Web, or
reading a long email. The software actually forces the phone to
recognize you're looking at the screen, keeping it on -- it's great.
To set up Smart Stay, follow the steps below.
From the Galaxy S3 home screen, select Applications.
From the Applications screen, select Settings.
From the Settings section, select Display.
Next, select Screen timeout.
Change the timeout time to 30 seconds and check the Smart stay box.
Boom! You're done.
How to add a new contact to your Samsung Galaxy S3
To add a new contact to the Galaxy S3, follow these simple steps:
From the Galaxy S3 home screen, find and select the People app.
Once inside the app, tape the plus symbol.
Then tap the Name field and enter the new contact's name.
Now select the Contact Type option and choose what account you want the contact to sync with. I always select Google.
Enter additional contact information in the fields provided (address, number, email, etc.)
Tap Save and you're done.
How to take panoramic photos on your Samsung Galaxy S3
The Samsung Galaxy S3 has a pretty amazing camera. The shooter is probably one of the most advanced cameras found on any smartphone and can take some amazing photos, including great panoramic shots.
So just how to do you take a panoramic photo on your Galaxy S3? If
you're not sure, you've definitely come to the right place as I am a
huge fan of panoramic photos.
To start snapping high-quality, panoramic shots, just follow the easy steps below:
From the Galaxy S3 home screen, open the Camera app.
On the viewfinder screen tap the square symbol on the left.
Tap Panorama in the camera mode list that pops up.
When you're ready to
take the first shot, tap the camera icon and directional arrows appear.
The app will then prompt you to pan left or right in landscape view.
As you pan, a guide appears onscreen. Use this to frame your panoramic shot.
Continue guiding the smartphone as smoothly as you can. The camera will automatically capture consecutive frames. It's easy!
Tap the red button on the right to stop capturing.
The camera will then link the shots into a single photo.
How to change the ringtone on your Samsung Galaxy S3
Ringtones are such an important part of owning a smartphone
like the Galaxy S3. They let you know who is calling, when to pick up
and also perhaps when not to pick up, if you know what I mean.
That being said, if you're a bit bored with your default ringtone on
the Galaxy S3 and just want a change, make sure to follow our guide.
With any luck, you'll be able to switch ringtones in no time and
customize calls however you please.
To change the ringtone on your Galaxy S3, follow these simple steps below:
From the Galaxy S3 home screen, find and select the Settings app.
Once inside the app, scroll down and tap Sound.
Next, tap Phone ringtone.
Finally, scroll to the ringtone you want, select it and then tap OK.
How to get better battery life on the Samsung Galaxy S3
The big, beautiful screen is one of the most appealing things about
the Galaxy S3, but this is also the thing that sucks the most juice. One
simple way to get more battery life out of your device is by turning
down the screen's brightness.
This can be accomplished by going into the Settings, tapping on
Display, turning off Auto Brightness and then setting the brightness
that you want. I've found the screen is so nice that you can comfortably
get by on some of the lower settings.
Another sure-fire way to get more battery life out of your Galaxy S3
is to reduce some of the connections your phone is making. Every time
your Galaxy S3 searches for a Wi-Fi network or pings the GPS database, that eats up battery life.
If you know that you're not going to need either of these, go into
the Settings and turn off Wi-Fi and GPS. It's kind of a pain that you
have to manually turn these on when you want to use it, but Samsung made
this super simple to do by including quick access to these in the
Android notification bar.
Speaking of location, make sure you know which apps have access to
your phone's location features and adjust accordingly. For something
like Foursquare or
Google Maps, having location capabilities is a must but you should
think about whether other apps really need to know where you are.
Another way to get more juice out of your Galaxy S3 is by turning off
background data syncing. For those who need every single Tweet, email
or Facebook notification in real time, turning off background data may
seem crazy but it definitely will save on battery life. Additionally,
I've found this can also make you more efficient by removing
distractions.
The Samsung Galaxy S3 is an Android-powered phone, so many of these tips will apply to other Android phones. Be sure to read How to improve your Android smartphone's battery life.
How to sync iTunes with your Samsung Galaxy S3
Thanks to the folks at Media Mushroom, you can now sync your full iTunes library to your Galaxy S3 in an easy way.
You can transfer contacts, messages, photos, music and videos with
ease. If this is something you're interested in doing, read our full
guide below.
Note: Easy Phone Sync will only import DRM-free videos and music from iTunes.
From the Galaxy S3 home screen, head to the Google Play Store and download and install the Easy Phone Sync app.
Next, head to www.easyphonesync.com and download and install the Easy Phone Sync desktop software on your PC or Mac.
Install and run the Easy Phone Sync desktop software and it will
automatically begin importing messages, photos, videos, music and
contacts from iTunes.
Now plug in your Galaxy S3 using the USB
cable to your computer and the Easy Phone Sync software should
automatically recognize and open the Easy Phone Sync app on your phone.
Now that the app is open, tap the sync button on your Galaxy S3.
That's it. Your Galaxy S3 should now automatically sync with iTunes!
How to back up your Samsung Galaxy S3
With smartphones being basically computers these days, having top of
the line back up software is key. Thankfully, Samsung provides users
with something known as Kies, a proprietary software for users. With
Kies you can back up your contacts, call log, SMS/MMS messages, and
media files.
Now, I'm sure there are a few of you who don't know how to use Kies
and if that sounds like you, this guide is going to be a big help. Here
we show you how to back up your S3 like a pro.
Follow the directions below.
Download install Samsung Kies to your Windows PC or Mac. Full directions can be found here.
Navigate to the Kies icon and open the application.
Plug your micro USB cable into the S3 and the USB end to your computer.
Wait for Samsung Kies to recognize the device.
Select the Back up/Restore tab.
Scroll to the bottom of the window and click the Backup button. Kies will by default select everything to back up.
When Kies finishes, click complete.
That's it! You have successfully created a backup of your Galaxy S3.
How to load music on your Samsung Galaxy S3
Being able to listen to music on your S3 is a big deal. Before you
can listen to it, however, you need to know how to transfer the songs
you love to your device.
To get started, follow on below:
Download, install, and open Samsung Kies.
Connect your S3 to the computer using a MicroUSB to USB data cable,
which should be provided with the phone. The phone should be recognized
once you plug it in.
Once it's connected, go to notifications and select "Media Device(MTP)" Kies will now recognize your device as a media player.
Go back to Kies and select Music under Library
Mark the music files you want to transfer to your device and then click Transfer to device.
The selected music files will now load up on your Note 2.
Disconnect the device and you're done!
How to format your microSD card on the Samsung Galaxy S3
If you've gotten that "Memory is Full" notice on the Samsung Galaxy
S3, you'll probably be a little frustrated. That being said, I'm sure
there are at least a few of you out there who would like to format your
S3's microSD card, but simply don't know how. If so, you've come to the
right place.
From the Galaxy S3 home screen, open the Settings app.
Scroll down and tap Storage.
Here you will see microSD card at the bottom. Press Mount microSD card.
Next you will tap Format microSD card and the card's data will be deleted.
How to sync your Samsung Galaxy S3 with FitBit
The new FitBit for Android update will let you sync to recent devices
over Bluetooth 4.0, which means you will be able to get data fed to
your phones in real-time. Bluetooth 4.0 also means better battery life
for the device and the phone.
So, just how do you sync your Galaxy S3 to a FitBit mobile device? Read our guide to find out!
From the Galaxy S3 home screen, head to the Google Play Store and download and install FitBit for Android.
Launch FitBit and sign-up or sign-in.
Tap your Samsung Galaxy S3 to your FitBit device. Make sure NFC and Bluetooth is turned on.
That's it. Your Galaxy S3 should now automatically sync with your FitBit in real-time.
How to send a scheduled email on the Samsung Galaxy S3
On the Galaxy S3 you can send an email at a specified date and time
whenever you please. The feature is useful and really really cool.
To schedule an email on your Galaxy S3, follow the steps below.
From the Galaxy S3 home screen, select Applications.
Next, tap on the default Samsung email app.
Enter the email you want to send in the compose line.
Now, tap the Expanded Menu option.
Tap Schedule Sending.
Now select the time you want the email to send and the date.
Tap Done. Your email will now send automatically at the date and time set.
How to use your Samsung Galaxy S3 as a Wi-Fi mobile hotspot
With a Wi-Fi hotspot enabled on your smartphone,
there are many things you might accomplish. From work to video editing,
you can do almost anything from your your laptop where and whenever you
want. Be aware that your carrier may charge you more for this option or
it can eat into your shared data plan.
Anyway, to set up and turn on a mobile Wi-Fi hotspot on your Galaxy S3, follow the steps below:
From the home screen, select Applications.
From the Applications screen, select Settings.
After selecting it, tap More.
Next, tap Tethering and Portable hotspot. This take you to a hotspot menu.
Now, select Portable Wi-Fi Hotspot and a mobile hotspot will turn on. Make sure you aren't on Wi-Fi.
To maximize the most out of the feature, you really need to
investigate all the settings on your own. In the settings you can set a
password and even make your mobile hotspot private.
When you've downloaded a ton of apps, it can be a bit of a pain to
have to keep flipping through multiple home pages to keep getting the
apps you want. Luckily, organizing your apps into folders is quite easy
to do with the Samsung Galaxy S3.
To create folders on your home screen, simply long press an app and
then drag it on top of another. This will create a folder with those two
apps and you can easily rename the folder, as well as add more apps.
How to switch to vibrate mode on the Samsung Galaxy S3
The Samsung Galaxy S3 supports a number of sound modes, for
ringtones, text messaging, emails and any other alert. It's easy to
switch betten silent mode, sound mode and vibrate mode.
Just tap the volume down button on the side of your device while
you're on the homescreen and a volume bar will show up. Keep pressing
until you see the vibrate icon appear and your device vibrates slightly.
How to switch of text message alerts on the Samsung Galaxy S3
If your device is in silent mode, but still makes a noise when you
receive text messages, you'll need to head to the sound settings to
change it and ensure you won't hear a peep from your phone when you get
an alert.
From the home screen, tap on Messaging.
Now, select the Menu key, then settings. Now choose Select ringtone.
A pop up will appear. From this list, select Silents, then OK.
Your device should now not utter a sound when you receive a text message.
How to improve Google Now cards on the Samsung Galaxy S3
One of the cool things about the Samsung Galaxy S3 with Android 4.1
Jelly Bean is that you can activate Google Now, the contextual "search"
feature, which uses the data it knows about you to deliver important
information quickly. You can make Google Now even better by adding and
customizing your cards.
One way to do this is to enable your Web history. Go to
history.google.com and tap on the "Turn web history on" box and it will
have a bit more data to pull from. Be sure that you understand this will
be opening up your privacy to Google more but it may help your Google
Now experience, so think about the benefits and downsides.
how to install a new keyboard on the Samsung Galaxy S3
If you want to try a new keyboard on your Galaxy S3, it's very simple
to change. Go into Settings, tap on Language and input and then tap on
Default. Depending on which new keyboard you've downloaded, you'll be
able to make that the standard input method on your Galaxy S3.
How to multitask on the Samsung Galaxy S3
You can use multiple applications at once on the Samsung Galaxy S3
really easily. To enter the multitasking screen where you can see all of
the apps you have open, tap the Home key and then task manager.
From here, you can tap the Active applications to see the apps you
have running. Tap end or End all to close individual or all
applications.
Tap the Downloaded tab to see all the apps you have downloaded. From here, you can uninstall them.
You can see how much RAM is being usd by each application in the RAM
tab and clear the memory to free up space and speed up your device,
while the storage tab tells you how mch space you have on your device.
Help will give you tips and tricks to help you save battery and free up RAM to get your Nexus 4 working to its best.
How to take a screen shot on the Samsung Galaxy S3
We're always taking screen shots to use for our reviews but you'd be
surprised at how often it can come in handy. Maybe you want to preserve a
picture of your high score in Angry Birds Friends or
share an image of how your phone is freaking out. Luckily, this is a
very simple thing to do: simply hold down the power and home button at
the same time and a screen shot animation will take place.
You'll then get a notification at the top of your screen and the
screen shot will be saved to your gallery. You can share it via your
social networks by going into your Gallery, clicking on it and then
hitting the Share button.
There's another way to take a screen shot on the Samsung Galaxy S3.
Go into the Settings, tap on Motion, go down to find Hand Motion and
then click on Palm Swipe to Capture. Now, whenever you want to take a
screen shot, do a swiping motion across the screen with your hand and
you should take a screen shot.
How to select a screen lock on the Samsung Galaxy S3
Putting a screen lock will help secure your Galaxy S3 and this can be
done by going into the Settings and then tapping on Security. Tap
Screen Lock and you'll then have the option to put in Swipe, Motion,
Face unlock, Face and Voice, Pattern, PIN or Pinword.
How to customize your lock screen on the Samsung Galaxy S3
If you've set up a screen lock, you'll also be able to control what info appears on it.
To add your own apps to the lock screen simply follow our short step-by-step guide below:
From the Galaxy S3 home screen, navigate to and open the Settings app.
Now scroll down the settings menu and tap Security, then Lock screen options.
Once inside, confirm that the shortcut button is turned on and then tap Shortcuts.
Now you will be presented with four icons. Drag to the trash those
that you want to remove from the lock screen and use the + symbol to add
new app shortcuts.
How to encrypt device, SD card on the Samsung Galaxy S3
If you encrypt your Samsung Galaxy S3, go into Settings, tap on
Security and then tap on either Encrypt device or Encrypt SD card. Once
you've tapped these, you'll go through the on-screen instructions for
securing your device further.
How to use Share Shot on the Samsung Galaxy S3
The Galaxy S3 has an amazing camera and one of the coolest features
is called Share Shot, which enables you to quickly share shots with
nearby Samsung users in real time. In the Camera app, tap on the
shooting mode button (in the middle) and then scroll down and check
Share shot. Have your other Samsung-toting friends do the same and as
long as you're within 100 meters of each other, shared images will be
stored in a Share Shot album on the device.
This can come in handy in a variety of situations and one of the most
obvious is when you're taking a group photo. We've all been in that
situation where we're posing and the shooter then has to take photos
with various people's phones. If everyone has a compatible Samsung
device, you can just take it with one Galaxy S3 and then Share Shot it.
How to use Group Cast on the Samsung Galaxy S3
The Group Cast feature on the Galaxy S3 lets multiple users interact
with the same image at once -- including the ability to have real-time
markups on an image or PDF file. To launch this with other devices on
the same Wi-Fi network, open an image, tap on the Share button and then
tap on Group Cast.
How to use AllShare Play on the Samsung Galaxy S3
The Samsung AllShare Play
lets you use DLNA to "automagically" transmit content from your Galaxy
S3 to other devices like a television or a computer. You have to sign up
for an AllShare account but once you do, launch the AllShare Play app
and then follow the on-screen instructions for adding other devices or
for utilizing Web storage.
How to take HDR photos on the Samsung Galaxy S3
You can set a variety of shooting options on the Galaxy S3. To turn
on things like HDR or Panorama, open up the Camera app and then tap on
the Shooting mode button. From there, you'll be able to choose from
Single shot, Burst shot, HDR, Smile shot, Beauty, Panorama, Cartoon,
Share shot and Buddy photo share.
How to take better shots on the Samsung Galaxy S3 This is probably
the one aspect that will take the most time to learn but it's definitely
worth it. Basically, when you're taking photos with your iPhone 4S,
keep in mind the lighting, composition and angles. We've dedicated
multiple sections to helping you take better smartphone photos, so go ahead and check out how to capture light and how to properly compose your pictures.
How to install apps on the Samsung Galaxy S3
In order to install a free Android application on the Samsung Galaxy S3, proceed with the following:
From the Galaxy S3 home screen, select the Google Play Store app.
From the main Google Play Store screen, select the Apps panel on the left.
Here, any mobile app can be accessed and installed. You can either
browse or conduct a search using the magnifying glass icon in the top
right of the screen.
After you find a free app that interests you, tap Download.
Then tap Accept & Download to accept the permissions for the app
(or press Back if you change your mind) -- your item will start
downloading immediately.
After downloading it will install in the background and will be instantly available for use.
That's it! You're now well on your way to using apps and games.
To install a paid Android application on the Samsung Galaxy S3, proceed with the following:
From the home screen, select the Google Play Store app.
From the main Google Play Store screen, select the Apps panel on the left.
Now go ahead and find any paid app you want. You can either browse
or conduct a search using the magnifying glass icon in the top right of
the screen.
After you find a paid app that interests you tap on the blue box with the price.
You will then be brought to a screen with the total and payment
method. If no credit card is shown it should allow you to add a card.
When finished confirming or adding a payment method tap Accept &
Buy to accept the permissions for the app (or press Back if you change
your mind) -- your item will start downloading immediately.
After downloading it will install in the background and will be instantly available for use.
You can also download free and paid apps directly from your computer.
Just go to play.google.com and search for the app you want to download.
Click on the Install button and if it's compatible with your device,
the app will be installed over the air automatically.
How to install apps from your computer on the Samsung Galaxy S3
You can install apps on your Galaxy S3 directly from your computer.
Go to play.google.com when you're signed into your Google account,
choose the app you want to download, click Install and there will be an
option that says "Send To Another Device…" Tap on the "Choose another
device on which to install," scroll down to the Samsung Galaxy S3 option
and the app will be automatically installed a few seconds later.
How to install apps from non-Play Store on the Samsung Galaxy S3
The Google Play Store is a great way to add apps but so is the Amazon
Appstore or GetJar. To install apps from third-party markets on the
Galaxy S3, go into Settings, tap Security and then check the "Unknown
sources" box. This does come with some security risks, so be sure you
want to do this.
Still, this opens you up to third-party stores and the ability to
install apps that you find in other places. Be sure that you trust where
you're getting the apps from because this could make your device more
vulnerable to malware and privacy violations.
How to put an app on your home screen on the Samsung Galaxy S3
After you've downloaded an app, you can easily put it on your home
screen of the Galaxy S3. Open the app tray and simply hold down on an
app icon for a second or two. You'll then be able to drag it to the home
screen you want it to be on.
How to delete apps on the Samsung Galaxy S3
If you want to get rid of an app, it's pretty easy to do on the
Galaxy S3. Open the app menu and then tap and hold an app icon like you
were going to place it on the home screen. Drag it to the App info icon
on the bottom of the screen and then click on the Uninstall icon.
How to root your Galaxy S3
Note: This guide is for the AT&T, Sprint, T-Mobile and international variants of the Galaxy S3.
Requirements
Download Odin3-v3.04.zip , extract it and install it. You will also need to download clockworkmod.tar. AT&T models of the Galaxy S3 will be required to download fixboot.tar.
It is now time to put your Galaxy S3 in download mode. You can do this by holding down the volume and home buttons
together until a warning message appears. When you see this warning
message appear press the volume up button. If you entered download mode
correctly your Galaxy S3 should be displaying a green Android and say
Downloading.
Now navigate to and open the Odin program from step 2.
Part II - Flashing recovery
Once your Galaxy S3 is connected to your PC via a USB cable and
Odin is open, click on PDA and then select the clockworkmod.tar file
you downloaded in step 2. If you have the AT&T Galaxy S3, choose
fixboot.tar.
Next you will need to ensure that Auto Reboot and Reset Time options are selected in Odin and then you can click go.
Next up, you will boot into ClockworkMod Recovery. To do this you
will simply need to shut down your Galaxy S3, press and hold Volume Up,
Home and Power buttons at the same time.
Part III - Rooting your Galaxy S3
Once you are inside ClockworkMod, make sure to flash
CMW_SuperUser_v3.07.zip that you copied to the Galaxy S3 earlier. Once
this is flashed, your will be rooted.
Finally, reboot and and you are good to go!
Your Galaxy S3 is now rooted and ready for custom ROMs! Now head on over to XDA-Developers and
start flashing some awesome ROMs and mods. The Galaxy S3 already has an
awesome development community, so you should find plenty of ROMs to
mess around with.
Lock screen widgets are easy to enable on the Galaxy S4, but there are a couple of extra settings to get to grips with
When you first pick up the Samsung Galaxy S4,
it might appear that lock screen widgets aren't available. After all,
the default lock screen is just a big clock widget with "life companion"
or some other message up top. But as an Android 4.2
device, the S4 includes full support for lock screen widgets, it's just
a case of enabling them in the phone's lock screen settings.
Head to Settings > My device > Lock screen and check "Multiple
widgets." Once you've done that, you're able to swipe to the right and
add more lock screen panels. There's the standard list of Google widgets
as well as some new stuff from Samsung, including a new WatchON widget.
This ties into the WatchON app, which is the Peel-powered universal
remote included on the Galaxy S4, giving you an expandable universal
remote right from your lock screen. Third-party offerings like Dashclock
Widget should work just fine, too.
In stock Android, there's always a camera shortcut on the right-most
lock screen panel. On the GS4 you can choose what goes here -- either a
big, Nexus-style camera shortcut or a grid of favorite apps. Head to
Settings > My device > Lock screen > Lock screen widgets >
Favorite apps or Camera to configure this.
Like some of the other Samsung widgets, the main clock widget is
customizable too. You can change or get rid of the message, have a dual
clock if you're roaming overseas and customize the style and size of the
on-screen fonts.
Check the quick video demo above to see lock screen widgets in action on the Samsung Galaxy S4.
Google's predictive search app is alive and well on the Galaxy S4 -- and there are a few ways to get to it quickly
On many Android phones with on-screen keys, getting to Google Now -- the excellent predictive/voice-controlled search app in Android 4.1 and above -- is simply a matter of swiping up from the bottom of the screen. It's not quite as simple as that on the new Samsung Galaxy S4, but fear not, there are still a few quick and easy ways to get to the new Google Search app.
At any time, long-press the home key to bring up the task switcher.
Then press the "G" icon at the bottom of the screen, in the middle.
Put an app shortcut or widget on your home screen. If you're using
Google Now a lot, this lets you open it with a single tap. Using a
Google Now widget also lets you see cards without opening up the app.
From the home screen, long-press the menu key. This will launch you
straight into the Google Search bar, and you'll see your Google Now
cards below recent search results.
Neither of these area quite as quick as a swipe-up gesture, but if
you get used to how Google Now works on the Galaxy S4, it's still easy
enough to take full advantage of it.
 3
comments
3
comments