Tuesday, October 9, 2012

If Your Android Phone Is Stolen, This App Photographs the Thief

,
flipboard-android-galaxy-siii-600 
If your Android phone goes missing Kaspersky’s mobile security app may help you not only locate your missing smartphone, but also send you pictures of the phone’s current surroundings.


Through a new web-based control center for the app users can activate a ‘Mugshot’ feature that accesses a lost or stolen phone’s forward-facing camera and captures photos of whatever or whomever might be in front of the lens.
Photos are secretly taken -– so if your phone is with a thief he or she will not know the pics are being taken -– and captured photos can be viewed directly through the app’s web-based control center or emailed to a pre-determined address.


If your phone is stolen, then those photos might potentially show you the thief. If you’ve just misplaced your smartphone, then a photo may help you remember where you left it.
In addition to giving you access to your phone’s camera, the app also allows you to remotely local a missing smartphone from the web interface as well as locate a lost or stolen phone using GPS, GSM or Wi-Fi, and Google Maps. You can also review logs of recent activities on your smartphone, and even find out of the SIM card in the handset has been removed or replaced.


Not just for missing phones, the app also automatically scans apps you download and helps protect your handset from new and emerging viruses, spyware, trojans and bots, and offers real-time protection against dangerous links and webpages, including phishing sites. Antivirus scans and updates can be completed on a schedule or done automatically.
Kaspersky Mobile Security is available now for Android. A 1-year license of the app can be purchased for $14.95 from the Google Play store, and is on sale for $9.99 from Kaspersky’s website (regularly $19.99). If you’re looking for an app to help you find a missing phone, but aren’t concerned about taking pictures or antivirus protection, then Where’s My Droid? can be a less-expensive alternative to the app.
If your phone was stolen would you want to take photos of the perpetrator? Let is know your thoughts in the comments.

(Emily Price)

7 Free Android Apps for Killing Time in Lines

,
With smartphones, tablets and the cloud, we’ve gotten used to multitasking and efficiency. God forbid we spend five minutes disconnected from our devices. Next time you find yourself stuck in a long line or waiting out a seemingly never-ending flight delay, look to your Android device for some entertainment.
We’ve rounded up seven apps, below, that are worth downloading. (We didn’t include Twitter, since we feel it’s a given).

1. Reddit is Fun

  Reddit is a treasure trove of links, pictures and facts; but let’s be honest, the social news site’s interface isn’t the best. Android users can benefit from Reddit Is Fun, which lets users browse Reddit’s homepage and “subreddit” pages.

2. Pocket

  A lot of places have crappy reception, but don’t let that get in your way. Pocket lets you save articles, videos and websites for offline viewing, and it automatically syncs to your phone, tablet or computer. If you do have reception, you can share articles directly from the app. Pocket just edged out another great app for offline reading, NewsRob, which autosyncs with Google Reader in the background to enable offline reading.

3. The New York Times

  If you’re looking to learn a thing or two while you’re stalled, you can’t go wrong with The Grey Lady. Stay up to date with the latest news from the New York Times (if you have reception, that is; otherwise save some articles to Pocket or Newsrob). The app’s free version offers the “Top News” section, but you’ll have to pony up and subscribe to unlock all the sections, which includes blogs, videos and photo galleries.

4. Who Becomes Rich?

  Test your wits with Who Becomes Rich, a multiple-choice trivia game. You can compete with friends for a high score or play privately, answering hundreds of questions about sports, movies, science, math, politics, pop culture and geography. Bored with the questions or looking to share your own knowledge? You can submit questions that’ll be reviewed by the developer and possibly added to the database.

5. SuperGNES Lite (SNES Emulator)

  Remember Super Nintendo? Now you can play it on your Android device with this emulator. The product works well, but you’ll have to find the ROMs for Super Mario World, Street Fighter, Donkey Kong, Super Metroid and more games on your own (they’re free, too). The free version of this app doesn’t let you save your progress, but that doesn’t mean it’s not a great way to kill a few minutes — and save Princess Peach. One up!

6. Pinterest

pinterest-pinboard-600
  Everyone’s favorite timesuck! It’s been a big month for Pinterest, which dropped invites and came to Android. The visual social-bookmarking site lets users collect and organize online images and videos into boards (think mood boards). If you have a project, an apartment to decorate or a goal, Pinterest can quite literally help you visualize it.

7. Bebbled


If you’re into frivolous time-killing and games are up your alley, try Bebbled. Align gems next to similar gems to nuke them, and repeat for 33 levels, as the game gets harder and harder. Finished level one? Keep going — there are six levels in all. A multiplayer version is in the works, so you can play with friends.
What apps do you use to kill time? Tell us in the comments below.

( Lauren Drell)

Friday, October 5, 2012

Android Source Code - Notes

,
How to compile the Android source code
This article contains a few pointer to get the Android source code and to compile the Android source code. It also looks how to download the source code for the Android Development Tools (which are Eclipse plugins). It is more a list of notes for myself. The description is based on Ubuntu.

1. Git and repo

To get the Android source code you to use two tools, Git and an additional tool called repo.
A modern version of Ubuntu has already everything necessary. Just install Git The installation of repo and the necessary steps for other platforms is described in Getting the Android Source code. After you installed the repo tool you can get the Android source code with the following command.

 
// To get the current master 
repo init -u git://android.git.kernel.org/platform/manifest.git ; repo sync ; 

The command "git branch -a" show you all available branches, e.g. froyo and gingerbread. You can checkout them via "git checkout branch_name".
To compile the code run the following command.

make 

2. Adding the framework source to Eclipse

Unfortunately Android does not provide the framework source code as part of the standard Android Installation. For example if you open the class "android.view.ViewGroup" you only see the bytecode.
After downloading the Android source code you can fix this, by creating a zip file of the Android standard Java classes and attaching this to your Android jar file. You find these classes in the "/frameworks/base/core/java" directory. Create a zip file from these classes ("zip -r source.zip android") and attach it to your Android jar .
An easier way of getting the source into your Eclipse installation is to use the "Android Sources" plug-in from http://code.google.com/p/adt-addons/ . Haris Peco maintains plugins with gives access to the Android Source code. Using the Eclipse update manager install two of his plugins.

Update site: "http://adt-addons.googlecode.com/svn/trunk/source/com.android.ide.eclipse.source.update"

and

"http://adt-addons.googlecode.com/svn/trunk/binedit/com.android.ide.eclipse.binedit.update".

Android Cloud to Device Messaging (C2DM) - Tutorial

,

1. Cloud to device messaging

1.1. Polling vs. Push

Most mobile apps require data from the Internet. One approach for updating its data is that the apps periodically polls a server for new data (Polling). If no new data is available this approach uses unnecessary network bandwidth and consumes the battery of the mobile phone.
An alternative approach is that the server contacts the mobile app once new data is available (Push). If the data does not change constantly, Push is the preferred solution.

1.2. Cloud to device messaging

As of Android 2.2 it is possible to push information to an Android app. This service is called Cloud to Device messaging or short C2DM.
In a C2DM you have three involved parties. The application server which wants to push messages to the Android device, Googles C2DM servers and the Android app. The program on the application server can be written in any programming language, e.g. Java, PHP, Python, etc.
When the application server needs to push a message to the Android application, it sends the message via an HTTP POST to Google’s C2DM servers.
The C2DM servers route the message to the device. If the device is not online, the message will be delivered once the device is available. Once the message is received, an Broadcast Intent is created. The mobile app has registered an Intent Receiver for this Broadcast. The app is started and processes the message via the defined Intent Receiver.
C2DM messages are limited in size to 1024 bytes and are intended to inform the device about new data not to transfer it. The typical workflow is that Googles C2DM servers notify the Android app that new data is available. Afterwards the Android app fetches the data from a different server.
Android devices maintain an connection to the Android Play server. C2DM uses this existing connections to the Google servers. This connection is highly optimize to minimize bandwidth and battery consumption.
C2DM is currently still in beta and you need to apply to use it. C2DM applies a limit of approximately 200 000 messages per sender per day and is currently free of charge.

1.3. Requirements

C2MD is available as of Android 2.2 and requires that Android Play application is installed on the device.
To use C2DM on the Android simulator you also need to use a Google device with API 8 or higher and to register with a Google account on the emulator via the Settings.

1.4. Permissions

To use C2DM in your application to have to register for the following permissions
  • com.google.android.c2dm.permission.RECEIVE
  • android.permission.INTERNET

Your application should also declare the permission "applicationPackage + ".permission.C2D_MESSAGE" with the "android:protectionLevel" of "signature" so that other applications cannot register and receive message for the application. android:protectionLevel="signature". ensures that applications with request a permission must be signed with same certificate as the application that declared the permission.

1.5. Intent Receiver

Your application must register an intent receiver for the two intents:
  • com.google.android.c2dm.intent.REGISTRATION
  • com.google.android.c2dm.intent.RECEIVE

The receiver for "com.google.android.c2dm.intent.RECEIVE" will be called once a new message is received, while the receiver for "com.google.android.c2dm.intent.REGISTRATION" will be called once the registration code for the app is received.

2. Implementation Steps

2.1. Application Server Registration

The application server needs to authenticate himself with the C2DM servers. Via an email and password an authentication token is determined with an HTTP POST request to the C2DM servers. The token is stored on the application server and is used to authenticate the application server with the C2DM servers once he sends out messages.
For example you can get the token for an registered email and password via the following coding:

package de.vogella.java.c2dm.server.util;

import java.io.BufferedReader;
import java.io.IOException;
import java.io.InputStreamReader;
import java.io.OutputStream;
import java.net.HttpURLConnection;
import java.net.URL;

public class AuthenticationUtil {
  private AuthenticationUtil() {
    // Util class cannot get instanziated
  }

  public static String getToken(String email, String password)
      throws IOException {
    // Create the post data
    // Requires a field with the email and the password
    StringBuilder builder = new StringBuilder();
    builder.append("Email=").append(email);
    builder.append("&Passwd=").append(password);
    builder.append("&accountType=GOOGLE");
    builder.append("&source=MyLittleExample");
    builder.append("&service=ac2dm");

    // Setup the Http Post
    byte[] data = builder.toString().getBytes();
    URL url = new URL("https://www.google.com/accounts/ClientLogin");
    HttpURLConnection con = (HttpURLConnection) url.openConnection();
    con.setUseCaches(false);
    con.setDoOutput(true);
    con.setRequestMethod("POST");
    con.setRequestProperty("Content-Type",
        "application/x-www-form-urlencoded");
    con.setRequestProperty("Content-Length", Integer.toString(data.length));

    // Issue the HTTP POST request
    OutputStream output = con.getOutputStream();
    output.write(data);
    output.close();

    // Read the response
    BufferedReader reader = new BufferedReader(new InputStreamReader(con.getInputStream()));
    String line = null;
    String auth_key = null;
    while ((line = reader.readLine()) != null) {
      if (line.startsWith("Auth=")) {
        auth_key = line.substring(5);
      }
    }

    // Finally get the authentication token
    // To something useful with it
    return auth_key;
  }
} 

The token is periodically refreshed.
The above example is in Java. It is also possible to get the token via other http tools or programming languages. For example you can simulate the server via the command line tool with the tool curl.

2.2. Getting the registration ID for the mobile app

To register your Android app for the C2DM service you fire an registration intent "com.google.android.c2dm.intent.REGISTER". This will trigger a service which will send the registration to the Google C2DM servers.
The intent include an extra with the key "sender" and the email address which was registered for the C2DM service. It also must include PendingIntent with the "app" extra. The PendingIntent gives the Android system information about the current application. The value for the "sender" is the email address under which you registered your C2DM message service. Replace in the following example "youruser@gmail.com" which your email address.

public void register(View view) {
  Intent intent = new Intent("com.google.android.c2dm.intent.REGISTER");
  intent.putExtra("app",PendingIntent.getBroadcast(this, 0, new Intent(), 0));
  intent.putExtra("sender", "youruser@gmail.com");
  startService(intent);
} 

The service will asynchronously register with Google and will send the "com.google.android.c2dm.intent.REGISTRATION" intent upon successful registration. Your application need to register an Broadcast Receiver for this intent. This also requires the usage of a permission based on your package as the Android system checks this internally.

package de.vogella.android.c2dm.simpleclient;

import android.content.BroadcastReceiver;
import android.content.Context;
import android.content.Intent;
import android.util.Log;

public class C2DMRegistrationReceiver extends BroadcastReceiver {

  @Override
  public void onReceive(Context context, Intent intent) {
    String action = intent.getAction();
    Log.w("C2DM", "Registration Receiver called");
    if ("com.google.android.c2dm.intent.REGISTRATION".equals(action)) {
      Log.w("C2DM", "Received registration ID");
      final String registrationId = intent
          .getStringExtra("registration_id");
      String error = intent.getStringExtra("error");

      Log.d("C2DM", "dmControl: registrationId = " + registrationId
          + ", error = " + error);
      // TODO Send this to my application server
    }
  }
} 

The ""AndroidManifest.xml looks like the following. Please note that if you are using a different package that you have to adjust this coding.

<?xml version="1.0" encoding="utf-8"?>
<manifest xmlns:android="http://schemas.android.com/apk/res/android"
    package="de.vogella.android.c2dm.simpleclient"
    android:versionCode="1"
    android:versionName="1.0" >

    <uses-sdk android:minSdkVersion="8" />

    <permission
        android:name="de.vogella.android.c2dm.simpleclient.permission.C2D_MESSAGE"
        android:protectionLevel="signature" />

    <uses-permission 
        android:name="de.vogella.android.c2dm.simpleclient.permission.C2D_MESSAGE" />
    <uses-permission android:name="com.google.android.c2dm.permission.RECEIVE" />
    <uses-permission android:name="android.permission.INTERNET" />

    <application
        android:icon="@drawable/icon"
        android:label="@string/app_name" >
        <activity
            android:label="@string/app_name"
            android:name=".C2DMClientActivity" >
            <intent-filter >
                <action android:name="android.intent.action.MAIN" />

                <category android:name="android.intent.category.LAUNCHER" />
            </intent-filter>
        </activity>

        <receiver
            android:name=".C2DMRegistrationReceiver"
            android:permission="com.google.android.c2dm.permission.SEND" >
            <intent-filter >
                <action android:name="com.google.android.c2dm.intent.REGISTRATION" >
                </action>

                <category android:name="de.vogella.android.c2dm.simpleclient" />
            </intent-filter>
        </receiver>
    </application>

</manifest> 

The "com.google.android.c2dm.intent.REGISTRATION" intent includes a registration ID. Each registration ID represents a particular device, e.g. every Android phone will receive its own registration code.
The C2DM may refresh this registration ID periodically but until a refreshment your application should store this ID for later use.
After the Android app received the registration ID it has to send this information to the application server. The application server can use the registration ID to send a message to the device via the C2DM servers from Google.
For example the following code sends the deviceId and the registrationId to a server.

// Better do this in an asynchronous thread
public void sendRegistrationIdToServer(String deviceId, String registrationId) {

  Log.d("C2DM", "Sending registration ID to my application server");
  HttpClient client = new DefaultHttpClient();
  HttpPost post = new HttpPost("http://your_url/register");
  try {
    List<NameValuePair> nameValuePairs = new ArrayList<NameValuePair>(1);
    // Get the deviceID
    nameValuePairs.add(new BasicNameValuePair("deviceid", deviceId));
    nameValuePairs.add(new BasicNameValuePair("registrationid", registrationId));

    post.setEntity(new UrlEncodedFormEntity(nameValuePairs));
    HttpResponse response = client.execute(post);
    BufferedReader rd = 
      new BufferedReader(new InputStreamReader(response.getEntity().getContent()));
    String line = "";
    while ((line = rd.readLine()) != null) {
      Log.e("HttpResponse", line);
    }
  } catch (IOException e) {
    e.printStackTrace();
  }
} 

The server uses some persistence to store the registration IDs.

2.3. Register Receiver for C2DM messages

Similar to registration of the registration receiver you need to configure a message receiver. This could be the same or a different receiver then the registration receiver. The following shows an example of an separate message receiver.

package de.vogella.android.c2dm.simpleclient;

import android.content.BroadcastReceiver;
import android.content.Context;
import android.content.Intent;
import android.util.Log;

public class C2DMMessageReceiver extends BroadcastReceiver {

  @Override
  public void onReceive(Context context, Intent intent) {
    String action = intent.getAction();
    Log.w("C2DM", "Message Receiver called");
    if ("com.google.android.c2dm.intent.RECEIVE".equals(action)) {
      Log.w("C2DM", "Received message");
      final String payload = intent.getStringExtra("payload");
      Log.d("C2DM", "dmControl: payload = " + payload);
      // Send this to my application server
    }
  }
} 

In addition you need to register the message receiver in your AndroidManifest.xml file.

<receiver android:name=".C2DMMessageReceiver"
  android:permission="com.google.android.c2dm.permission.SEND">
  <intent-filter>
    <action android:name="com.google.android.c2dm.intent.RECEIVE"></action>
    <category android:name="de.vogella.android.c2dm.simpleclient" />
  </intent-filter>
</receiver> 

2.4. Send messages

At this point your application server and your Android app are ready to use C2DM. Your server has his authentication token and the registration ID of the app. And the mobile app has registered Broadcast Receiver for receiving the message.
To send a message to a device, the application server sends a HTTP POST request to the Google C2DM servers. This HTTP GET request contains the registration ID for this device and well as the authentication token (to tell Google that this server is allowed to send messages).

package de.vogella.java.c2dm.server.util;

import java.io.IOException;
import java.io.OutputStream;
import java.net.URL;
import java.net.URLEncoder;

import javax.net.ssl.HostnameVerifier;
import javax.net.ssl.HttpsURLConnection;
import javax.net.ssl.SSLSession;

public class MessageUtil {
  private final static String AUTH = "authentication";

  private static final String UPDATE_CLIENT_AUTH = "Update-Client-Auth";

  public static final String PARAM_REGISTRATION_ID = "registration_id";

  public static final String PARAM_DELAY_WHILE_IDLE = "delay_while_idle";

  public static final String PARAM_COLLAPSE_KEY = "collapse_key";

  private static final String UTF8 = "UTF-8";

  public static int sendMessage(String auth_token, String registrationId,
      String message) throws IOException {

    StringBuilder postDataBuilder = new StringBuilder();
    postDataBuilder.append(PARAM_REGISTRATION_ID).append("=")
        .append(registrationId);
    postDataBuilder.append("&").append(PARAM_COLLAPSE_KEY).append("=")
        .append("0");
    postDataBuilder.append("&").append("data.payload").append("=")
        .append(URLEncoder.encode(message, UTF8));

    byte[] postData = postDataBuilder.toString().getBytes(UTF8);

    // Hit the dm URL.

    URL url = new URL("https://android.clients.google.com/c2dm/send");
    HttpsURLConnection
        .setDefaultHostnameVerifier(new CustomizedHostnameVerifier());
    HttpsURLConnection conn = (HttpsURLConnection) url.openConnection();
    conn.setDoOutput(true);
    conn.setUseCaches(false);
    conn.setRequestMethod("POST");
    conn.setRequestProperty("Content-Type",
        "application/x-www-form-urlencoded;charset=UTF-8");
    conn.setRequestProperty("Content-Length",
        Integer.toString(postData.length));
    conn.setRequestProperty("Authorization", "GoogleLogin auth="
        + auth_token);

    OutputStream out = conn.getOutputStream();
    out.write(postData);
    out.close();

    int responseCode = conn.getResponseCode();
    return responseCode;
  }

  private static class CustomizedHostnameVerifier implements HostnameVerifier {
    public boolean verify(String hostname, SSLSession session) {
      return true;
    }
  }
} 

Once your server sends the message to the C2DM server this server will queue the message until the device is available. The message will be send to the device as a broadcast. Your application needs to register for this broadcast event to receive the message.
A received message is send to the registered broadcast receiver for "com.google.android.c2dm.intent.RECEIVE". The data can be received from the Intent via getExtras(). The available keys are "payload", "from", "collapse_key". The actual data is included in "payload". The receiver can extracts this data and can react to it.

3. Device and Registration

Currently C2DM is under beta testing. You need to ask for access. Here is the link to the signup form.
If you test the following example on the emulator make sure that you use Google API 8 or later. You also have to register a Google user on the virtual device under SettingsAccounts Sync.
If you test the following example on a real device make sure that the Android Market is installed.

4. Tutorial: Create your C2DM enabled application

4.1. Project and Layout

Create the Android project "de.vogella.android.c2dm.simpleclient" with the activity "C2DMClientActivity". Create the following layout main.xml.

<?xml version="1.0" encoding="utf-8"?>
<LinearLayout xmlns:android="http://schemas.android.com/apk/res/android"
    android:layout_width="match_parent"
    android:layout_height="match_parent"
    android:orientation="vertical" >

    <Button
        android:layout_width="wrap_content"
        android:layout_height="wrap_content"
        android:onClick="register"
        android:text="Register" >
    </Button>

    <Button
        android:layout_width="wrap_content"
        android:layout_height="wrap_content"
        android:onClick="showRegistrationId"
        android:text="Show" >
    </Button>

</LinearLayout> 

Also create the layout "activity_result.xml" which we will use in our result activities.

<?xml version="1.0" encoding="utf-8"?>
<LinearLayout xmlns:android="http://schemas.android.com/apk/res/android"
    android:layout_width="match_parent"
    android:layout_height="match_parent"
    android:orientation="vertical" >

    <TextView
        android:id="@+id/result"
        android:layout_width="match_parent"
        android:layout_height="match_parent"
        android:layout_gravity="center"
        android:text="No info."
        android:textAppearance="?android:attr/textAppearanceLarge" >
    </TextView>

</LinearLayout> 

4.2. Create receivers and activities

Create the following class "C2DMReceiverReceiver" and "C2DMMessageReceiver" which we will later registers as receivers for the registration intent and the message intent.

package de.vogella.android.c2dm.simpleclient;

import java.io.BufferedReader;
import java.io.IOException;
import java.io.InputStreamReader;
import java.util.ArrayList;
import java.util.List;

import org.apache.http.HttpResponse;
import org.apache.http.NameValuePair;
import org.apache.http.client.HttpClient;
import org.apache.http.client.entity.UrlEncodedFormEntity;
import org.apache.http.client.methods.HttpPost;
import org.apache.http.impl.client.DefaultHttpClient;
import org.apache.http.message.BasicNameValuePair;

import android.app.Notification;
import android.app.NotificationManager;
import android.app.PendingIntent;
import android.content.BroadcastReceiver;
import android.content.Context;
import android.content.Intent;
import android.content.SharedPreferences;
import android.content.SharedPreferences.Editor;
import android.preference.PreferenceManager;
import android.provider.Settings.Secure;
import android.util.Log;

public class C2DMRegistrationReceiver extends BroadcastReceiver {

  @Override
  public void onReceive(Context context, Intent intent) {
    String action = intent.getAction();
    Log.w("C2DM", "Registration Receiver called");
    if ("com.google.android.c2dm.intent.REGISTRATION".equals(action)) {
      Log.w("C2DM", "Received registration ID");
      final String registrationId = intent
          .getStringExtra("registration_id");
      String error = intent.getStringExtra("error");

      Log.d("C2DM", "dmControl: registrationId = " + registrationId
          + ", error = " + error);
      String deviceId = Secure.getString(context.getContentResolver(),
          Secure.ANDROID_ID);
      createNotification(context, registrationId);
      sendRegistrationIdToServer(deviceId, registrationId);
      // Also save it in the preference to be able to show it later
      saveRegistrationId(context, registrationId);
    }
  }

  private void saveRegistrationId(Context context, String registrationId) {
    SharedPreferences prefs = PreferenceManager
        .getDefaultSharedPreferences(context);
    Editor edit = prefs.edit();
    edit.putString(C2DMClientActivity.AUTH, registrationId);
    edit.commit();
  }

  public void createNotification(Context context, String registrationId) {
    NotificationManager notificationManager = (NotificationManager) context
        .getSystemService(Context.NOTIFICATION_SERVICE);
    Notification notification = new Notification(R.drawable.icon,
        "Registration successful", System.currentTimeMillis());
    // Hide the notification after its selected
    notification.flags |= Notification.FLAG_AUTO_CANCEL;

    Intent intent = new Intent(context, RegistrationResultActivity.class);
    intent.putExtra("registration_id", registrationId);
    PendingIntent pendingIntent = PendingIntent.getActivity(context, 0,
        intent, 0);
    notification.setLatestEventInfo(context, "Registration",
        "Successfully registered", pendingIntent);
    notificationManager.notify(0, notification);
  }

  // Incorrect usage as the receiver may be canceled at any time
  // do this in an service and in an own thread
  public void sendRegistrationIdToServer(String deviceId,
      String registrationId) {
    Log.d("C2DM", "Sending registration ID to my application server");
    HttpClient client = new DefaultHttpClient();
    HttpPost post = new HttpPost("http://vogellac2dm.appspot.com/register");
    try {
      List<NameValuePair> nameValuePairs = new ArrayList<NameValuePair>(1);
      // Get the deviceID
      nameValuePairs.add(new BasicNameValuePair("deviceid", deviceId));
      nameValuePairs.add(new BasicNameValuePair("registrationid",
          registrationId));

      post.setEntity(new UrlEncodedFormEntity(nameValuePairs));
      HttpResponse response = client.execute(post);
      BufferedReader rd = new BufferedReader(new InputStreamReader(response.getEntity().getContent()));

      String line = "";
      while ((line = rd.readLine()) != null) {
        Log.e("HttpResponse", line);
      }
    } catch (IOException e) {
      e.printStackTrace();
    }
  }
} 


package de.vogella.android.c2dm.simpleclient;

import android.app.Notification;
import android.app.NotificationManager;
import android.app.PendingIntent;
import android.content.BroadcastReceiver;
import android.content.Context;
import android.content.Intent;
import android.util.Log;

public class C2DMMessageReceiver extends BroadcastReceiver {

  @Override
  public void onReceive(Context context, Intent intent) {
    String action = intent.getAction();
    Log.w("C2DM", "Message Receiver called");
    if ("com.google.android.c2dm.intent.RECEIVE".equals(action)) {
      Log.w("C2DM", "Received message");
      final String payload = intent.getStringExtra("payload");
      Log.d("C2DM", "dmControl: payload = " + payload);
      // TODO Send this to my application server to get the real data
      // Lets make something visible to show that we received the message
      createNotification(context, payload);

    }
  }

  public void createNotification(Context context, String payload) {
    NotificationManager notificationManager = (NotificationManager) context
        .getSystemService(Context.NOTIFICATION_SERVICE);
    Notification notification = new Notification(R.drawable.icon,
        "Message received", System.currentTimeMillis());
    // Hide the notification after its selected
    notification.flags |= Notification.FLAG_AUTO_CANCEL;

    Intent intent = new Intent(context, MessageReceivedActivity.class);
    intent.putExtra("payload", payload);
    PendingIntent pendingIntent = PendingIntent.getActivity(context, 0,
        intent, 0);
    notification.setLatestEventInfo(context, "Message",
        "New message received", pendingIntent);
    notificationManager.notify(0, notification);

  }

} 

Also create the following two Activities which we will use to see the results.

package de.vogella.android.c2dm.simpleclient;

import android.app.Activity;
import android.os.Bundle;
import android.widget.TextView;

public class RegistrationResultActivity extends Activity {
  @Override
  protected void onCreate(Bundle savedInstanceState) {
    setContentView(R.layout.activity_result);
    Bundle extras = getIntent().getExtras();
    if (extras != null) {
      String registrationId = extras.getString("registration_id");
      if (registrationId != null && registrationId.length() > 0) {
        TextView view = (TextView) findViewById(R.id.result);
        view.setText(registrationId);
      }
    }

    super.onCreate(savedInstanceState);
  }
} 


package de.vogella.android.c2dm.simpleclient;

import android.app.Activity;
import android.os.Bundle;
import android.widget.TextView;

public class MessageReceivedActivity extends Activity {
  @Override
  protected void onCreate(Bundle savedInstanceState) {
    setContentView(R.layout.activity_result);
    Bundle extras = getIntent().getExtras();
    if (extras != null) {
      String message = extras.getString("payload");
      if (message != null && message.length() > 0) {
        TextView view = (TextView) findViewById(R.id.result);
        view.setText(message);
      }
    }

    super.onCreate(savedInstanceState);
  }

} 

Create the following AndroidManifest.xml file. That will register the Intent Receivers, Activities and requests the required permissions.

<?xml version="1.0" encoding="utf-8"?>
<manifest xmlns:android="http://schemas.android.com/apk/res/android"
    package="de.vogella.android.c2dm.simpleclient"
    android:versionCode="1"
    android:versionName="1.0" >

    <uses-sdk android:minSdkVersion="8" />

    <permission
        android:name="de.vogella.android.c2dm.simpleclient.permission.C2D_MESSAGE"
        android:protectionLevel="signature" />

    <uses-permission 
      android:name="de.vogella.android.c2dm.simpleclient.permission.C2D_MESSAGE" />
    <uses-permission android:name="com.google.android.c2dm.permission.RECEIVE" />
    <uses-permission android:name="android.permission.INTERNET" />

    <application
        android:icon="@drawable/icon"
        android:label="@string/app_name" >
        <activity
            android:label="@string/app_name"
            android:name=".C2DMClientActivity" >
            <intent-filter >
                <action android:name="android.intent.action.MAIN" />

                <category android:name="android.intent.category.LAUNCHER" />
            </intent-filter>
        </activity>

        <receiver
            android:name=".C2DMRegistrationReceiver"
            android:permission="com.google.android.c2dm.permission.SEND" >
            <intent-filter >
                <action android:name="com.google.android.c2dm.intent.REGISTRATION" >
                </action>

                <category android:name="de.vogella.android.c2dm.simpleclient" />
            </intent-filter>
        </receiver>
        <receiver
            android:name=".C2DMMessageReceiver"
            android:permission="com.google.android.c2dm.permission.SEND" >
            <intent-filter >
                <action android:name="com.google.android.c2dm.intent.RECEIVE" >
                </action>

                <category android:name="de.vogella.android.c2dm.simpleclient" />
            </intent-filter>
        </receiver>

        <activity android:name="RegistrationResultActivity" >
        </activity>
        <activity android:name="MessageReceivedActivity" >
        </activity>
    </application>

</manifest> 

Change your "C2DMClientActivity" class to the following.

package de.vogella.android.c2dm.simpleclient;

import android.app.Activity;
import android.app.PendingIntent;
import android.content.Intent;
import android.content.SharedPreferences;
import android.os.Bundle;
import android.preference.PreferenceManager;
import android.util.Log;
import android.view.View;
import android.widget.Toast;

public class C2DMClientActivity extends Activity {

  public final static String AUTH = "authentication";

  // Example Activity to trigger a request for a registration ID to the Google
  // server
  @Override
  public void onCreate(Bundle savedInstanceState) {
    super.onCreate(savedInstanceState);
    setContentView(R.layout.main);
  }

  public void register(View view) {
    Log.w("C2DM", "start registration process");
    Intent intent = new Intent("com.google.android.c2dm.intent.REGISTER");
    intent.putExtra("app",
        PendingIntent.getBroadcast(this, 0, new Intent(), 0));
    // Sender currently not used
    intent.putExtra("sender", "nonsenses@gmail.com");
    startService(intent);
  }

  public void showRegistrationId(View view) {
    SharedPreferences prefs = PreferenceManager
        .getDefaultSharedPreferences(this);
    String string = prefs.getString(AUTH, "n/a");
    Toast.makeText(this, string, Toast.LENGTH_LONG).show();
    Log.d("C2DM RegId", string);

  }
} 

The methods in the activity are connected to the buttons via the onclick property of the buttons. The first button triggers a request for a registration ID and the second button shows the saved registration key. Both also write the registration id also to the Logcat View.
Copy the registration Id from the Logcat View so that you can later use it in your server implementation.

4.3. Register your application

Run your application, maintain your registered user and press the button. Check LogCat for the registration ID.
If you see the following message:

Unable to start service Intent 
  {act=com.google.android.c2dm.intent.REGISTER ... }: not found 

make sure you are using a Google device and that you have a Google user registered on the device.

5. Tutorial: Using command line tool curl to simulator the server

If you run a Linux system you can easily test the service on the command line. You can request your authentication key via curl on the command line. From the response get the part after "Auth=".

curl https://www.google.com/accounts/ClientLogin -d 
  Email=your_user -d "Passwd=your_password" -d accountType=GOOGLE 
  -d source=Google-cURL-Example -d service=ac2dm 

This part and the registration code can be used to send a message to your device.

curl --header "Authorization: GoogleLogin auth=your_authenticationid" 
  "https://android.apis.google.com/c2dm/send" -d registration_id=your_registration 
  -d "data.payload=payload" -d collapse_key=0 

6. Tutorial: Create your server application

As described earlier the application server needs to get an authentication key via HTTPS. Afterwards it can send messages to the device via HTTP by supplying the authentication key and the registration ID.
We will simulate the Server via a Java program. The registration ID of the device will be hard-coded into this app as we do not have the possibility to reach this app via http. Keep in mind that this is only an example to make it simple to test C2DM.
To store you credentials use the following class.

package de.vogella.java.c2dm.server.secret;

public class SecureStorage {
  public static final String USER = "your_registeredUser";
  public static final String PASSWORD = "your_password";
} 

Create a new Java project "de.vogella.java.c2dm.server". Create the following class. This class is an utility class to get the authentication token from the Google server.

package de.vogella.java.c2dm.server.util;

import java.io.BufferedReader;
import java.io.IOException;
import java.io.InputStreamReader;
import java.io.OutputStream;
import java.net.HttpURLConnection;
import java.net.URL;

public class AuthenticationUtil {
  private AuthenticationUtil() {
    // Util class cannot get instanziated
  }

  public static String getToken(String email, String password)
      throws IOException {
    // Create the post data
    // Requires a field with the email and the password
    StringBuilder builder = new StringBuilder();
    builder.append("Email=").append(email);
    builder.append("&Passwd=").append(password);
    builder.append("&accountType=GOOGLE");
    builder.append("&source=MyLittleExample");
    builder.append("&service=ac2dm");

    // Setup the Http Post
    byte[] data = builder.toString().getBytes();
    URL url = new URL("https://www.google.com/accounts/ClientLogin");
    HttpURLConnection con = (HttpURLConnection) url.openConnection();
    con.setUseCaches(false);
    con.setDoOutput(true);
    con.setRequestMethod("POST");
    con.setRequestProperty("Content-Type",
        "application/x-www-form-urlencoded");
    con.setRequestProperty("Content-Length", Integer.toString(data.length));

    // Issue the HTTP POST request
    OutputStream output = con.getOutputStream();
    output.write(data);
    output.close();

    // Read the response
    BufferedReader reader = new BufferedReader(new InputStreamReader(con.getInputStream()));
    String line = null;
    String auth_key = null;
    while ((line = reader.readLine()) != null) {
      if (line.startsWith("Auth=")) {
        auth_key = line.substring(5);
      }
    }

    // Finally get the authentication token
    // To something useful with it
    return auth_key;
  }
} 


Create the following class "GetAuthenticationToken". This class can be used to get the authentication token.

package de.vogella.java.c2dm.server;

import java.io.IOException;

import de.vogella.java.c2dm.server.secret.SecureStorage;
import de.vogella.java.c2dm.server.util.AuthenticationUtil;

public class GetAuthenticationToken {

  public static void main(String[] args) throws IOException {
    String token = AuthenticationUtil.getToken(SecureStorage.USER,
        SecureStorage.PASSWORD);
    System.out.println(token);
  }
} 

Run your GetAuthenticationToken class and copy the authentication token from the command line.
Create the following class and maintain your authentication token and your registration id.

package de.vogella.java.c2dm.server;

public class ServerConfiguration {
  public static final String AUTHENTICATION_TOKEN = "your_token";
  public static final String REGISTRATION_ID = "registration_id_of_your_device";

} 

Also create the following utility class which will allow to send messages to your device.

package de.vogella.java.c2dm.server.util;

import java.io.IOException;
import java.io.OutputStream;
import java.net.URL;
import java.net.URLEncoder;

import javax.net.ssl.HostnameVerifier;
import javax.net.ssl.HttpsURLConnection;
import javax.net.ssl.SSLSession;

public class MessageUtil {
  private final static String AUTH = "authentication";

  private static final String UPDATE_CLIENT_AUTH = "Update-Client-Auth";

  public static final String PARAM_REGISTRATION_ID = "registration_id";

  public static final String PARAM_DELAY_WHILE_IDLE = "delay_while_idle";

  public static final String PARAM_COLLAPSE_KEY = "collapse_key";

  private static final String UTF8 = "UTF-8";

  public static int sendMessage(String auth_token, String registrationId,
      String message) throws IOException {

    StringBuilder postDataBuilder = new StringBuilder();
    postDataBuilder.append(PARAM_REGISTRATION_ID).append("=")
        .append(registrationId);
    postDataBuilder.append("&").append(PARAM_COLLAPSE_KEY).append("=")
        .append("0");
    postDataBuilder.append("&").append("data.payload").append("=")
        .append(URLEncoder.encode(message, UTF8));

    byte[] postData = postDataBuilder.toString().getBytes(UTF8);

    // Hit the dm URL.

    URL url = new URL("https://android.clients.google.com/c2dm/send");
    HttpsURLConnection
        .setDefaultHostnameVerifier(new CustomizedHostnameVerifier());
    HttpsURLConnection conn = (HttpsURLConnection) url.openConnection();
    conn.setDoOutput(true);
    conn.setUseCaches(false);
    conn.setRequestMethod("POST");
    conn.setRequestProperty("Content-Type",
        "application/x-www-form-urlencoded;charset=UTF-8");
    conn.setRequestProperty("Content-Length",
        Integer.toString(postData.length));
    conn.setRequestProperty("Authorization", "GoogleLogin auth="
        + auth_token);

    OutputStream out = conn.getOutputStream();
    out.write(postData);
    out.close();

    int responseCode = conn.getResponseCode();
    return responseCode;
  }

  private static class CustomizedHostnameVerifier implements HostnameVerifier {
    public boolean verify(String hostname, SSLSession session) {
      return true;
    }
  }
} 

Finally create the following class "SendMessageToDevice" which can send messages to your device.

package de.vogella.java.c2dm.server;

import java.io.IOException;

import de.vogella.java.c2dm.server.util.MessageUtil;

public class SendMessageToDevice {

  public static void main(String[] args) throws IOException {
    // "Message to your device." is the message we will send to the Android app
    int responseCode = MessageUtil.sendMessage(ServerConfiguration.AUTHENTICATION_TOKEN,
        ServerConfiguration.REGISTRATION_ID, "Message to your device.");
    System.out.println(responseCode);
  }
} 

Run it. This should send a message to your device and give you the return code "200". On your device you should see a notification and if you open it you should see the message displayed.

(vogella)


How To Root Samsung Galaxy S III GT-I9300

,
Now you can root Samsung Galaxy S III. Samsung Galaxy is still not available in many of the markets and XDA developers have already found a way to root the device. Here in this post we will tell you in detail how to root Samsung Galaxy S III.

Root Samsung Galaxy SIII

Before we start the process of rooting Samsung Galaxy S III GT-I9300 make sure that it has XXALE8 firmware. You can check this once you go to Settings > About Phone > Baseband Version.

Warning

  • These instructions are to be only used on Samsung Galaxy S III. Applying the same procedure on any other device may produce unexpected & undesirable results.
  • The information given here is purely instructional and educational. There is no guarantee that the instructions given here will work under your specific and unique conditions.
  • Instructions are to be used at your own risk. Android Trickz do not hold any responsibility or liability for whatever happens to your device and you using the info provided in this guide.
  • Read carefully and understand the whole guide before actually using it.

Requirements

  • Although its not necessary to take back up the data before rooting the handset but its better to take precaution and back up all the required data.
  • Minimum charge should be at least 60% so that device may not get turned off during the rooting procedure.
  • Disable security tools installed on your computer so that it may not interrupt the rooting process.
  • Enable USB debugging on your Samsung Galaxy S III GT-I9300. To do this, go to Settings > {} Developer Options > USB Debugging.
  • Download the rooting package (CF-Insecure-SGS3_XX_NEE_ALE8-v1.2.tar).
  • Download Odin required to carry out the rooting procedure.
  • File extracting software like WinRAR, WinZIP, 7-Zip or any other similar software.

Process to Root Samsung Galaxy S III GT-I9300 on XXALE8 Firmware

Follow the below mentioned process to root Samsung Galaxy S3 GT-I9300:
  • First of all download the rooting package and Odin. Extract the rooting package.
  • Open Odin on your computer.
  • Turn off your device to enter it in Download mode. Samsung Galaxy S3 can be entered into Download mode by pressing Volume down Key, Center button (OK button) and while holding both of them simultaneously press the power button until the green robot is visible on the screen indicating that handset is in Download mode.
  • Connect the phone to the computer after which you get the COM port visible highlighted with yellow color as shown in the image.
COM port of Samsung Galaxy S III highlighted in Odin
  • After this, click on “PDA” present on right side and select the file named “CF-Insecure-SGS3_XX_NEE_ALE8-v1.2.tar” from the extracted folder of rooting package.
  • Once the file is selected, click on Start to begin the rooting process. As soon as the rooting procedure is complete, your Galaxy S3 device will be rebooted. Disconnect the phone once home screen is visible.

Necessary Steps To Be Taken In case of Force Close Issue

  • Say if after rooting, device is facing force close issue then in that case turn off the device and enter it into Recovery Mode.
  • Recovery mode can be entered by pressing the Volume Up Key, center Button and while holding both of them simultaneously press the power button.
  • Once the phone is in recovery mode, select the options for Wipe data/factory reset and also select Wipe Cache partition. After this reboot the device by selecting reboot system now. All the options can be accessed by using volume rocker key and to select a particular option press the power button.
NOTE: At any point of time if the process of rooting gets stopped or affected due to any reason then there is no need to worry, just restart the process by re-inserting the battery.
Congratulation, you have successfully rooted your Samsung Galaxy S3. Now you can enjoy certain apps which require root access and also you can install custom ROMs.

(Android Trickz)

Thursday, October 4, 2012

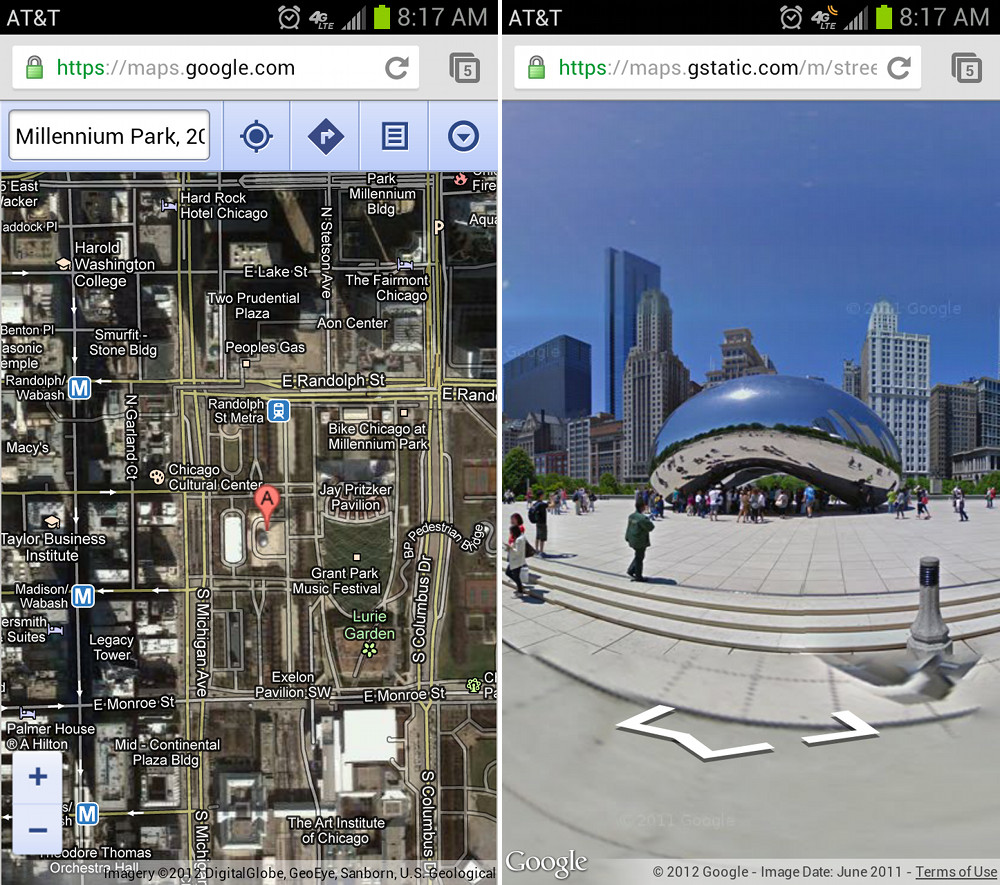
Google Adds Street View to Maps [Mobile Browsers]

,


Google, those kind-hearted mobile enthusiasts, made Street View available through Google Maps in mobile browsers, this morning. While Android users probably couldn’t care less because they have the best mobile turn-by-turn navigation and maps experience on the planet for free in the Google Maps app, this could be used as a backup. Oh who am I kidding, the only reason Google did this, was to let iPhone 5 and iOS6 users know that the mobile version of their Maps service is still better than what Apple is doing.

Thanks, Google.

Tip: Quickly Drag and Drop Text With a Double Tap in Jelly Bean and ICS

,
In Jelly Bean and Ice Cream Sandwich, the Android team built in a quick way to quickly move text around that you may not have seen before. All it takes, is a double tap and hold, and then you have control over the word you would like to move. You can easily rearrange words in a text box or take one and copy it to another. The video above demonstrates it in case that didn’t make any sense.
The trick works perfect on the Galaxy S3 with TouchWiz over Ice Cream Sandwich. As you’ll see in the video, it has its issues on stock Jelly Bean and apparently, other ROMs as well.


(Droid Life)
 

Android Development Tutorials Copyright © 2011 -- Template created by O Pregador -- Powered by Blogger Templates