Friday, October 5, 2012

How To Root Samsung Galaxy S III GT-I9300

,
Now you can root Samsung Galaxy S III. Samsung Galaxy is still not available in many of the markets and XDA developers have already found a way to root the device. Here in this post we will tell you in detail how to root Samsung Galaxy S III.

Root Samsung Galaxy SIII

Before we start the process of rooting Samsung Galaxy S III GT-I9300 make sure that it has XXALE8 firmware. You can check this once you go to Settings > About Phone > Baseband Version.

Warning

  • These instructions are to be only used on Samsung Galaxy S III. Applying the same procedure on any other device may produce unexpected & undesirable results.
  • The information given here is purely instructional and educational. There is no guarantee that the instructions given here will work under your specific and unique conditions.
  • Instructions are to be used at your own risk. Android Trickz do not hold any responsibility or liability for whatever happens to your device and you using the info provided in this guide.
  • Read carefully and understand the whole guide before actually using it.

Requirements

  • Although its not necessary to take back up the data before rooting the handset but its better to take precaution and back up all the required data.
  • Minimum charge should be at least 60% so that device may not get turned off during the rooting procedure.
  • Disable security tools installed on your computer so that it may not interrupt the rooting process.
  • Enable USB debugging on your Samsung Galaxy S III GT-I9300. To do this, go to Settings > {} Developer Options > USB Debugging.
  • Download the rooting package (CF-Insecure-SGS3_XX_NEE_ALE8-v1.2.tar).
  • Download Odin required to carry out the rooting procedure.
  • File extracting software like WinRAR, WinZIP, 7-Zip or any other similar software.

Process to Root Samsung Galaxy S III GT-I9300 on XXALE8 Firmware

Follow the below mentioned process to root Samsung Galaxy S3 GT-I9300:
  • First of all download the rooting package and Odin. Extract the rooting package.
  • Open Odin on your computer.
  • Turn off your device to enter it in Download mode. Samsung Galaxy S3 can be entered into Download mode by pressing Volume down Key, Center button (OK button) and while holding both of them simultaneously press the power button until the green robot is visible on the screen indicating that handset is in Download mode.
  • Connect the phone to the computer after which you get the COM port visible highlighted with yellow color as shown in the image.
COM port of Samsung Galaxy S III highlighted in Odin
  • After this, click on “PDA” present on right side and select the file named “CF-Insecure-SGS3_XX_NEE_ALE8-v1.2.tar” from the extracted folder of rooting package.
  • Once the file is selected, click on Start to begin the rooting process. As soon as the rooting procedure is complete, your Galaxy S3 device will be rebooted. Disconnect the phone once home screen is visible.

Necessary Steps To Be Taken In case of Force Close Issue

  • Say if after rooting, device is facing force close issue then in that case turn off the device and enter it into Recovery Mode.
  • Recovery mode can be entered by pressing the Volume Up Key, center Button and while holding both of them simultaneously press the power button.
  • Once the phone is in recovery mode, select the options for Wipe data/factory reset and also select Wipe Cache partition. After this reboot the device by selecting reboot system now. All the options can be accessed by using volume rocker key and to select a particular option press the power button.
NOTE: At any point of time if the process of rooting gets stopped or affected due to any reason then there is no need to worry, just restart the process by re-inserting the battery.
Congratulation, you have successfully rooted your Samsung Galaxy S3. Now you can enjoy certain apps which require root access and also you can install custom ROMs.

(Android Trickz)

Thursday, October 4, 2012

Google Adds Street View to Maps [Mobile Browsers]

,


Google, those kind-hearted mobile enthusiasts, made Street View available through Google Maps in mobile browsers, this morning. While Android users probably couldn’t care less because they have the best mobile turn-by-turn navigation and maps experience on the planet for free in the Google Maps app, this could be used as a backup. Oh who am I kidding, the only reason Google did this, was to let iPhone 5 and iOS6 users know that the mobile version of their Maps service is still better than what Apple is doing.

Thanks, Google.

Tip: Quickly Drag and Drop Text With a Double Tap in Jelly Bean and ICS

,
In Jelly Bean and Ice Cream Sandwich, the Android team built in a quick way to quickly move text around that you may not have seen before. All it takes, is a double tap and hold, and then you have control over the word you would like to move. You can easily rearrange words in a text box or take one and copy it to another. The video above demonstrates it in case that didn’t make any sense.
The trick works perfect on the Galaxy S3 with TouchWiz over Ice Cream Sandwich. As you’ll see in the video, it has its issues on stock Jelly Bean and apparently, other ROMs as well.


(Droid Life)

How To Activate USB Debugging

,
Do you know how to activate USB debug on Android phones? USB debugging is at times required for application development. There are few handsets which can only be synchronized and connected to computers when USB Debug option is activated. That’s why for all it is necessary how to activate USB debugging and where to find it.

How To Activate USB Debugging on Android Phones

To activate USB Debug on your Android phone first of all make sure that it is not connected with USB cable. If it is, then unplug it otherwise phone will keep on giving you warning to remove the cable.
Now the question is where to find USB Debugging option in your Android mobile. Let’s find it step by step.
  •  Tap the Application icon present on home screen.
There is one faster method, where you can press the menu key on your phone and then tap on settings when the quick launch options appear.
Settings from quick launch
If you go by quick launch method then skip the second step.
  • Once you pressed the application icon, tap on Settings.
Settings in Android
  • Now in settings screen, select the Applications option.
Applications in Settings window
  • Applications will provide you further options where you need to look for Development option. Tap on it to open.
Development options in Application wiondow
  • As soon as you tap on Development, the first option which will appear in front of you will be of USB Debugging. Tap on it to activate it.
USB Debugging option in Development window
  • Your phone would ask further to confirm the activation of setting. Confirm it by tapping on OK button.
Press ok to activate usb debugging
  • Once tapped, a green tick will appear in the check box next to USB Debugging option.
Green tick on activated usb debugging
Now after activating once you plug your Android phone with USB cable, it will notify you about successful USB connection by displaying the android and USB icon in the upper left corner of status bar.
Android and USB icon in status bar
The detailed notification can be seen when status bar is pulled down.
USB Debugging info in status bar
Now your Android phone is ready for communication. This is how you can easily activate USB Debugging option in your Android phone. If you have any further queries then do ask us through your comments.

(Satyesh Kumar Singh )

Wednesday, October 3, 2012

What Is Android Rooting?

,
You must have wondered people talking about Android Rooting. But do you know what is Android Rooting? In this article we will discuss all aspects of rooting your Android.

What is Android Rooting?

Android Rooting or getting root or rooting your Android phone is nothing but the process to modify the operating system which is shipped with your purchased Android device so as to award you complete control over it.
what is Android rooting? Android rooting explained.
Manufacturers and carriers put certain limitations on the phone while selling them in the market. B rooting you can overcome those limitations and extend the system functionalities. Rooting also helps in removing bloatware and installing Custom ROMs.
Word ‘root’ is actually used in Linux OS for the most privileged user just like an Administrator in Windows.

Rooting is usually simple. For most of the cases you will get useful videos and articles on internet that will explain how to root a specific phone model. To search how to root your Android device just search “Yourphonemodel root”.
Rooting process is not something permitted by manufacturers or carriers but they can’t even avert it from happening because the process of rooting usually exploits susceptibility in the Android OS code or in the device drivers which permits the ‘hacker’ to upload a program known as su where su stands for switch user. Su is the program which provides root access to the programs.
There is another program named Superuser Permissions which is usually bundled with all of the root methods. Superuser Permissions gives user a chance to approve or deny requests from any app that requests to utilize root. This program replaces the conventional root password and puts a simple approve/deny prompt for the same. This is not as secure as the password but it is definitely convenient on a mobile device.

WARNING: Rooting has potential risks of bricking the phone which means it could leave your phone non-functional. So before rooting your phone do your homework.

Benefits of Android Rooting

There are many benefits of rooting and few of them are discussed below:
1. Full Control
Android Rooting gives you the power to edit anything in the Android OS. After rooting you can do following things:
  • Use themes
  • Alter system files
  • Change boot images
  • Remove bloatware
To do this just use Titanium backup and delete apps from there. Although there are other methods also available on the web but we prefer using Titanium backup for this purpose.
2. Backup and Restore
Most of the rooted phones have this facility of taking back up of entire system to an SD card. In fact this is a very convenient feature. Say, if you try a new ROM, as you take back up of your phone, wipe it & flash the new ROM and if you don’t like it, simply restore from your backup to get all the same old features back.
One can use ROM Manager, the easiest tool to do this; developed by Koush (famous Android developer). With the ROM Manager you can easily flash a custom recovery image which will be required in order to take backup of your phone and will be used while restoring it.
Recovery image is a unique program which can be booted into outside device’s OS juts like an OS recovery console used in PC. BY default recovery image gives only provide a few options that too mainly related to wiping the phone. Whereas, in comparison to default recovery image; custom recovery image offers a wide variety of options for the same job. It includes scripts that can help in doing things like backup and restore system, fix file permissions, allow you to flash and install custom ROMs.
Normally some command line work is required on PC or on the terminal emulator on phone to flash a custom recovery image but with Koush’s ROM Manager this won’t be required as it should automatically flash a custom recovery image known as ClockworkMod Recovery. The only catch is that it supported only on some of the supported phones which is by the way a long list :) . You can find your phone’s name in this supported phone’s list which is constantly updated by Koush himself.

How To Use ROM Manager?

Its pretty simple to use ROM manager. You just need to download and install the application from Google Play store. Start the application and you will be prompted to allow the application superuser permissions which you have to make sure that you approve it. The very first thing which will be required is flash the ClockworkMod recovery image which we mentioned earlier. It can be done with the help of first option from the app. ROM Manager will then automatically find the latest version of the right custom image for your Android handset, download and install it. Once this is done, you can take backup or restore from an existing backup by using these two options – ‘Manage and Restore Backups’ & ‘Backup current ROM’.
3. Increase Memory Space on Your Phone
Even though Google did introduce Apps2SD officially in Android 2.2 Froyo update still it is up to developers to manually add support for this feature in their apps. Because of this reason it is fairly possible to overflow your device internal memory space.
The easiest way to overcome this problem is to enable most applications to be transferable or movable to SD card. For example, CyanogenMod one of the most popular custom ROM for Android allows its users to force most of the apps to SD even if developers didn’t add this feature. It doesn’t work on all the apps, especially if we talk about keyboard apps and other apps with widgets.
4. Run Applications Meant for Rooted Phones
Yes, it’s true that there are apps with some uniquely enhanced features that can be used on rooted phones only. Few of them are Titanium Backup, ROM Manager, Quick boot, Move2SD Enabler and many more such apps can be used on rooted devices.
5. Remove Bloatware
If your phone is rooted then you can also remove bloatware. Bloatware are nothing but pre-installed apps which comes from  manufacturer or carrier of the device. Most of these pre-installed apps are not useful and if they are removed then it can hellp you in saving some memory.
6. Use Custom ROMs
Well we have already covered, what custom ROMs are. Through the years, Android ROM community has grown greatly and ROMs have been developed for almost all the phones out there in the market. These days custom ROMs are coming major tweaks that can give you an entirely new look, feel and performance. The ROMs can make your Android phone fly by replacing the kernel with highly optimized versions or they can even over-clock the CPU.
Here at Android Trickz, we are developing a series of custom ROM reviews for various phones. So stay tuned for updates.

(Satyesh Kumar Singh)

Create your own ringtone using Ringdroid for Android

,
ringdroid_logo
Android platform provides number of applications that are helpful in numerous ways. Have you ever think of an editor which can be helpful in creating your own tunes? Now its possible with your Android device, Ringdroid is a free Android app that will enable you to create your own ringtones.


ringdroid

With this app you can easily manipulate any of your existing songs on your Android phone and make shorter clips. It’s an open-source ringtone editor from Android that allows user to create their own ringtones, alarm or notification sound from an existing audio file or create new record file. Ringdroid is flexible by nature and provides good user interface.

Android user’s simply needs to set the starting and ending notes of their ringtone by sliding arrows over the timeline screens and tapping Start and End to record the clip. You can simply allocate the ringtone directly to the contact person as there will be an option for doing it. This application is specially designed for passionate music lovers. So what are you waiting for just go for it and feel the musical world.

You can download Ringdroid from Android Market.
or you can use this QR code.
ringdroid

Share bills among friends using Advanced Bill Splitter Android application

,
This seems to be the most handy tool while going out with friends or sharing apartment with friends. It happens that while sharing apartment, groceries, restaurant bills etc. every time you need to seat with the list of bills and calculator to make proper split and if the no. of persons are more the task becomes really time consuming.

advanced_bill_splitter_1 advanced_bill_splitter_2 advanced_bill_splitter_3

Advanced Bill Splitter can solve all your problems regarding sharing. Its is really nice application with more flexibility of adding no. of people and adding the items, taxes. Once added all the needed options, it will auto calculate the share per person with generating in depth receipt, so no one get confused. It also give facility of item based sharing which means you can do more precise splitting.

You can download Advanced Bill Splitter from Android market
or use this QR code.
advanced_bill_splitter

How to automatically reject a call on Android phone

,
Android phone comes with an inbuilt functionality of auto rejecting a call without even ringing your phone! It is so simple and comes with wide range of match criteria for incoming phone call. Now it is the answer for how to set your android phone on auto call reject mode.
How to do it? Just go to Settings –> Call –> Call rejection. Once you are at this step, first you can define auto reject mode. You can set it to off, All numbers or Only black list. I am not sure why one wants to block all numbers but still it might be helpful if you are in some important meeting or just want to take rest without any disturbance.
auto_call_reject_mode_android
The next option is Black list, which allows you to manage numbers in the black list with the option of match criteria to block certain pattern of phone numbers. There are 4 types of match criteria using which you can black list any kind of number you want.
call_reject_match_criteria_android

This is really helpful to get rid of some annoying marketing calls. Also you can block all calls from some country or states as well!

(How to Android!?)

Tuesday, October 2, 2012

Set Data Limits on Android

,


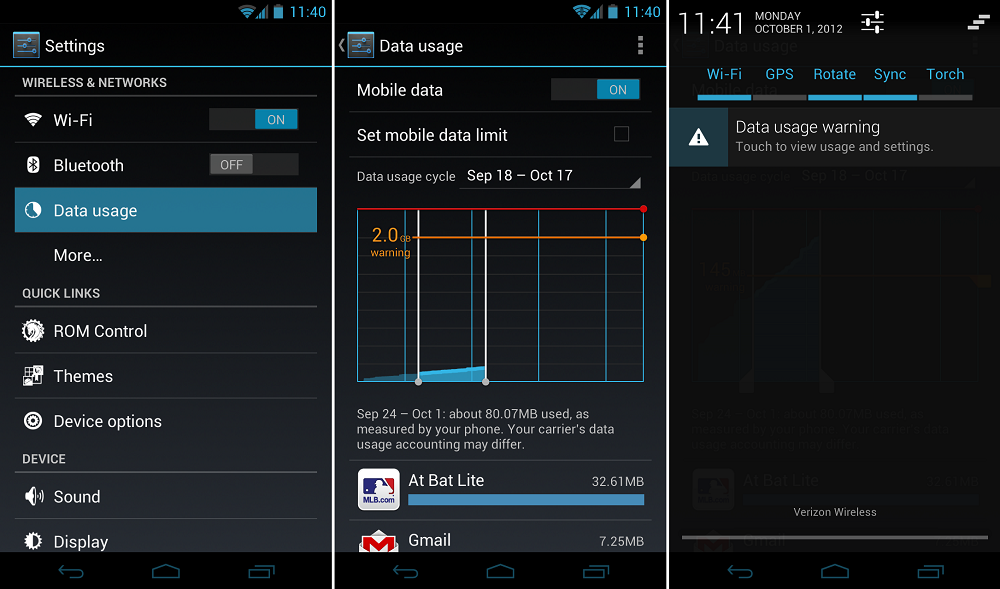
With the introduction of Ice Cream Sandwich and Jelly Bean, Google has enabled Android devices to notify their owners that the device has reached a set data limit. You as the owner can set this limit anywhere from 0.0MB all the way to whatever your plan is set at. If you’re unlimited, then this feature is probably something you won’t be using anytime soon. 
Below we have written out the directions for setting a data limit. These limits can be used as just a warning or as a way for the device to automatically restrict data usage to make sure you don’t go over your carrier’s plan. Additionally, users can set time cycles for the data count to reset, which should usually be set on your billing cycle. If you’re a heavy user, then this feature could save you later down the road.

Instructions:

1.  Open the Settings menu.
2.  Under “Wireless & Networks” select “Data usage.”
If you would like to enable a data limit, check the box for “Set mobile data limit.” Once the limit is reached, the device will disable your mobile connection.
3.  Under “Data usage cycle” set the time of your billing cycle. (Example: Sep 1 – Oct 1)
4.  Using the horizontal orange line, set the limit at which you want the device to disable data.
5.  Using the two vertical white lines, set the range of time you would like calculated.
6.  Once your mobile data reaches this number, it will notify you in the notification area and disable data.
Hopefully this can save some of you data hogs from going over your limits. Happy streaming!

(droid life)

Monday, October 1, 2012

How to Rename Android Apps and Change their Icons

,
Using APK Editor once can easily rename an Android application and change its default icon even for a non-rooted android phone. So let’s see how it’s done.

Rename and Change Android Apps Icon

Step 1: First of all, we will need the APK package of the app you want to rename and change the icon for. If you don’t have the APK with you, but the app is installed on your phone, you can easily compile its APK using the Astro file manager. We have already discussed how you can make APK files of the installed apps while talking about transferring the installed apps from one device to another over Bluetooth.

Step 2: Download and extract APK Edit v0.4 to a folder in your computer. As APK Edit v0.4 needs Java to work, please install it if you don’t already have it.

Step 3: Now that you have both – the APK file and the APK editor – let’s start with the editing. Launch APK Edit.exe that you extracted in the previous step and load the APK file you want to edit.

apkedit.exe


Step 4: The tool will now read the file and display the app icon and name under the General tab. You can edit the name text field directly and click on the icon image to search for a new icon. Please make sure that the icon file is in PNG format and is a perfect square in dimensions.

initial apk
modded apk

Step 5: After you are done with the editing, click on the Apply button to save the changes.
Although the app gives you an option to directly push the apps to the device using a data cable, I would suggest you to transfer the modified APK file to your internal hard disk using Wi-Fi or data cable and then install it on the device.
Renamed Android File  (2)Renamed Android File  (1)
Even while installing the file you will see the changes in the file name and the app icon. After the app’s installed, you will see the app with the user defined icon and name.

Conclusion

You can use this trick to mask your secure applications on android. But do remember that the trick is only meant for personal use. Don’t try to change the name and icon of the app and publish it as your own work

(guidingtech)


Android Development Tutorials Copyright © 2011 -- Template created by O Pregador -- Powered by Blogger Templates