Friday, September 28, 2012

Android RESTful/OAuth upload file to Dropbox

,

Introduction 

A few of my applications generate files locally and although  methods to transfer those files like Bluetooth/Wifi transfer , email and similar are included users are heavily using the Cloud so the option to write the files to the Cloud was due pronto. We can accomplish this  using the RESTful API/services from the Cloud provider.
 RESTFul services are becoming a predominant Web service  nowadays due to its simpler style specially its stateless mode. Clients on different platforms can access resources via this architecture with very low complexity. Clients need to authenticate to the server and  the OAuth is the  method of choice since it is an open and straightforward standard with a decent level of security. In this article we will walk through an Android implementation of uploading a file to dropbox using their RESTFul API which utilizes OAuth authentication.
Download source code - 150.2 K

Background

Most of the big players like Google, Facebook, Tweeter, etc. offer RESTful services with OAuth authentication.
The OAuth carries out the authentication with these few steps:
    
  • Ask the server for permission to request the user to access his/her account. To carry out this the client (e.g. our code) needs a pair of key/secret_word credentials which is available from the provider upon request.
  • Upon success we then ask the user for permission this usually requires for him/her to log in to the Dropbox account.
  • Upon success  a new set of key/secret_word credentials is provided and with this set handy all of the available APIs/methods can be accessed using this pair to sign each request, in our case we can upload files, read user info , etc.  
These RESTful APIs are nothing but URLs which are sent via a GET or POST http request. The OAUth authentication  requires a call to these URLs with a set of predefined args that include timestamps the key/secret_word set and the encryption type(SHA1, etc), this time stamp prevents from somebody else grabbing the URL and trying to call  it again since the time stamp will be different at a later time providing a good layer of security.
The syntax is straightforward:
<URL from the RESTful API>?<OAuth args ...>&<Dropbox args...>
For instance to start the Dropbox OAuth we need to call the URL below without any DropBpx args just the regular OAuth
https://api.dropbox.com/1/oauth/request_token?<OAuth args ..>

oauth_consumer_key=<key> provided by Dropbox
oauth_token=<secret_word> provided by Dropbox
oauth_nonce=<a number used once> a random string that is meant to uniquely identify each signed request.
oauth_timestamp=<when the request is sent>
oauth_signature_method=HMAC-SHA1 (it could be any other standard encryption used to generate the nonce)
oauth_version
The combination of nonce and timestamp takes the load off the server and allows  the Service Provider to only keep nonce values for a limited time. The particular signature specification can be acquired and implemented internally in our code but there are quite a few pre-cooked libraries already so no need to reinvent the wheel here we will be using the Signpost library to help us with the OAuth authentication steps.

Finally RESTful  providers like Dropbox also offer SDKs specific to the platforms (e.g. items for Android, iPhone, etc) but  these are nothing but wrappers of the basic RESTful APIs implemented for the specific platform.

1. Implementing the code 

The audience here is supposed to be well versed in Java/Android already so we will skip  the basics and get to the meat of the topic. Our basic screen looks like this.

1.1 Prerequisites: Manifest and Jar libraries

The Manifest needs to include a section that allows our App access to the net. Also our application needs an intent-filter so that our browser fires up properly and a definition of our dummy schema/URL used when we come back to our application from the browser.
<activity android:name=".main"
           ....
                  
            <intent-filter>
                <action android:name="android.intent.action.MAIN" />
                <category android:name="android.intent.category.LAUNCHER" />
            </intent-filter>
            ...
            
            <intent-filter>  
                <action android:name="android.intent.action.VIEW" />
                <category android:name="android.intent.category.DEFAULT" />
                <category android:name="android.intent.category.BROWSABLE" />
                <data android:scheme="myrest" android:host="myStep.com"  />
            </intent-filter>   
</activity>
...
<uses-permission android:name="android.permission.INTERNET">        
</uses-permission> 
 
We need to download the Signpost jar library and add it to our project ,we just drop it to the libs folder and add it 
Also we need to keep a reference to the Dropbox RESTful APIs.

1.2 Getting the credentials to sign an API request

Call the server properly to start up the process, the calls to the SingPost methods are highlighted
private static CommonsHttpOAuthConsumer consumer;
private static CommonsHttpOAuthProvider provider ;

...
// need to request this
String DropB_key="<request this From DropBox>";
String DropB_secret="<request this From DropBox>";
    
// from dropB API
String  request_url = "https://api.dropbox.com/1/oauth/request_token";
String  authorization_url = "https://www.dropbox.com/1/oauth/authorize";
String  access_url ="https://api.dropbox.com/1/oauth/access_token";    
    // to come back to our App after user authorizes
String  callBack_url ="myRest://myStep.com";   
    

...
// ask authorization to request the user
consumer = new CommonsHttpOAuthConsumer(
     DropB_key, DropB_secret);

provider = new CommonsHttpOAuthProvider(
    request_url, access_url, authorization_url); 

// we r good not let's ask the user's permission
try
{
  String authURL = provider.retrieveRequestToken(
            consumer, callBack_url);
        
  Intent intent2 = new Intent(Intent.ACTION_VIEW);

  intent2.setData( Uri.parse(authURL) );
  startActivity(intent2);
                      
}catch (Exception e)
{}
As you can see the highlighted Signpost library methods make it very straightforward to start out the authentication process taking care of all of the gory details. When we call the user for authorization we will fire a browser to get back to our App the callBack_url is set to a dummy schema and URL that we can catch  on the onResume event and wrap up the process.
..    @Override
public void onResume() 
{
    // upon confirmation the call back will come to here.
    super.onResume();

    Uri uri = this.getIntent().getData();
        
    ...
        
                
    // so it is coming back from the auth, catch it when it comes to our dummy URL
    if( uri != null)
    {
           ...    
        
        // now let's do the real stuff
        if( uri.getHost().equals("myStep.com"))
        {
            //grab the tokens
            String parms = uri.getEncodedQuery();
                
            // perfomr the write thru
            try {
    
                // grab the token/secret items to carry on
                String verifier = uri.getQueryParameter(OAuth.OAUTH_VERIFIER);
                
                provider.retrieveAccessToken(consumer, verifier);
                String ACCESS_KEY = consumer.getToken();
                String ACCESS_SECRET = consumer.getTokenSecret();

                Log.d("OAuth Dropbox", ACCESS_KEY);
                Log.d("OAuth Dropbox", ACCESS_SECRET);
            
                ...
We have got the credentials to sign requests to the available RESTful APIs, we are good to go now.

1.3 Request user info and upload a file to Dropbox 

With the credentials acquired the rest is straightforward, we get the proper API (a URL from Dropbox) and carry out either a GET or a POST as specified by the API, Dropbox returns either a few values formatted as URL arguments, or a JSON set.
Each request must be signed with those credentials
We ask Dropbox for current user info below:
...
consumer.setTokenWithSecret(ACCESS_KEY, ACCESS_SECRET);

String uRL_file_list_req="https://api.dropbox.com/1/account/info";
HttpClient httpclient = new DefaultHttpClient();  
HttpGet request = new HttpGet(uRL_file_list_req );  

consumer.sign(request);


ResponseHandler<String> handler = new BasicResponseHandler();  
try {  
    result = httpclient.execute(request, handler);  
} catch (ClientProtocolException e) {  
    e.printStackTrace();  
    Toast.makeText(getApplicationContext(), "Protocol failure uploading the file",
            Toast.LENGTH_SHORT).show();
    return;
} catch (IOException e) {  
    e.printStackTrace();
    Log.e("******",Log.getStackTraceString(e)); 
    Toast.makeText(getApplicationContext(), "IO failure uploading the file",
            Toast.LENGTH_SHORT).show();
    return;
}  


JSONObject json_data = new JSONObject(result);
JSONArray nameArray = json_data.names();
JSONArray valArray = json_data.toJSONArray(nameArray);

...
We upload a text file with contents of the simple Android UI above, changing the proper MIME type and encoding the contents properly is all it is needed to upload any other file type like an image.
//
// last but not least let's upload a file
// default parm is overwritten so we keep it simple
String textStr = myContents.getText() + "";  
String fileName = fName.getText() + "";  


uRL_file_list_req="https://api-content.dropbox.com/1/files_put/"  + 
         "sandbox/" + fileName ; //+ "?param=val" ;

consumer.setTokenWithSecret(ACCESS_KEY, ACCESS_SECRET);


HttpPost request3 = new HttpPost(uRL_file_list_req );  


request3.addHeader("Content-Type", "text/plain"); 
request3.setEntity(new StringEntity(textStr)); 

...

consumer.sign(request3);


result="";
try {  
    result = httpclient.execute(request3, handler);  
} catch (ClientProtocolException e) {  
    e.printStackTrace();  
    Log.e("$$$$$$$",Log.getStackTraceString(e));
    Toast.makeText(getApplicationContext(), 
            "Protocol failure uploading the file",
            Toast.LENGTH_SHORT).show();
    return;
    
} catch (IOException e) 
{  
    e.printStackTrace();
    Log.e("******",Log.getStackTraceString(e)); 
    Toast.makeText(getApplicationContext(), 
            "IO failure uploading the file",
            Toast.LENGTH_SHORT).show();
    return;
}  

// parse out the data
json_data = new JSONObject(result);
nameArray = json_data.names();
valArray = json_data.toJSONArray(nameArray);

Toast.makeText(getApplicationContext(), "Succes!! - " + 
        valArray.getString(7) + " " + valArray.getString(10),
        Toast.LENGTH_SHORT).show();

httpclient.getConnectionManager().shutdown(); 
...

2. Caveats  

The only issue here  is that the  Dropbox documentation reference  is a bit blurry,  when you  need to carry file transfer operations the URL is of the form
https://api-content.dropbox.com/1/files/<root>/<path>
<root> is a string with a value of either dropbox or sandbox , when you request the initial credential pair from Dropbox it defaults you in Folder mode with root as sandbox. Later on you can request to change the status to production so users can use your App. It will create a folder under Apps with the name of your application.
<path> is the path to the actual file and it is relative to the App folder, e.g., to stat file test.txt sitting in the Apps/myCoolApp/ folder the above should be
https://api-content.dropbox.com/1/files/sandbox/text.txt

3. Final Thoughts  

Very straightforward as you can see just a matter of getting through the specification of the Dropbox API. Having the credential keys handy and stored as a local preference in your app can allow further queries or file operations to Dropbox from your application without any other user interaction with Dropbox.
The included sample code has the little extra details to get this working on Android since we are calling the RESTful API and not the SDK it is easy to port over to other platforms. Obviously the sample code is just a bare sample to get things going.

License

This article, along with any associated source code and files, is licensed under The Code Project Open License (CPOL)

About the Author

becker666
Software Developer (Senior) BSC Inc
United States United States
Member

Thursday, September 27, 2012

Tricks: Add Multiple Google Accounts to Your Android Device

,

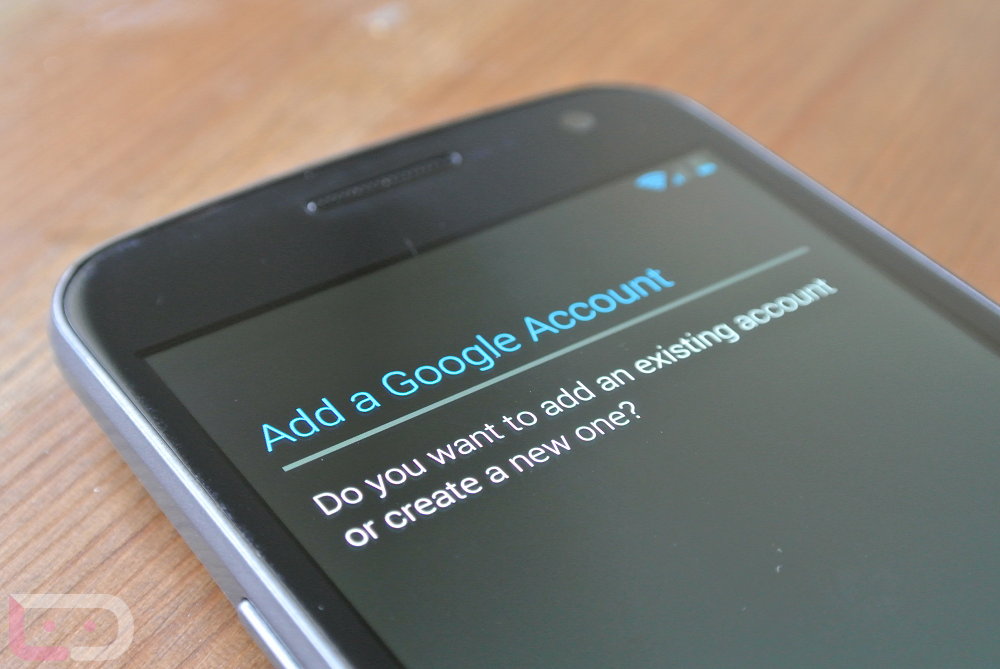
Like many others, I have a few Google accounts. One which was my personal before I came to Droid Life and of course my business one that I use now. With Google allowing me to sync multiple accounts on one device, it allows me to receive emails from both accounts and also use services under different accounts as well such as Picasa, Google Play, and more.
Sometimes, you’re not the only one that uses your Android device. For example, if you have an Android tablet like the Nexus 7, maybe your children like to use it or your girlfriend. For times like these, it’s great that Google allows you to have multiple Google accounts tied to a single device. While your account can remain professional and business-centric, your other Google account can have all of the nonsense games and applications that one may download from Google Play.
Down below, we’ll go over how to set up multiple Google accounts on your Android device and you can start utilizing all of your accounts at once like a champion.

How to add multiple accounts:

1.  From the main homescreen, open up your main Settings menu.
2.  Under “Accounts,” select “Add account.”
From this next page, you will choose which type of account you will add. Depending on what apps you have installed will determine which options you have. If you have nothing installed yet, you’ll be given options for Google, Corporate, and Email.
3.  For this example, select “Google.”
4.  If it is an already existing Google account, simply add in your username and password.
5.  By selecting “New”, your device will have you create a new Google account for use on your Android device.
Now that you have another Google account set up on your device, you can use it for another user on Google Play or whatever else you may need it for.

Alternative method:

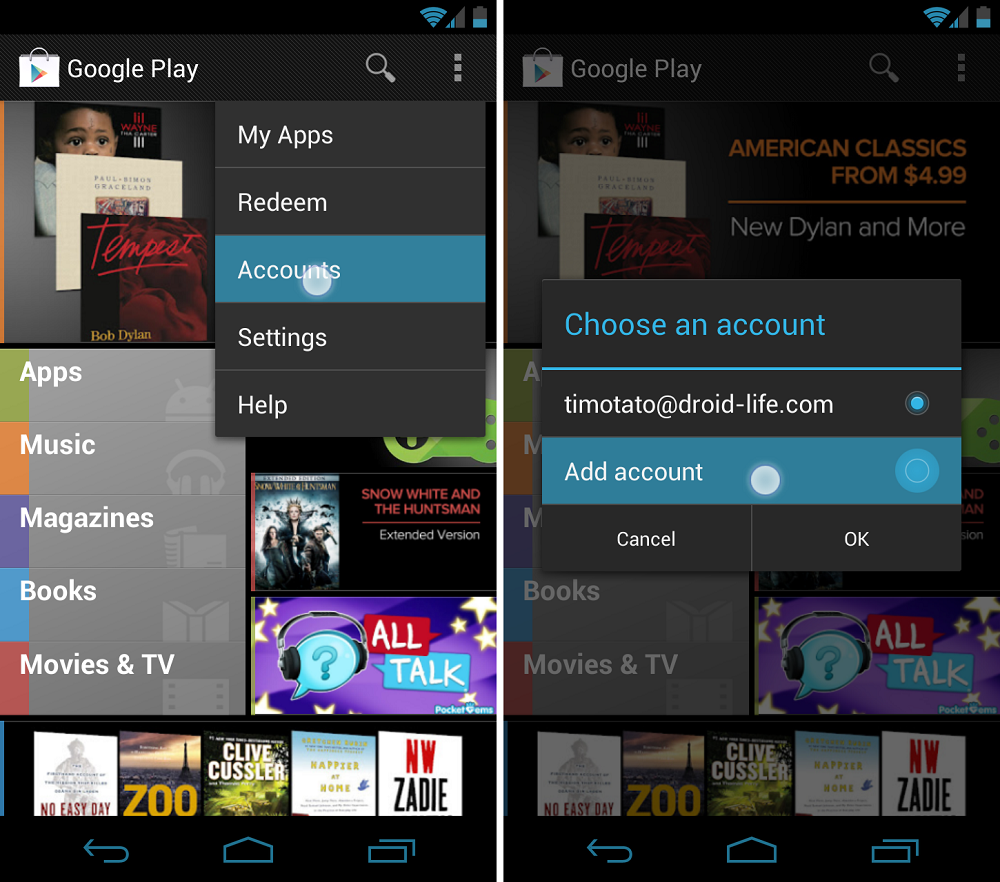
The quickest way to add another Google account is from the Google Play application.
1.  From anywhere in Google Play, hit the settings menu.
2.  Select “Accounts.”
3.  The window will display the main account associated to the device and underneath will show “Add account.”
4.  Select “Add account.”
5.  From here, enter in the username and password to the Google account you wish to add to the device.
Once signed in, you’re free to roam the Play store with multiple accounts on the device.

(droid-life)

How to: Quickly Share Photos on Android

,

Why else would we be taking tons of pictures if not to share them with the people we love? Today’s smartphones are coming equipped with powerful cameras that can capture some stunning images with the quick press of a button. The one above is certainly not “stunning” but it’s cute nonetheless.
In this post, we’ll be going over how to share pictures you’ve taken to social networks, through email, and other means.


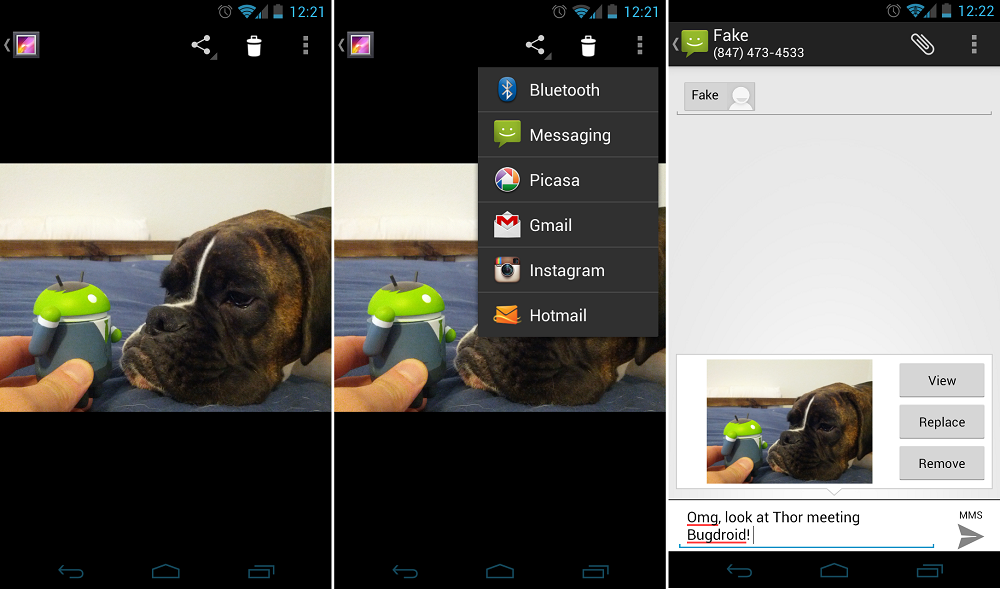
Taking a photo and sharing it through MMS:

“Just send me a picture of it!” We’ve heard that before. Sometimes, instead of fully explaining something, people just do better with a picture. So, let’s go over taking a picture and sending it through your text messaging application.
1.  Using the Camera app, snap your picture.
2.  Tap on the thumbnail that is created of the picture you just took.
3.  In the top right, hit the “Share” icon. *Looks like 3 dots connected with lines*
4.  This will drop down the different ways you can share the photo.
You’ll see options for emailing it, sending it through MMS, and any other apps like Instagram and Facebook if you have those installed.
5.  Hit “Messaging.”
6.  Select which contact you want to send the picture to, and hit “Send.”
Ready to take over Instagram now? Let’s do this!

Sharing photos to Instagram and other Social Networks:

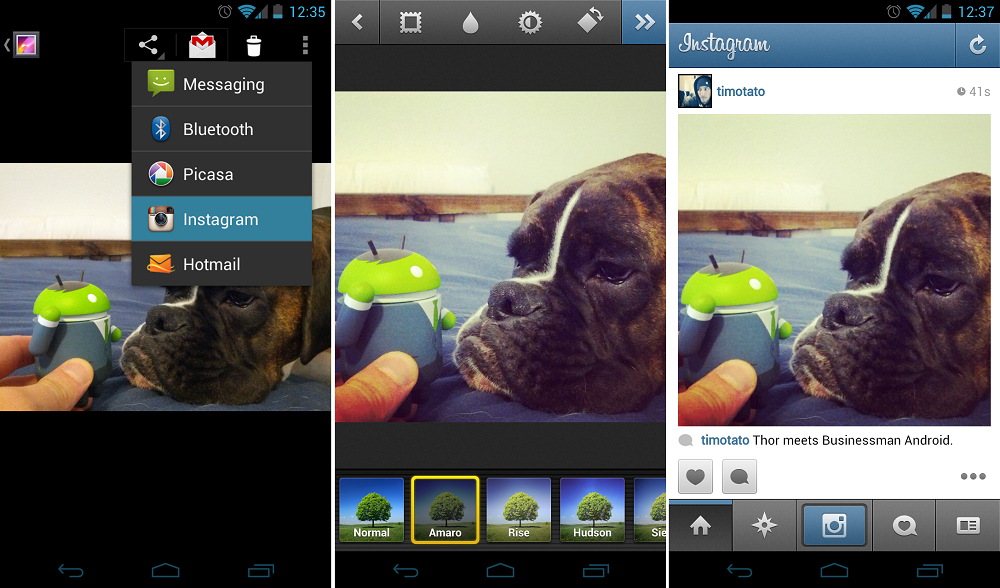
Now let’s talk about sharing the “lolz” with your friends on Social Networks. Apps like Facebook, Twitter, Instagram, and a ton more allow you to instantly upload photos from your Android device. Here’s how to do it.
1.  Find a photo you want to share in the Gallery app.
This is where all of your pictures are kept.
2.  Click on the image.
3.  Hit the “Share” button.
4.  Select which application you want to share the photo with.
I have chosen Instagram in my example.
5.  Write whatever description you want to add and hit “Upload.”
It’s that easy! Now everyone on your Friends List can see your awesome photos.

(droid-life)

Managing Notifications in Jelly Bean

,

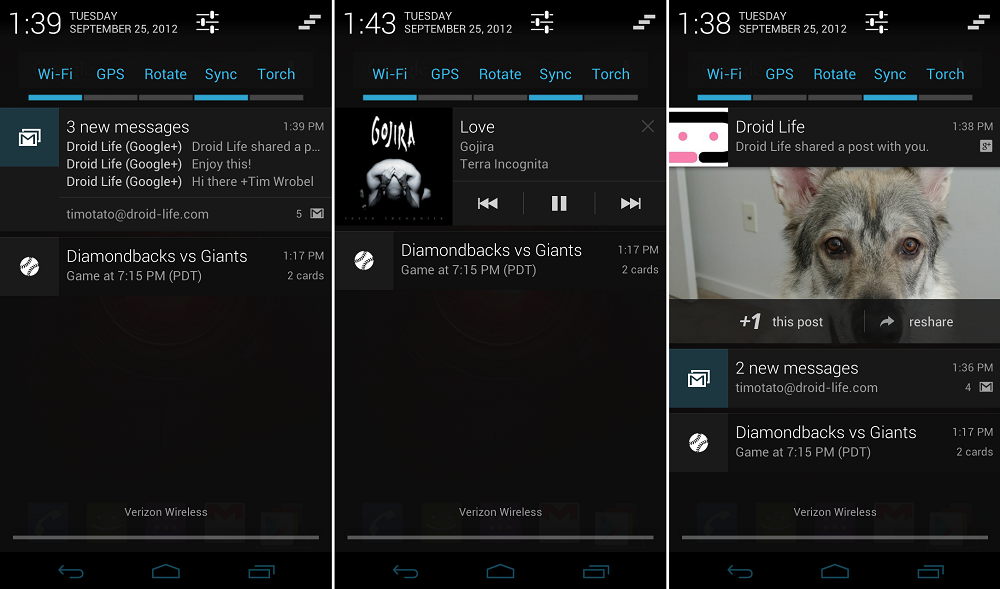
When Google introduced Jelly Bean at this year’s Google I/O event in San Francisco, one of the features that struck as us as really cool was Jelly Bean’s new notifications. With Jelly Bean, some applications are able to show interactive notifications and also expandable notifications that allow you to take certain actions straight from the notification bar.
For now, only certain applications support expandable notifications. But if anything is for certain, it’s that Google will be adding more and more of these interactive notifications as time goes by. Here’s a quick rundown of the specific apps that support the new system and what they look like.


Gmail | Google Music | Google+ 

When an email from Gmail is received, it will display as a regular looking notification, but you can choose to preview a small portion of the email by two-finger sliding down on the notification. Also, if you have multiple unread messages in your inbox such as I do above, you will see the first few subject lines and senders in your notifications area. You can also two finger slide up to collapse the notifications or slide them away to either the right or left to dismiss it.
With Google Music, when not in the actual app and you have music playing, you can control the app from the notification bar. You’re given a skip, backwards, and play/pause button as well as album art and track info. If you collapse this notification, you will only be given options for pausing/playing and skipping music. No backtracking.
On Google+, when you’re tagged in someone’s post, it’s sent straight to your device for a “+1.” You can also choose to share things straight from your notification bar if you so choose. But do note, these notifications will only appear if you have Google+ installed and are signed into the application.

Missed Calls | Taking screenshots | Swipe Away Notifications 

If you miss a call, Google has enabled you to take action straight from your notification bar. From the notification, you can either call back that poor soul or even send them a text.
Another neat notification appears when you take a screenshot. In the notification bar, it will show you a small thumbnail of the image and allow you to share it through an app straight form the notification area when it’s expanded. When collapsed, you’ll just have to click on it and it will take you to the gallery and you can share it or edit it from there.
Last but not least, is the ability to swipe away notifications. Any notification for an app that isn’t currently running (for example, you can’t swipe away the Google Music app if it’s running) you can simply swipe it away to either the left or right of your screen. That way, instead of having to dismiss all notifications, you can do them individually. This was introduced in Ice Cream Sandwich, so many of you should be familiar with it.

(droid-life)

Sending a SMS Message from an Android Application

,

Introduction

We often come across situations where we are required to send a text message from our Android app. In this article we will explore all possible ways to achieve this simple yet very useful task.

Download Source Code - 25 KB

Background

There are two possible ways to send a text message from an Android app
1. The first way is to send it programmatically from your application.
2. The second way is to send it by invoking the built-in SMS application.
In this article we will explore both the scenarios one by one.

* If you are new to Android app development, do refer to the Demo Project section of this article for some useful tips.

1. Sending a SMS programmatically from your application

Include the following permission in your AndroidManifest.xml file -
<uses-permission android:name="android.permission.SEND_SMS" />
Import the package -
import android.telephony.SmsManager;

Code to send a SMS -

public void sendSMS() {
    String phoneNumber = "0123456789";
    String message = "Hello World!";

    SmsManager smsManager = SmsManager.getDefault();
    smsManager.sendTextMessage(phoneNumber, null, message, null, null);
}
The method sendTextMessage of class SmsManager sends a text based SMS.
Method Detail
public void sendTextMessage(String destinationAddress, String scAddress, String text, PendingIntent sentIntent, PendingIntent deliveryIntent)
Details about the parameters that the method accepts can be found here.
If you use the code above you will able to send messages with length less than or equal to 160 characters only.

Code to send a long SMS -

public void sendLongSMS() {
 
    String phoneNumber = "0123456789";
    String message = "Hello World! Now we are going to demonstrate " + 
            "how to send a message with more than 160 characters from your Android application.";

    SmsManager smsManager = SmsManager.getDefault();
    ArrayList<String> parts = smsManager.divideMessage(message); 
    smsManager.sendMultipartTextMessage(phoneNumber, null, parts, null, null);
}
The method sendMultipartTextMessage of class SmsManager sends a multi-part text based SMS
Method Detail
public void sendMultipartTextMessage(String destinationAddress, String scAddress, ArrayList<String> parts, ArrayList<PendingIntent> sentIntents, ArrayList<PendingIntent> deliveryIntents)
Details about the parameters that the method accepts can be found here
Note
The method divideMessage of class SmsManager divides the message text into several smaller fragments of size 160 characters or less.
* Refer to the Points of Interest section of this article for a useful tip.

2. Send a SMS by invoking the built-in SMS application using Intents.

To invoke the SMS application via intents we have to do the following:
- Set the action to ACTION_VIEW
- Set the mime type to vnd.android-dir/mms-sms
- Add the text to send by adding an extra String with the key sms_body
- Add the phone number of the recipient to whom you wish to send the message by adding an extra String with the key address
Note:
- The last two steps are optional, if you don't wish to specify the message text or the recipients you can ignore these steps.
- If you wish to set multiple recipients use semi-colon ';' as the separator in the string passed as the address

Code to send a SMS using Intents

    
public void invokeSMSApp() {
        Intent smsIntent = new Intent(Intent.ACTION_VIEW);

        smsIntent.putExtra("sms_body", "Hello World!"); 
        smsIntent.putExtra("address", "0123456789");
        smsIntent.setType("vnd.android-dir/mms-sms");

        startActivity(smsIntent);
}

Points of Interest

If you choose to send messages programmatically and wish to add the message sent from your application in the native 'Messages' application of Android in the 'Sent' folder, here is the code to achieve it using Content providers -

Code to save a SMS in 'Sent' folder of native 'Messages' application

Include the following permission in your AndroidManifest.xml file -
<uses-permission android:name="android.permission.WRITE_SMS" />
<uses-permission android:name="android.permission.READ_SMS" />
You will have to add both WRITE_SMS and READ_SMS permissions.
Add the following imports -
    import android.net.Uri;
    import android.content.ContentValues;
Insert the below code where you wish to perform the operation -
    ContentValues values = new ContentValues(); 
              
    values.put("address", "0123456789"); 
              
    values.put("body", "Hello World!"); 
              
    getContentResolver().insert(Uri.parse("content://sms/sent"), values);

Demo Project

I have created a demo project which implements all the scenarios as discussed in this article.
I have used EditText widget for the Phone Number and Message input. Here I'd like to mention two XML attributes that I have used -
  • android:hint This string is displayed as a hint to the user when the field is empty. This will give your application a more native look and feel.
  • android:inputType="phone" (for Phone Number field) This signals the input method (IME) that this field should accept only valid Phone Numbers. This will save you from validating user input.

Which way to go....

Both the ways have their own set of pros and cons. If you decide to use Intents to send text messages from your application then no additional permissions are required but it will become a two step process, for instance if the user presses any button in your app to send SMS the intent will be displayed where he/she will have to press send; whereas if you decide to do it programitically you might also have to check for the result.

Hope this small article helps someone out there.

Happy Coding!

History

- September 21, 2012; First version

License

This article, along with any associated source code and files, is licensed under The Code Project Open License (CPOL)

About the Author

gupta.avinash
Architect
India India
Member

Friday, September 21, 2012

10 cool tips and tricks for Jelly Bean

,
It has been a little over a month now since Google made its big announcement about the newest Android flavour

10 cool tips and tricks for Jelly Bean

It has been a little over a month now since Google made its big announcement about the newest  flavour of Android. The search giant unveiled Android 4.1, codenamed as yet another sweet treat, Jelly Bean. Although the version number is only incrementally greater than the previous Ice Cream Sandwich (Android 4.0) and not a full-fledged version number improvement (we had expected it to be called Android 5.0), there are a few remarkable changes that one can look forward to. Google along with some partners have begun rolling out Jelly Bean updates. The lucky few who have managed to lay their hands on it can try these tips and tricks.

Launch 'Google Now'
When Google announced Jelly Bean, the new ‘Google Now’ was one of the most highlighted features. This unique feature has been designed to show you just the right information at the right time, be it weather, location, sports scores and so on. It negates all the digging otherwise required to get to a particular app for information, and presents it all in the form of cards. Jelly Bean users can quickly launch Google Now from the home page or while other apps are open too. Long press the main Home button on the home page and a white semicircle pops out with the Google logo printed on it. Now, just drag your finger towards the logo and it will instantly launch Google Now. The Google Now function can also be launched by pressing the Back button or the Apps Drawer button on the main page and then moving your finger towards the same semicircle and logo that appears on the screen.
Quick launch

Quick launch


Notifications
While Jelly Bean retains the familiar slide-down notifications bar, it has added some cool improvements that make it even more convenient to use. Android’s notification bar is something many Apple fiends may envy. The quick alerts, all in one place, add ease and convenience. With the new Jelly Bean version, you will notice that it lets you expand a few notifications, offering a sort of preview, especially for email notifications. To get rid of any of the notifications simply swipe it sideways. What we really liked is the Share option that pops up in the notifications bar.

Call out ‘Google’
The popularity of Apple's Siri seemed to have compelled Google to start its own Project Majel, and the result is its own voice commands feature—Google Assistant. Google has been placing a lot of emphasis on its voice-based features lately, but didn’t make much hullabaloo about about it during the Jelly Bean launch. Nevertheless, the search giant has come up with some nifty support for voice-based functions. Whether in Google Now or while typing in Google Search, simply call out ‘Google’ and your command is recognized as a Google Voice Search command. So, if you say 'Google' out loud , the Voice Search option pops up instantly. We tried some voice commands such as pulling up maps of cities and voice dialling and after a little struggle with the accent; it worked quite well. However, you will notice a dearth of local Indian search results.

Face Unlock with a Blink
We know that Ice Cream Sandwich introduced a face unlock option, but Jelly Bean certainly improves this feature. Now, with Face Unlock, Jelly Bean users can enable a ‘liveness check’ option. This has been added to avoid security issues that could be caused because the original Face Unlock system could be fooled by static images such as a photo of the rightful owner. With the liveness check option, the owner doesn’t just have to hold up his/her face to unlock the device but also has to blink. If the software doesn’t detect a blink, it will take the user to the Pattern Unlock screen as a fallback.
Screenshot and security


Screen Capture
Very simply, Jelly Bean comes with built-in screenshot functionality, something many Android fans have been waiting for. This ensures that the user doesn’t need to root the device or employ third-party apps just to take a photo of what's happening on screen. Taking a screenshot is simple, just press the volume down and power buttons together. The device will quickly take a snapshot of the screen and you will find it in your notifications. You then have options to edit, crop, delete, and share the photo. This makes sharing and even making changes to the captured screenshot much simpler than before.

Say it offline
Speech-to-text has been an underused Android feature for some time now. What might finally change that is the fact that you can now convert speech into text without a Wi-Fi or data connection. Yes, voice typing has gone offline with Jelly Bean, as the recognition can happen on the device itself rather than having to be uploaded to a remote server.

Smart Widgets
In Jelly Bean, widgets have become smarter. Google has given them some cool manners, as they can now automatically reposition themselves to make room for each other. You don’t have to manually move widgets to place another as they are now smart enough to move and make space. Try dragging an app icon from the main menu onto the homepage and you will see this in action.
For fun
For fun


Delete App
Earlier, deleting an app would need one to long-press on the icon till it becomes editable and then manually drag it onto the ‘trash bin’ that appears on the upper side of the screen. However, Google has simplified it further. One only needs to fling it upwards and the app is deleted—it's as simple as that.

Its raining Jelly Beans!
If you want to indulge in some fun while using your newly upgraded device, then head straight to the Settings screen. Under Settings, click on About Phone and then tap on the Android version a few times. This will take you to a screen that displays one big Jelly Bean. Keep tapping it and more Jelly Beans will start flying across the screen. You can fling and swipe them around for fun. This doesn't really add any convenience or benefit to your usage, but it’s fun to try.

Barrel Roll
As part of Google's regular antics, it had introduced a "barrel roll" trick for desktop browsers. Type "do a barrel roll" as a search term, and Google would demonstrate the power of modern browsers by flipping everything around on your screen. The company is trying hard to show off its voice-enabled capabilities, so your Android device can also do a barrel roll if you speak out the same command. Again, this is of no practical benefit, but it's great fun to show off.

If you have any more tips and tricks to add to this list, do let us know in the comments section below.

(tech2)

Opengles Animation Example (Part II)

,
This example shows how to use opengles to create animation in android.
Algorithm:
1.) Create a new project by File-> New -> Android Project name it OpenglesAnimationExample2.
2.) Add skycubemap0.jpg to skycubemap5.jpg files attached with this post to res/raw folder.
3.) Run for output.
Steps:
1.) Create a project named OpenglesAnimationExample2 and set the information as stated in the image.
Build Target: Android 4.0
Application Name: OpenglesAnimationExample2
Package Name: com. example. OpenglesAnimationExample2
Activity Name: OpenglesAnimationExample2Activity
Min SDK Version: 14

2.) Open OpenglesAnimationExample2Activity.java file and write following code there:
package com.example.OpenglesAnimationExample2; import java.io.IOException;
import java.io.InputStream;
import java.nio.ByteBuffer;
import java.nio.ByteOrder;
import java.nio.CharBuffer;
import java.nio.FloatBuffer;
import javax.microedition.khronos.egl.EGLConfig;
import javax.microedition.khronos.opengles.GL;
import javax.microedition.khronos.opengles.GL10;
import javax.microedition.khronos.opengles.GL11;
import javax.microedition.khronos.opengles.GL11ExtensionPack;
import android.app.Activity;
import android.graphics.Bitmap;
import android.graphics.BitmapFactory;
import android.opengl.GLSurfaceView;
import android.opengl.GLU;
import android.opengl.GLUtils;
import android.os.Bundle;
import android.util.Log;
public class OpenglesAnimationExample2Activity extends Activity {
    private GLSurfaceView mGLSurfaceView;
    private class Renderer implements GLSurfaceView.Renderer {
        private boolean mContextSupportsCubeMap;
        private Grid mGrid;
        private int mCubeMapTextureID;
        private boolean mUseTexGen = false;
        private float mAngle;
        public void onDrawFrame(GL10 gl) {
            checkGLError(gl);
            if (mContextSupportsCubeMap) {
                gl.glClearColor(0,0,1,0);
            } else {
                gl.glClearColor(1,0,0,0);
            }
            gl.glClear(GL10.GL_COLOR_BUFFER_BIT | GL10.GL_DEPTH_BUFFER_BIT);
            gl.glEnable(GL10.GL_DEPTH_TEST);
            gl.glMatrixMode(GL10.GL_MODELVIEW);
            gl.glLoadIdentity();
            GLU.gluLookAt(gl, 0, 0, -5, 0f, 0f, 0f, 0f, 1.0f, 0.0f);
            gl.glRotatef(mAngle,        0, 1, 0);
            gl.glRotatef(mAngle*0.25f,  1, 0, 0);
            gl.glEnableClientState(GL10.GL_VERTEX_ARRAY);
            checkGLError(gl);
            if (mContextSupportsCubeMap) {
                gl.glActiveTexture(GL10.GL_TEXTURE0);
                checkGLError(gl);
                gl.glEnable(GL11ExtensionPack.GL_TEXTURE_CUBE_MAP);
                checkGLError(gl);
                gl.glBindTexture(GL11ExtensionPack.GL_TEXTURE_CUBE_MAP, mCubeMapTextureID);
                checkGLError(gl);
                GL11ExtensionPack gl11ep = (GL11ExtensionPack) gl;
                gl11ep.glTexGeni(GL11ExtensionPack.GL_TEXTURE_GEN_STR,
                        GL11ExtensionPack.GL_TEXTURE_GEN_MODE,
                        GL11ExtensionPack.GL_REFLECTION_MAP);
                checkGLError(gl);
                gl.glEnable(GL11ExtensionPack.GL_TEXTURE_GEN_STR);
                checkGLError(gl);
                gl.glTexEnvx(GL10.GL_TEXTURE_ENV, GL10.GL_TEXTURE_ENV_MODE, GL10.GL_DECAL);
            }
            checkGLError(gl);
            mGrid.draw(gl);
            if (mContextSupportsCubeMap) {
                gl.glDisable(GL11ExtensionPack.GL_TEXTURE_GEN_STR);
            }
            checkGLError(gl);
            mAngle += 1.2f;
        }
        public void onSurfaceChanged(GL10 gl, int width, int height) {
            checkGLError(gl);
            gl.glViewport(0, 0, width, height);
            float ratio = (float) width / height;
            gl.glMatrixMode(GL10.GL_PROJECTION);
            gl.glLoadIdentity();
            gl.glFrustumf(-ratio, ratio, -1, 1, 1, 10);
            checkGLError(gl);
        }
        public void onSurfaceCreated(GL10 gl, EGLConfig config) {
            checkGLError(gl);
            mContextSupportsCubeMap = checkIfContextSupportsCubeMap(gl);
            mGrid = generateTorusGrid(gl, 60, 60, 3.0f, 0.75f);
            if (mContextSupportsCubeMap) {
                int[] cubeMapResourceIds = new int[]{
                        R.raw.skycubemap0, R.raw.skycubemap1, R.raw.skycubemap2,
                        R.raw.skycubemap3, R.raw.skycubemap4, R.raw.skycubemap5};
                mCubeMapTextureID = generateCubeMap(gl, cubeMapResourceIds);
            }
            checkGLError(gl);
        }
        private int generateCubeMap(GL10 gl, int[] resourceIds) {
            checkGLError(gl);
            int[] ids = new int[1];
            gl.glGenTextures(1, ids, 0);
            int cubeMapTextureId = ids[0];
            gl.glBindTexture(GL11ExtensionPack.GL_TEXTURE_CUBE_MAP, cubeMapTextureId);
            gl.glTexParameterf(GL11ExtensionPack.GL_TEXTURE_CUBE_MAP,
                    GL10.GL_TEXTURE_MIN_FILTER, GL10.GL_LINEAR);
            gl.glTexParameterf(GL11ExtensionPack.GL_TEXTURE_CUBE_MAP,
                    GL10.GL_TEXTURE_MAG_FILTER, GL10.GL_LINEAR);
            for (int face = 0; face < 6; face++) {
                InputStream is = getResources().openRawResource(resourceIds[face]);
                Bitmap bitmap;
                try {
                    bitmap = BitmapFactory.decodeStream(is);
                } finally {
                    try {
                        is.close();
                    } catch(IOException e) {
                        Log.e("CubeMap", "Could not decode texture for face " + Integer.toString(face));
                    }
                }
                GLUtils.texImage2D(GL11ExtensionPack.GL_TEXTURE_CUBE_MAP_POSITIVE_X + face, 0,
                        bitmap, 0);
                bitmap.recycle();
            }
            checkGLError(gl);
            return cubeMapTextureId;
        }
        private Grid generateTorusGrid(GL gl, int uSteps, int vSteps, float majorRadius, float minorRadius) {
            Grid grid = new Grid(uSteps + 1, vSteps + 1);
            for (int j = 0; j <= vSteps; j++) {
                double angleV = Math.PI * 2 * j / vSteps;
                float cosV = (float) Math.cos(angleV);
                float sinV = (float) Math.sin(angleV);
                for (int i = 0; i <= uSteps; i++) {
                    double angleU = Math.PI * 2 * i / uSteps;
                    float cosU = (float) Math.cos(angleU);
                    float sinU = (float) Math.sin(angleU);
                    float d = majorRadius+minorRadius*cosU;
                    float x = d*cosV;
                    float y = d*(-sinV);
                    float z = minorRadius * sinU;
                    float nx = cosV * cosU;
                    float ny = -sinV * cosU;
                    float nz = sinU;
                    float length = (float) Math.sqrt(nx*nx + ny*ny + nz*nz);
                    nx /= length;
                    ny /= length;
                    nz /= length;
                    grid.set(i, j, x, y, z, nx, ny, nz);
                }
            }
            grid.createBufferObjects(gl);
            return grid;
        }
        private boolean checkIfContextSupportsCubeMap(GL10 gl) {
            return checkIfContextSupportsExtension(gl, "GL_OES_texture_cube_map");
        }
        private boolean checkIfContextSupportsExtension(GL10 gl, String extension) {
            String extensions = " " + gl.glGetString(GL10.GL_EXTENSIONS) + " ";
            return extensions.indexOf(" " + extension + " ") >= 0;
        }
    }
    private static class Grid {
        final static int FLOAT_SIZE = 4;
        final static int CHAR_SIZE = 2;
        final static int VERTEX_SIZE = 6 * FLOAT_SIZE;
        final static int VERTEX_NORMAL_BUFFER_INDEX_OFFSET = 3;
        private int mVertexBufferObjectId;
        private int mElementBufferObjectId;
        private ByteBuffer mVertexByteBuffer;
        private FloatBuffer mVertexBuffer;
        private CharBuffer mIndexBuffer;
        private int mW;
        private int mH;
        private int mIndexCount;
        public Grid(int w, int h) {
            if (w < 0 || w >= 65536) {
                throw new IllegalArgumentException("w");
            }
            if (h < 0 || h >= 65536) {
                throw new IllegalArgumentException("h");
            }
            if (w * h >= 65536) {
                throw new IllegalArgumentException("w * h >= 65536");
            }
            mW = w;
            mH = h;
            int size = w * h;
            mVertexByteBuffer = ByteBuffer.allocateDirect(VERTEX_SIZE * size)
            .order(ByteOrder.nativeOrder());
            mVertexBuffer = mVertexByteBuffer.asFloatBuffer();
            int quadW = mW - 1;
            int quadH = mH - 1;
            int quadCount = quadW * quadH;
            int indexCount = quadCount * 6;
            mIndexCount = indexCount;
            mIndexBuffer = ByteBuffer.allocateDirect(CHAR_SIZE * indexCount)
            .order(ByteOrder.nativeOrder()).asCharBuffer();
            {
                int i = 0;
                for (int y = 0; y < quadH; y++) {
                    for (int x = 0; x < quadW; x++) {
                        char a = (char) (y * mW + x);
                        char b = (char) (y * mW + x + 1);
                        char c = (char) ((y + 1) * mW + x);
                        char d = (char) ((y + 1) * mW + x + 1);
                        mIndexBuffer.put(i++, a);
                        mIndexBuffer.put(i++, c);
                        mIndexBuffer.put(i++, b);
                        mIndexBuffer.put(i++, b);
                        mIndexBuffer.put(i++, c);
                        mIndexBuffer.put(i++, d);
                    }
                }
            }
        }
        public void set(int i, int j, float x, float y, float z, float nx, float ny, float nz) {
            if (i < 0 || i >= mW) {
                throw new IllegalArgumentException("i");
            }
            if (j < 0 || j >= mH) {
                throw new IllegalArgumentException("j");
            }
            int index = mW * j + i;
            mVertexBuffer.position(index * VERTEX_SIZE / FLOAT_SIZE);
            mVertexBuffer.put(x);
            mVertexBuffer.put(y);
            mVertexBuffer.put(z);
            mVertexBuffer.put(nx);
            mVertexBuffer.put(ny);
            mVertexBuffer.put(nz);
        }
        public void createBufferObjects(GL gl) {
            checkGLError(gl);
            int[] vboIds = new int[2];
            GL11 gl11 = (GL11) gl;
            gl11.glGenBuffers(2, vboIds, 0);
            mVertexBufferObjectId = vboIds[0];
            mElementBufferObjectId = vboIds[1];
            gl11.glBindBuffer(GL11.GL_ARRAY_BUFFER, mVertexBufferObjectId);
            mVertexByteBuffer.position(0);
            gl11.glBufferData(GL11.GL_ARRAY_BUFFER, mVertexByteBuffer.capacity(), mVertexByteBuffer, GL11.GL_STATIC_DRAW);
            gl11.glBindBuffer(GL11.GL_ELEMENT_ARRAY_BUFFER, mElementBufferObjectId);
            mIndexBuffer.position(0);
            gl11.glBufferData(GL11.GL_ELEMENT_ARRAY_BUFFER, mIndexBuffer.capacity() * CHAR_SIZE, mIndexBuffer, GL11.GL_STATIC_DRAW);
            mVertexBuffer = null;
            mVertexByteBuffer = null;
            mIndexBuffer = null;
            checkGLError(gl);
        }
        public void draw(GL10 gl) {
            checkGLError(gl);
            GL11 gl11 = (GL11) gl;
            gl.glEnableClientState(GL10.GL_VERTEX_ARRAY);
            gl11.glBindBuffer(GL11.GL_ARRAY_BUFFER, mVertexBufferObjectId);
            gl11.glVertexPointer(3, GL10.GL_FLOAT, VERTEX_SIZE, 0);
            gl.glEnableClientState(GL10.GL_NORMAL_ARRAY);
            gl11.glNormalPointer(GL10.GL_FLOAT, VERTEX_SIZE, VERTEX_NORMAL_BUFFER_INDEX_OFFSET * FLOAT_SIZE);
            gl11.glBindBuffer(GL11.GL_ELEMENT_ARRAY_BUFFER, mElementBufferObjectId);
            gl11.glDrawElements(GL10.GL_TRIANGLES, mIndexCount, GL10.GL_UNSIGNED_SHORT, 0);
            gl.glDisableClientState(GL10.GL_VERTEX_ARRAY);
            gl.glDisableClientState(GL10.GL_NORMAL_ARRAY);
            gl11.glBindBuffer(GL11.GL_ARRAY_BUFFER, 0);
            gl11.glBindBuffer(GL11.GL_ELEMENT_ARRAY_BUFFER, 0);
            checkGLError(gl);
        }
    }
    static void checkGLError(GL gl) {
        int error = ((GL10) gl).glGetError();
        if (error != GL10.GL_NO_ERROR) {
            throw new RuntimeException("GLError 0x" + Integer.toHexString(error));
        }
    }
    @Override
    protected void onCreate(Bundle savedInstanceState) {
        super.onCreate(savedInstanceState);
        mGLSurfaceView = new GLSurfaceView(this);
        mGLSurfaceView.setRenderer(new Renderer());
        setContentView(mGLSurfaceView);
    }
    @Override
    protected void onResume() {
        super.onResume();
        mGLSurfaceView.onResume();
    }
    @Override
    protected void onPause() {
        super.onPause();
        mGLSurfaceView.onPause();
    }
}
3.) Compile and build the project.
Output


(android-tutorial)
 

Android Development Tutorials Copyright © 2011 -- Template created by O Pregador -- Powered by Blogger Templates